En la Parte 2 de esta serie, agregó la capacidad de guardar los cambios realizados a través de la API de REST en una base de datos mediante SQLAlchemy y aprendió a serializar esos datos para la API de REST mediante Marshmallow. Conectar la API REST a una base de datos para que la aplicación pueda realizar cambios en los datos existentes y crear nuevos datos es excelente y hace que la aplicación sea mucho más útil y robusta.
Sin embargo, esa es solo una parte del poder que ofrece una base de datos. Una característica aún más poderosa es la R parte de RDBMS sistemas:relaciones . En una base de datos, una relación es la capacidad de conectar dos o más tablas de manera significativa. En este artículo, aprenderá cómo implementar relaciones y convertir su Person base de datos en una aplicación web de mini-blogging.
En este artículo, aprenderá:
- Por qué más de una tabla en una base de datos es útil e importante
- Cómo se relacionan las tablas entre sí
- Cómo SQLAlchemy puede ayudarlo a administrar las relaciones
- Cómo las relaciones te ayudan a crear una aplicación de miniblogs
Para quién es este artículo
La Parte 1 de esta serie lo guió a través de la creación de una API REST y la Parte 2 le mostró cómo conectar esa API REST a una base de datos.
Este artículo amplía aún más su cinturón de herramientas de programación. Aprenderá a crear estructuras de datos jerárquicas representadas como relaciones de uno a muchos por SQLAlchemy. Además, ampliará la API de REST que ya creó para brindar compatibilidad con CRUD (crear, leer, actualizar y eliminar) para los elementos de esta estructura jerárquica.
La aplicación web presentada en la Parte 2 tendrá sus archivos HTML y JavaScript modificados de manera importante para crear una aplicación de mini-blogging más completamente funcional. Puede revisar la versión final del código de la Parte 2 en el repositorio de GitHub para ese artículo.
¡Espera mientras comienzas a crear relaciones y tu aplicación de mini-blogging!
Dependencias adicionales
No hay nuevas dependencias de Python más allá de lo requerido para el artículo de la Parte 2. Sin embargo, usará dos nuevos módulos de JavaScript en la aplicación web para hacer las cosas más fáciles y consistentes. Los dos módulos son los siguientes:
- Manillares.js es un motor de plantillas para JavaScript, muy parecido a Jinja2 para Flask.
- Momento.js es un módulo de formato y análisis de fecha y hora que facilita la visualización de las marcas de tiempo UTC.
No es necesario que descargue ninguno de estos, ya que la aplicación web los obtendrá directamente de Cloudflare CDN (Content Delivery Network), como ya lo está haciendo con el módulo jQuery.
Datos de personas extendidos para blogs
En la Parte 2, las People los datos existían como un diccionario en build_database.py Código Python. Esto es lo que usó para llenar la base de datos con algunos datos iniciales. Vas a modificar las People estructura de datos para dar a cada persona una lista de notas asociadas con ellos. Las nuevas People la estructura de datos se verá así:
# Data to initialize database with
PEOPLE = [
    {
        "fname": "Doug",
        "lname": "Farrell",
        "notes": [
            ("Cool, a mini-blogging application!", "2019-01-06 22:17:54"),
            ("This could be useful", "2019-01-08 22:17:54"),
            ("Well, sort of useful", "2019-03-06 22:17:54"),
        ],
    },
    {
        "fname": "Kent",
        "lname": "Brockman",
        "notes": [
            (
                "I'm going to make really profound observations",
                "2019-01-07 22:17:54",
            ),
            (
                "Maybe they'll be more obvious than I thought",
                "2019-02-06 22:17:54",
            ),
        ],
    },
    {
        "fname": "Bunny",
        "lname": "Easter",
        "notes": [
            ("Has anyone seen my Easter eggs?", "2019-01-07 22:47:54"),
            ("I'm really late delivering these!", "2019-04-06 22:17:54"),
        ],
    },
]
Cada persona en el People el diccionario ahora incluye una clave llamada notes , que está asociado a una lista que contiene tuplas de datos. Cada tupla en las notes lista representa una sola nota que contiene el contenido y una marca de tiempo. Las marcas de tiempo se inicializan (en lugar de crearse dinámicamente) para demostrar el pedido más adelante en la API REST.
Cada persona individual está asociada con varias notas, y cada nota individual está asociada con una sola persona. Esta jerarquía de datos se conoce como una relación de uno a muchos, en la que un solo objeto principal está relacionado con muchos objetos secundarios. Verá cómo se gestiona esta relación de uno a muchos en la base de datos con SQLAlchemy.
Enfoque de fuerza bruta
La base de datos que creó almacenó los datos en una tabla, y una tabla es una matriz bidimensional de filas y columnas. ¿Pueden las People diccionario anterior se representa en una sola tabla de filas y columnas? Puede ser, de la siguiente forma, en tu person tabla de base de datos Desafortunadamente, incluir todos los datos reales en el ejemplo crea una barra de desplazamiento para la tabla, como verá a continuación:
person_id | lname | fname | timestamp | content | note_timestamp |
|---|---|---|---|---|---|
| 1 | Farrell | Doug | 2018-08-08 21:16:01 | ¡Genial, una mini-aplicación de blogs! | 2019-01-06 22:17:54 |
| 2 | Farrell | Doug | 2018-08-08 21:16:01 | Esto podría ser útil | 2019-01-08 22:17:54 |
| 3 | Farrell | Doug | 2018-08-08 21:16:01 | Bueno, bastante útil | 2019-03-06 22:17:54 |
| 4 | Brockman | Kent | 2018-08-08 21:16:01 | Voy a hacer observaciones muy profundas | 2019-01-07 22:17:54 |
| 5 | Brockman | Kent | 2018-08-08 21:16:01 | Tal vez sean más obvios de lo que pensaba | 2019-02-06 22:17:54 |
| 6 | Pascua | Conejito | 2018-08-08 21:16:01 | ¿Alguien ha visto mis huevos de Pascua? | 2019-01-07 22:47:54 |
| 7 | Pascua | Conejito | 2018-08-08 21:16:01 | ¡Estoy muy atrasado en entregar esto! | 2019-04-06 22:17:54 |
La tabla anterior realmente funcionaría. Todos los datos están representados, y una sola persona está asociada a una colección de diferentes notas.
Ventajas
Conceptualmente, la estructura de la tabla anterior tiene la ventaja de ser relativamente simple de entender. Incluso podría argumentar que los datos podrían persistir en un archivo plano en lugar de una base de datos.
Debido a la estructura de la tabla bidimensional, puede almacenar y utilizar estos datos en una hoja de cálculo. Las hojas de cálculo se han utilizado bastante como almacenamiento de datos.
Desventajas
Si bien la estructura de la tabla anterior funcionaría, tiene algunas desventajas reales.
Para representar la colección de notas, todos los datos de cada persona se repiten para cada nota única, por lo que los datos de la persona son redundantes. Esto no es un gran problema para los datos de su persona, ya que no hay tantas columnas. Pero imagina si una persona tuviera muchas más columnas. Incluso con unidades de disco grandes, esto puede convertirse en un problema de almacenamiento si se trata de millones de filas de datos.
Tener datos redundantes como este puede generar problemas de mantenimiento a medida que pasa el tiempo. Por ejemplo, ¿qué pasaría si el Conejo de Pascua decidiera que un cambio de nombre es una buena idea? Para hacer esto, cada registro que contenga el nombre del Conejo de Pascua tendría que actualizarse para mantener la coherencia de los datos. Este tipo de trabajo en la base de datos puede generar inconsistencias en los datos, especialmente si el trabajo lo realiza una persona que ejecuta una consulta SQL a mano.
Nombrar columnas se vuelve incómodo. En la tabla anterior, hay una timestamp columna utilizada para realizar un seguimiento de la hora de creación y actualización de una persona en la tabla. También desea tener una funcionalidad similar para la hora de creación y actualización de una nota, pero debido a que timestamp ya se usa, un nombre artificial de note_timestamp se utiliza.
¿Qué sucede si desea agregar relaciones adicionales de uno a muchos a la person? ¿mesa? Por ejemplo, para incluir los hijos o números de teléfono de una persona. Cada persona podría tener varios hijos y varios números de teléfono. Esto podría hacerse con relativa facilidad para las People de Python diccionario anterior agregando children y phone_numbers claves con nuevas listas que contienen los datos.
Sin embargo, representar esas nuevas relaciones de uno a muchos en su person la tabla de la base de datos anterior se vuelve significativamente más difícil. Cada nueva relación de uno a varios aumenta drásticamente el número de filas necesarias para representarlo para cada entrada individual en los datos secundarios. Además, los problemas asociados con la redundancia de datos se vuelven más grandes y más difíciles de manejar.
Por último, los datos que obtendría de la estructura de la tabla anterior no serían muy pitónicos:sería solo una gran lista de listas. SQLAlchemy no podría ayudarlo mucho porque la relación no existe.
Enfoque de base de datos relacional
Según lo que ha visto anteriormente, queda claro que tratar de representar incluso un conjunto de datos moderadamente complejo en una sola tabla se vuelve inmanejable con bastante rapidez. Ante eso, ¿qué alternativa ofrece una base de datos? Aquí es donde la R parte de RDBMS entran en juego las bases de datos. La representación de relaciones elimina las desventajas descritas anteriormente.
En lugar de tratar de representar datos jerárquicos en una sola tabla, los datos se dividen en varias tablas, con un mecanismo para relacionarlos entre sí. Las tablas se dividen a lo largo de las líneas de colección, por lo que para su People diccionario anterior, esto significa que habrá una tabla que represente a las personas y otra que represente las notas. Esto trae de vuelta a tu person original tabla, que se ve así:
person_id | lname | fname | timestamp |
|---|---|---|---|
| 1 | Farrell | Doug | 2018-08-08 21:16:01.888444 |
| 2 | Brockman | Kent | 2018-08-08 21:16:01.889060 |
| 3 | Pascua | Conejito | 2018-08-08 21:16:01.886834 |
Para representar la información de la nueva nota, creará una nueva tabla llamada note . (Recuerde nuestra convención de nomenclatura de tablas en singular). La tabla se ve así:
note_id | person_id | content | timestamp |
|---|---|---|---|
| 1 | 1 | ¡Genial, una mini-aplicación de blogs! | 2019-01-06 22:17:54 |
| 2 | 1 | Esto podría ser útil | 2019-01-08 22:17:54 |
| 3 | 1 | Bueno, bastante útil | 2019-03-06 22:17:54 |
| 4 | 2 | Voy a hacer observaciones muy profundas | 2019-01-07 22:17:54 |
| 5 | 2 | Tal vez sean más obvios de lo que pensaba | 2019-02-06 22:17:54 |
| 6 | 3 | ¿Alguien ha visto mis huevos de Pascua? | 2019-01-07 22:47:54 |
| 7 | 3 | ¡Estoy muy atrasado en entregar esto! | 2019-04-06 22:17:54 |
Fíjate que, como la person tabla, la note la tabla tiene un identificador único llamado note_id , que es la clave principal para la note mesa. Una cosa que no es obvia es la inclusión de person_id valor en la tabla. ¿Para qué se usa eso? Esto es lo que crea la relación con la person mesa. Mientras que note_id es la clave principal de la tabla, person_id es lo que se conoce como clave externa.
La clave foránea da cada entrada en la note tabla la clave principal de la person registro con el que está asociado. Usando esto, SQLAlchemy puede recopilar todas las notas asociadas con cada persona conectando el person.person_id clave principal para note.person_id clave foránea, creando una relación.
Ventajas
Al dividir el conjunto de datos en dos tablas e introducir el concepto de una clave externa, ha hecho que los datos sean un poco más complejos de pensar, ha resuelto las desventajas de una representación de tabla única. SQLAlchemy lo ayudará a codificar la mayor complejidad con bastante facilidad.
Los datos ya no son redundantes en la base de datos. Solo hay una entrada de persona para cada persona que desea almacenar en la base de datos. Esto resuelve el problema de almacenamiento de inmediato y simplifica drásticamente los problemas de mantenimiento.
Si el Conejito de Pascua todavía quisiera cambiar los nombres, solo tendría que cambiar una sola fila en la person tabla y cualquier otra cosa relacionada con esa fila (como la note table) aprovecharía inmediatamente el cambio.
La denominación de las columnas es más consistente y significativa. Debido a que los datos de persona y nota existen en tablas separadas, la marca de tiempo de creación y actualización se puede nombrar de manera consistente en ambas tablas, ya que no hay conflicto de nombres entre tablas.
Además, ya no tendrá que crear permutaciones de cada fila para las nuevas relaciones de uno a varios que desee representar. Llévate a nuestros children y phone_numbers ejemplo de antes. Implementar esto requeriría child y phone_number mesas. Cada tabla contendría una clave externa de person_id relacionándolo con la person mesa.
Usando SQLAlchemy, los datos que obtendría de las tablas anteriores serían más útiles de inmediato, ya que lo que obtendría es un objeto para cada fila de persona. Ese objeto tiene atributos con nombre equivalentes a las columnas de la tabla. Uno de esos atributos es una lista de Python que contiene los objetos de nota relacionados.
Desventajas
Donde el enfoque de fuerza bruta era más simple de entender, el concepto de claves externas y relaciones hace que pensar en los datos sea algo más abstracto. Esta abstracción debe tenerse en cuenta para cada relación que establezca entre tablas.
Hacer uso de las relaciones significa comprometerse a utilizar un sistema de base de datos. Esta es otra herramienta para instalar, aprender y mantener más allá de la aplicación que realmente usa los datos.
Modelos SQLAlchemy
Para usar las dos tablas anteriores y la relación entre ellas, deberá crear modelos SQLAlchemy que sean conscientes de ambas tablas y la relación entre ellas. Aquí está la Person de SQLAlchemy modelo de la Parte 2, actualizado para incluir una relación con una colección de notes :
 1class Person(db.Model):
 2    __tablename__ = 'person'
 3    person_id = db.Column(db.Integer, primary_key=True)
 4    lname = db.Column(db.String(32))
 5    fname = db.Column(db.String(32))
 6    timestamp = db.Column(
 7        db.DateTime, default=datetime.utcnow, onupdate=datetime.utcnow
 8    )
 9    notes = db.relationship(
10        'Note',
11        backref='person',
12        cascade='all, delete, delete-orphan',
13        single_parent=True,
14        order_by='desc(Note.timestamp)'
15    )
Las líneas 1 a 8 de la clase de Python anterior se ven exactamente como lo que creó antes en la Parte 2. Las líneas 9 a 16 crean un nuevo atributo en Person clase llamada notes . Estas nuevas notes atributos se define en las siguientes líneas de código:
-
Línea 9: Al igual que los otros atributos de la clase, esta línea crea un nuevo atributo llamado
notesy lo establece igual a una instancia de un objeto llamadodb.relationship. Este objeto crea la relación que estás agregando a laPersonclase y se crea con todos los parámetros definidos en las líneas siguientes. -
Línea 10: El parámetro de cadena
'Note'define la clase SQLAlchemy que laPersonla clase estará relacionada con. LaNotela clase aún no está definida, por lo que es una cadena aquí. Esta es una referencia directa y ayuda a manejar los problemas que podría causar el orden de las definiciones cuando se necesita algo que no se define hasta más adelante en el código. La'Note'string permite que laPersonclass para encontrar laNoteclass en tiempo de ejecución, que está después dePersonyNotehan sido definidos. -
Línea 11: La
backref='person'el parámetro es más complicado. Crea lo que se conoce como una referencia hacia atrás enNoteobjetos. Cada instancia de unaNoteel objeto contendrá un atributo llamadoperson. Lapersonatributo hace referencia al objeto principal que unaNoteparticular la instancia está asociada. Tener una referencia al objeto padre (personen este caso) en el elemento secundario puede ser muy útil si su código itera sobre notas y tiene que incluir información sobre el elemento principal. Esto sucede sorprendentemente a menudo en el código de representación de visualización. -
Línea 12:
cascade='all, delete, delete-orphan'El parámetro determina cómo tratar las instancias de objetos de nota cuando se realizan cambios en el padrePersoninstancia. Por ejemplo, cuando unaPersonse elimina el objeto, SQLAlchemy creará el SQL necesario para eliminar laPersonde la base de datos Además, este parámetro le indica que también elimine todas lasNoteinstancias asociadas a él. Puede leer más sobre estas opciones en la documentación de SQLAlchemy. -
Línea 13: El
single_parent=Trueel parámetro es obligatorio sidelete-orphanes parte de lacascadeanterior parámetro. Esto le dice a SQLAlchemy que no permitaNotehuérfanas instancias (unaNotesin padrePersonobjeto) porque cadaNotetiene un padre soltero. -
Línea 14: El
order_by='desc(Note.timestamp)'El parámetro le dice a SQLAlchemy cómo ordenar laNoteinstancias asociadas con unaPerson. Cuando unaPersonse recupera el objeto, por defecto lasnotesla lista de atributos contendráNoteobjetos en un orden desconocido. SQLAlchemydesc(...)La función ordenará las notas en orden descendente de la más reciente a la más antigua. Si esta línea fueraorder_by='Note.timestamp', SQLAlchemy utilizaría de forma predeterminadaasc(...)y ordene las notas en orden ascendente, de la más antigua a la más reciente.
Ahora que tu Person modelo tiene las nuevas notes atributo, y esto representa la relación de uno a muchos con Note objetos, deberá definir un modelo SQLAlchemy para una Note :
 1class Note(db.Model):
 2    __tablename__ = 'note'
 3    note_id = db.Column(db.Integer, primary_key=True)
 4    person_id = db.Column(db.Integer, db.ForeignKey('person.person_id'))
 5    content = db.Column(db.String, nullable=False)
 6    timestamp = db.Column(
 7        db.DateTime, default=datetime.utcnow, onupdate=datetime.utcnow
 8    )
La Note class define los atributos que componen una nota como se ve en nuestra muestra note tabla de base de datos desde arriba. Los atributos se definen aquí:
-
Línea 1 crea la
Noteclase, heredando dedb.Model, exactamente como lo hizo antes al crear laPersonclase. -
Línea 2 le dice a la clase qué tabla de base de datos usar para almacenar
Noteobjetos. -
Línea 3 crea el
note_idatributo, definiéndolo como un valor entero, y como la clave principal para laNoteobjeto. -
Línea 4 crea el
person_idatributo, y lo define como clave foránea, relacionando laNoteclase a laPersonclase usandoperson.person_idClave primaria. Esto, yPerson.notesatributo, es cómo SQLAlchemy sabe qué hacer cuando interactúa conPersonyNoteobjetos. -
Línea 5 crea el
contentatributo, que contiene el texto real de la nota. Elnullable=FalseEl parámetro indica que está bien crear nuevas notas que no tengan contenido. -
Línea 6 crea la
timestampatributo, y exactamente como laPersonclass, contiene la hora de creación o actualización de cualquierNoteen particular instancia.
Inicializar la base de datos
Ahora que ha actualizado la Person y creó la Note modelos, los usará para reconstruir la base de datos de prueba people.db . Para ello, actualice build_database.py código de la Parte 2. Así es como se verá el código:
 1import os
 2from datetime import datetime
 3from config import db
 4from models import Person, Note
 5
 6# Data to initialize database with
 7PEOPLE = [
 8    {
 9        "fname": "Doug",
10        "lname": "Farrell",
11        "notes": [
12            ("Cool, a mini-blogging application!", "2019-01-06 22:17:54"),
13            ("This could be useful", "2019-01-08 22:17:54"),
14            ("Well, sort of useful", "2019-03-06 22:17:54"),
15        ],
16    },
17    {
18        "fname": "Kent",
19        "lname": "Brockman",
20        "notes": [
21            (
22                "I'm going to make really profound observations",
23                "2019-01-07 22:17:54",
24            ),
25            (
26                "Maybe they'll be more obvious than I thought",
27                "2019-02-06 22:17:54",
28            ),
29        ],
30    },
31    {
32        "fname": "Bunny",
33        "lname": "Easter",
34        "notes": [
35            ("Has anyone seen my Easter eggs?", "2019-01-07 22:47:54"),
36            ("I'm really late delivering these!", "2019-04-06 22:17:54"),
37        ],
38    },
39]
40
41# Delete database file if it exists currently
42if os.path.exists("people.db"):
43    os.remove("people.db")
44
45# Create the database
46db.create_all()
47
48# Iterate over the PEOPLE structure and populate the database
49for person in PEOPLE:
50    p = Person(lname=person.get("lname"), fname=person.get("fname"))
51
52    # Add the notes for the person
53    for note in person.get("notes"):
54        content, timestamp = note
55        p.notes.append(
56            Note(
57                content=content,
58                timestamp=datetime.strptime(timestamp, "%Y-%m-%d %H:%M:%S"),
59            )
60        )
61    db.session.add(p)
62
63db.session.commit()
El código anterior proviene de la Parte 2, con algunos cambios para crear la relación de uno a muchos entre Person y Note . Estas son las líneas actualizadas o nuevas agregadas al código:
-
Línea 4 se ha actualizado para importar la
Noteclase definida previamente. -
Líneas 7 a 39 contienen las
PEOPLEactualizadas diccionario que contiene los datos de nuestra persona, junto con la lista de notas asociadas a cada persona. Estos datos se insertarán en la base de datos. -
Líneas 49 a 61 iterar sobre las
PEOPLEdiccionario, obteniendo cadapersona su vez y usarlo para crear unaPersonobjeto. -
Línea 53 itera sobre
person.noteslista, obteniendo cadanotea su vez. -
Línea 54 descomprime el
contentytimestampde cadanotetupla. -
Línea 55 a 60 crea una
Noteobjeto y lo agrega a la colección de notas de la persona usandop.notes.append(). -
Línea 61 agrega la
Personobjetopa la sesión de la base de datos. -
Línea 63 envía toda la actividad de la sesión a la base de datos. Es en este punto que todos los datos se escriben en la
personynotetablas enpeople.dbarchivo de base de datos.
Puedes ver que trabajando con las notes colección en la Person instancia de objeto p es como trabajar con cualquier otra lista en Python. SQLAlchemy se ocupa de la información subyacente de la relación de uno a muchos cuando db.session.commit() se realiza la llamada.
Por ejemplo, como una Person la instancia tiene su campo de clave principal person_id inicializado por SQLAlchemy cuando se confirma en la base de datos, instancias de Note tendrán sus campos de clave principal inicializados. Además, la Note clave foránea person_id también se inicializará con el valor de clave principal de Person instancia a la que está asociado.
Aquí hay una instancia de ejemplo de una Person objeto antes del db.session.commit() en una especie de pseudocódigo:
Person (
    person_id = None
    lname = 'Farrell'
    fname = 'Doug'
    timestamp = None
    notes = [
        Note (
            note_id = None
            person_id = None
            content = 'Cool, a mini-blogging application!'
            timestamp = '2019-01-06 22:17:54'
        ),
        Note (
            note_id = None
            person_id = None
            content = 'This could be useful'
            timestamp = '2019-01-08 22:17:54'
        ),
        Note (
            note_id = None
            person_id = None
            content = 'Well, sort of useful'
            timestamp = '2019-03-06 22:17:54'
        )
    ]
)
Aquí está el ejemplo Person objeto después de db.session.commit() :
Person (
    person_id = 1
    lname = 'Farrell'
    fname = 'Doug'
    timestamp = '2019-02-02 21:27:10.336'
    notes = [
        Note (
            note_id = 1
            person_id = 1
            content = 'Cool, a mini-blogging application!'
            timestamp = '2019-01-06 22:17:54'
        ),
        Note (
            note_id = 2
            person_id = 1
            content = 'This could be useful'
            timestamp = '2019-01-08 22:17:54'
        ),
        Note (
            note_id = 3
            person_id = 1
            content = 'Well, sort of useful'
            timestamp = '2019-03-06 22:17:54'
        )
    ]
)
La diferencia importante entre los dos es que la clave principal de la Person y Note los objetos han sido inicializados. El motor de la base de datos se encargó de esto ya que los objetos se crearon debido a la función de incremento automático de las claves primarias que se discutió en la Parte 2.
Además, el person_id clave foránea en todos los Note instancias se ha inicializado para hacer referencia a su padre. Esto sucede debido al orden en que la Person y Note los objetos se crean en la base de datos.
SQLAlchemy es consciente de la relación entre Person y Note objetos. Cuando una Person el objeto está comprometido con la person tabla de la base de datos, SQLAlchemy obtiene el person_id valor de la clave principal. Ese valor se usa para inicializar el valor de clave externa de person_id en una Note objeto antes de que se confirme en la base de datos.
SQLAlchemy se encarga de este trabajo de limpieza de la base de datos debido a la información que pasó cuando Person.notes el atributo se inicializó con db.relationship(...) objeto.
Además, Person.timestamp el atributo se ha inicializado con la marca de tiempo actual.
Ejecutando build_database.py programa desde la línea de comando (en el entorno virtual se volverá a crear la base de datos con las nuevas incorporaciones, preparándola para su uso con la aplicación web. Esta línea de comando reconstruirá la base de datos:
$ python build_database.py
El build_database.py El programa de utilidad no muestra ningún mensaje si se ejecuta correctamente. Si arroja una excepción, se imprimirá un error en la pantalla.
Actualizar API REST
Actualizaste los modelos de SQLAlchemy y los usaste para actualizar people.db base de datos. Ahora es el momento de actualizar la API REST para brindar acceso a la información de las nuevas notas. Esta es la API REST que creaste en la Parte 2:
| Acción | Verbo HTTP | Ruta URL | Descripción |
|---|---|---|---|
| Crear | POST | /api/people | URL para crear una nueva persona |
| Leer | GET | /api/people | URL para leer una colección de personas |
| Leer | GET | /api/people/{person_id} | URL para leer una sola persona por person_id |
| Actualizar | PUT | /api/people/{person_id} | URL para actualizar una persona existente por person_id |
| Eliminar | DELETE | /api/people/{person_id} | URL para eliminar una persona existente por person_id |
La API REST anterior proporciona rutas de URL HTTP a colecciones de cosas y a las cosas mismas. Puede obtener una lista de personas o interactuar con una sola persona de esa lista de personas. Este estilo de ruta refina lo que se devuelve de izquierda a derecha, y se vuelve más granular a medida que avanza.
Continuará este patrón de izquierda a derecha para obtener más granularidad y acceder a las colecciones de notas. Esta es la API REST extendida que creará para proporcionar notas a la aplicación web de miniblog:
| Acción | Verbo HTTP | Ruta URL | Descripción |
|---|---|---|---|
| Crear | POST | /api/people/{person_id}/notes | URL para crear una nueva nota |
| Leer | GET | /api/people/{person_id}/notes/{note_id} | URL para leer la nota individual de una sola persona |
| Actualizar | PUT | api/people/{person_id}/notes/{note_id} | URL para actualizar la nota individual de una sola persona |
| Eliminar | DELETE | api/people/{person_id}/notes/{note_id} | URL para eliminar la nota individual de una sola persona |
| Leer | GET | /api/notes | URL para obtener todas las notas de todas las personas ordenadas por note.timestamp |
Hay dos variaciones en las notes parte de la API REST en comparación con la convención utilizada en people sección:
-
No hay una URL definida para obtener todas las
notesassociated with a person, only a URL to get a single note. This would have made the REST API complete in a way, but the web application you’ll create later doesn’t need this functionality. Therefore, it’s been left out. -
There is the inclusion of the last URL
/api/notes. This is a convenience method created for the web application. It will be used in the mini-blog on the home page to show all the notes in the system. There isn’t a way to get this information readily using the REST API pathing style as designed, so this shortcut has been added.
As in Part 2, the REST API is configured in the swagger.yml file.
The idea of designing a REST API with a path that gets more and more granular as you move from left to right is very useful. Thinking this way can help clarify the relationships between different parts of a database. Just be aware that there are realistic limits to how far down a hierarchical structure this kind of design should be taken.
For example, what if the Note object had a collection of its own, something like comments on the notes. Using the current design ideas, this would lead to a URL that went something like this:/api/people/{person_id}/notes/{note_id}/comments/{comment_id}
There is no practical limit to this kind of design, but there is one for usefulness. In actual use in real applications, a long, multilevel URL like that one is hardly ever needed. A more common pattern is to get a list of intervening objects (like notes) and then use a separate API entry point to get a single comment for an application use case.
Implement the API
With the updated REST API defined in the swagger.yml file, you’ll need to update the implementation provided by the Python modules. This means updating existing module files, like models.py and people.py , and creating a new module file called notes.py to implement support for Notes in the extended REST API.
Update Response JSON
The purpose of the REST API is to get useful JSON data out of the database. Now that you’ve updated the SQLAlchemy Person and created the Note models, you’ll need to update the Marshmallow schema models as well. As you may recall from Part 2, Marshmallow is the module that translates the SQLAlchemy objects into Python objects suitable for creating JSON strings.
The updated and newly created Marshmallow schemas are in the models.py module, which are explained below, and look like this:
 1class PersonSchema(ma.ModelSchema):
 2    class Meta:
 3        model = Person
 4        sqla_session = db.session
 5    notes = fields.Nested('PersonNoteSchema', default=[], many=True)
 6
 7class PersonNoteSchema(ma.ModelSchema):
 8    """
 9    This class exists to get around a recursion issue
10    """
11    note_id = fields.Int()
12    person_id = fields.Int()
13    content = fields.Str()
14    timestamp = fields.Str()
15
16class NoteSchema(ma.ModelSchema):
17    class Meta:
18        model = Note
19        sqla_session = db.session
20    person = fields.Nested('NotePersonSchema', default=None)
21
22class NotePersonSchema(ma.ModelSchema):
23    """
24    This class exists to get around a recursion issue
25    """
26    person_id = fields.Int()
27    lname = fields.Str()
28    fname = fields.Str()
29    timestamp = fields.Str()
There are some interesting things going on in the above definitions. The PersonSchema class has one new entry:the notes attribute defined in line 5. This defines it as a nested relationship to the PersonNoteSchema . It will default to an empty list if nothing is present in the SQLAlchemy notes relationship. The many=True parameter indicates that this is a one-to-many relationship, so Marshmallow will serialize all the related notes .
The PersonNoteSchema class defines what a Note object looks like as Marshmallow serializes the notes list. The NoteSchema defines what a SQLAlchemy Note object looks like in terms of Marshmallow. Notice that it has a person attribute. This attribute comes from the SQLAlchemy db.relationship(...) definition parameter backref='person' . The person Marshmallow definition is nested, but because it doesn’t have the many=True parameter, there is only a single person connected.
The NotePersonSchema class defines what is nested in the NoteSchema.person attribute.
You might be wondering why the PersonSchema class has its own unique PersonNoteSchema class to define the notes collection attribute. By the same token, the NoteSchema class has its own unique NotePersonSchema class to define the person attribute. You may be wondering whether the PersonSchema class could be defined this way:
class PersonSchema(ma.ModelSchema):
    class Meta:
        model = Person
        sqla_session = db.session
    notes = fields.Nested('NoteSchema', default=[], many=True)
Additionally, couldn’t the NoteSchema class be defined using the PersonSchema to define the person attribute? A class definition like this would each refer to the other, and this causes a recursion error in Marshmallow as it will cycle from PersonSchema to NoteSchema until it runs out of stack space. Using the unique schema references breaks the recursion and allows this kind of nesting to work.
People
Now that you’ve got the schemas in place to work with the one-to-many relationship between Person and Note , you need to update the person.py and create the note.py modules in order to implement a working REST API.
The people.py module needs two changes. The first is to import the Note class, along with the Person class at the top of the module. Then only read_one(person_id) needs to change in order to handle the relationship. That function will look like this:
 1def read_one(person_id):
 2    """
 3    This function responds to a request for /api/people/{person_id}
 4    with one matching person from people
 5
 6    :param person_id:   Id of person to find
 7    :return:            person matching id
 8    """
 9    # Build the initial query
10    person = (
11        Person.query.filter(Person.person_id == person_id)
12        .outerjoin(Note)
13        .one_or_none()
14    )
15
16    # Did we find a person?
17    if person is not None:
18
19        # Serialize the data for the response
20        person_schema = PersonSchema()
21        data = person_schema.dump(person).data
22        return data
23
24    # Otherwise, nope, didn't find that person
25    else:
26        abort(404, f"Person not found for Id: {person_id}")
The only difference is line 12:.outerjoin(Note) . An outer join (left outer join in SQL terms) is necessary for the case where a user of the application has created a new person object, which has no notes related to it. The outer join ensures that the SQL query will return a person object, even if there are no note rows to join with.
At the start of this article, you saw how person and note data could be represented in a single, flat table, and all of the disadvantages of that approach. You also saw the advantages of breaking that data up into two tables, person and note , with a relationship between them.
Until now, we’ve been working with the data as two distinct, but related, items in the database. But now that you’re actually going to use the data, what we essentially want is for the data to be joined back together. This is what a database join does. It combines data from two tables together using the primary key to foreign key relationship.
A join is kind of a boolean and operation because it only returns data if there is data in both tables to combine. If, for example, a person row exists but has no related note row, then there is nothing to join, so nothing is returned. This isn’t what you want for read_one(person_id) .
This is where the outer join comes in handy. It’s a kind of boolean or operation. It returns person data even if there is no associated note data to combine with. This is the behavior you want for read_one(person_id) to handle the case of a newly created Person object that has no notes yet.
You can see the complete people.py in the article repository.
Notes
You’ll create a notes.py module to implement all the Python code associated with the new note related REST API definitions. In many ways, it works like the people.py module, except it must handle both a person_id and a note_id as defined in the swagger.yml configuration file. As an example, here is read_one(person_id, note_id) :
 1def read_one(person_id, note_id):
 2    """
 3    This function responds to a request for
 4    /api/people/{person_id}/notes/{note_id}
 5    with one matching note for the associated person
 6
 7    :param person_id:       Id of person the note is related to
 8    :param note_id:         Id of the note
 9    :return:                json string of note contents
10    """
11    # Query the database for the note
12    note = (
13        Note.query.join(Person, Person.person_id == Note.person_id)
14        .filter(Person.person_id == person_id)
15        .filter(Note.note_id == note_id)
16        .one_or_none()
17    )
18
19    # Was a note found?
20    if note is not None:
21        note_schema = NoteSchema()
22        data = note_schema.dump(note).data
23        return data
24
25    # Otherwise, nope, didn't find that note
26    else:
27        abort(404, f"Note not found for Id: {note_id}")
The interesting parts of the above code are lines 12 to 17:
- Line 13 begins a query against the
NoteSQLAlchemy objects and joins to the relatedPersonSQLAlchemy object comparingperson_idfrom bothPersonandNote. - Line 14 filters the result down to the
Noteobjects that has aPerson.person_idequal to the passed inperson_idparameter. - Line 15 filters the result further to the
Noteobject that has aNote.note_idequal to the passed innote_idparameter. - Line 16 returns the
Noteobject if found, orNoneif nothing matching the parameters is found.
You can check out the complete notes.py .
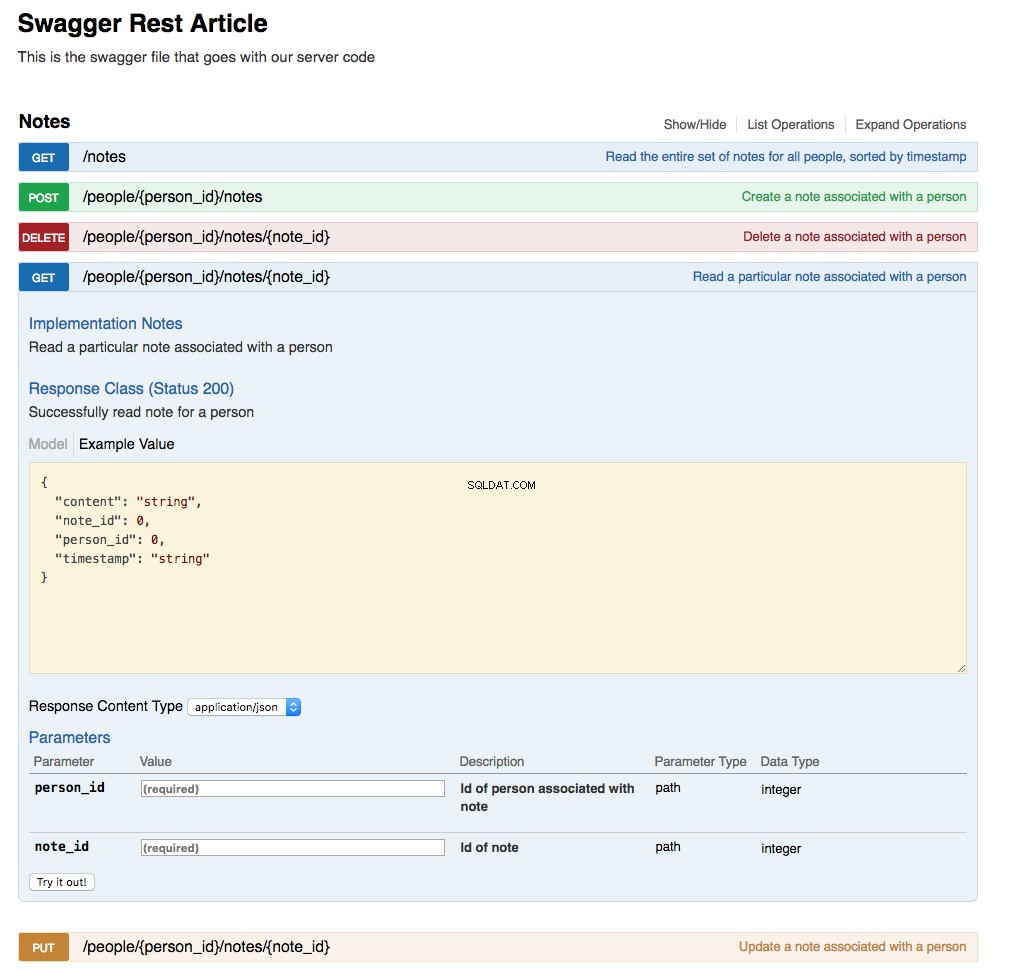
Updated Swagger UI
The Swagger UI has been updated by the action of updating the swagger.yml file and creating the URL endpoint implementations. Below is a screenshot of the updated UI showing the Notes section with the GET /api/people/{person_id}/notes/{note_id} expanded:
Mini-Blogging Web Application
The web application has been substantially changed to show its new purpose as a mini-blogging application. It has three pages:
-
The home page (
localhost:5000/) , which shows all of the blog messages (notes) sorted from newest to oldest -
The people page (
localhost:5000/people) , which shows all the people in the system, sorted by last name, and also allows the user to create a new person and update or delete an existing one -
The notes page (
localhost:5000/people/{person_id}/notes) , which shows all the notes associated with a person, sorted from newest to oldest, and also allows the user to create a new note and update or delete an existing one
Navigation
There are two buttons on every page of the application:
- The Home button will navigate to the home screen.
- The People button navigates to the
/peoplescreen, showing all people in the database.
These two buttons are present on every screen in the application as a way to get back to a starting point.
Home Page
Below is a screenshot of the home page showing the initialized database contents:
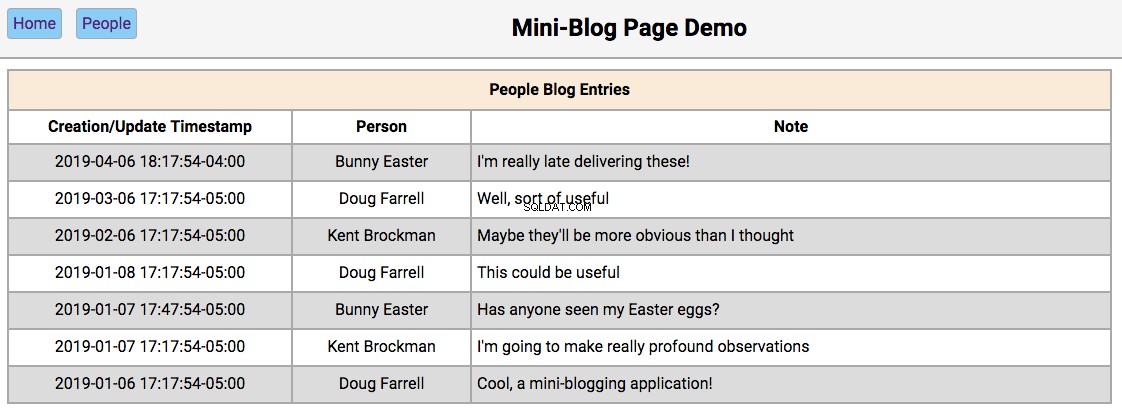
The functionality of this page works like this:
-
Double-clicking on a person’s name will take the user to the
/people/{person_id}page, with the editor section filled in with the person’s first and last names and the update and reset buttons enabled. -
Double-clicking on a person’s note will take the user to the
/people/{person_id}/notes/{note_id}page, with the editor section filled in with the note’s contents and the Update and Reset buttons enabled.
People Page
Below is a screenshot of the people page showing the people in the initialized database:
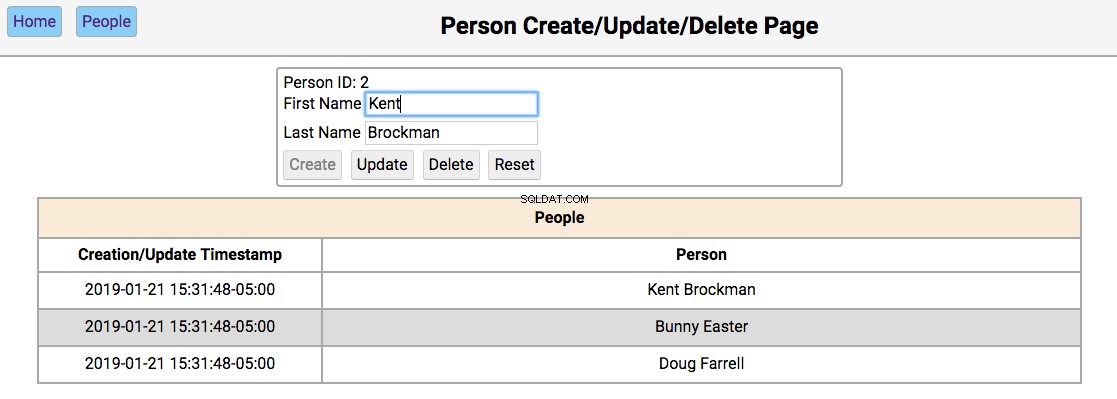
The functionality of this page works like this:
-
Single-clicking on a person’s name will populate the editor section of the page with the person’s first and last name, disabling the Create button, and enabling the Update and Delete buttons.
-
Double clicking on a person’s name will navigate to the notes pages for that person.
The functionality of the editor works like this:
-
If the first and last name fields are empty, the Create and Reset buttons are enabled. Entering a new name in the fields and clicking Create will create a new person and update the database and re-render the table below the editor. Clicking Reset will clear the editor fields.
-
If the first and last name fields have data, the user navigated here by double-clicking the person’s name from the home screen. In this case, the Update , Delete , and Reset buttons are enabled. Changing the first or last name and clicking Update will update the database and re-render the table below the editor. Clicking Delete will remove the person from the database and re-render the table.
Notes Page
Below is a screenshot of the notes page showing the notes for a person in the initialized database:
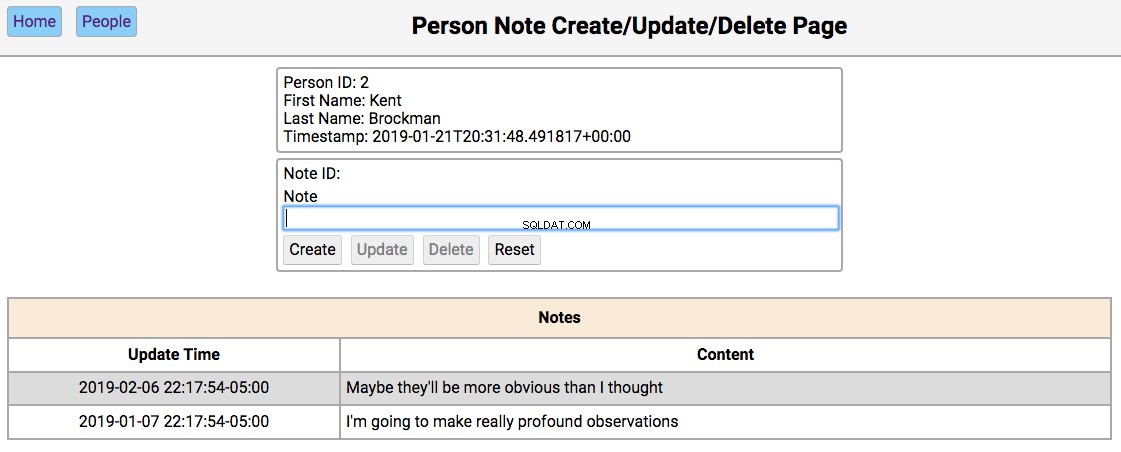
The functionality of this page works like this:
-
Single-clicking on a note will populate the editor section of the page with the notes content, disabling the Create button, and enabling the Update and Delete buttons.
-
All other functionality of this page is in the editor section.
The functionality of the editor works like this:
-
If the note content field is empty, then the Create and Reset buttons are enabled. Entering a new note in the field and clicking Create will create a new note and update the database and re-render the table below the editor. Clicking Reset will clear the editor fields.
-
If the note field has data, the user navigated here by double-clicking the person’s note from the home screen. In this case, the Update , Delete , and Reset buttons are enabled. Changing the note and clicking Update will update the database and re-render the table below the editor. Clicking Delete will remove the note from the database and re-render the table.
Web Application
This article is primarily focused on how to use SQLAlchemy to create relationships in the database, and how to extend the REST API to take advantage of those relationships. As such, the code for the web application didn’t get much attention. When you look at the web application code, keep an eye out for the following features:
-
Each page of the application is a fully formed single page web application.
-
Each page of the application is driven by JavaScript following an MVC (Model/View/Controller) style of responsibility delegation.
-
The HTML that creates the pages takes advantage of the Jinja2 inheritance functionality.
-
The hardcoded JavaScript table creation has been replaced by using the Handlebars.js templating engine.
-
The timestamp formating in all of the tables is provided by Moment.js.
You can find the following code in the repository for this article:
- The HTML for the web application
- The CSS for the web application
- The JavaScript for the web application
All of the example code for this article is available in the GitHub repository for this article. This contains all of the code related to this article, including all of the web application code.
Conclusion
Congratulations are in order for what you’ve learned in this article! Knowing how to build and use database relationships gives you a powerful tool to solve many difficult problems. There are other relationship besides the one-to-many example from this article. Other common ones are one-to-one, many-to-many, and many-to-one. All of them have a place in your toolbelt, and SQLAlchemy can help you tackle them all!
For more information about databases, you can check out these tutorials. You can also set up Flask to use SQLAlchemy. You can check out Model-View-Controller (MVC) more information about the pattern used in the web application JavaScript code.
In Part 4 of this series, you’ll focus on the HTML, CSS, and JavaScript files used to create the web application.
« Part 2:Database PersistencePart 3:Database RelationshipsPart 4:Simple Web Applications »