En ingeniería de sistemas, la comunicación es un elemento clave para alcanzar el éxito en cualquier proyecto. Esto se debe a que es fundamental para todo el ciclo de desarrollo; desde la recopilación de requisitos hasta la entrega de un producto mínimo viable.
Usando un sistema de control de versiones distribuido (como Git, un estándar de la industria), los desarrolladores pueden enviar pequeños fragmentos de código y trabajar en conjunto con servicios como Bitbucket creado a su alrededor. El alojamiento de Bitbucket es posible cuando los datos generados por sus usuarios tienen una base de datos para permanecer, al igual que PostgreSQL, pero la integración de ambos requiere configuraciones adicionales para ejecutar en diferentes máquinas.
Resumen de redes
Una red de área local puede pasar la información entre los programas sin necesidad de exponerla a la red externa, dependiendo de dónde se encuentren los usuarios.
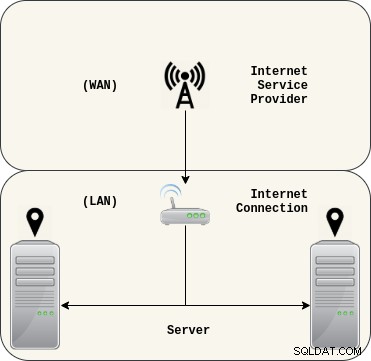 1.1. Red de área local (LAN).
Con la separación de intereses, Bitbucket y PostgreSQL pueden hablar entre sí para lograr su objetivo común, proporcionando una plataforma de sistema de control de versiones distribuidas.
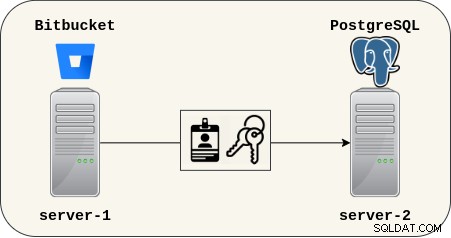 1.2. Bitbucket accede a PostgreSQL.
PostgreSQL se basa en un socket proporcionado por el sistema operativo, por lo que los datos del clúster se mantienen detrás de una puerta protegida por reglas de firewall.
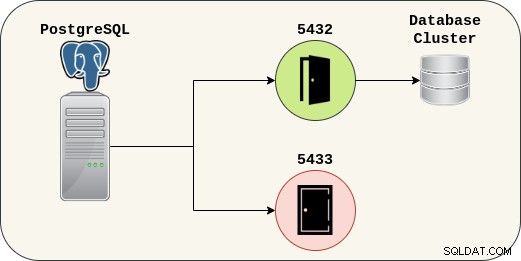 1.3. Fuente de datos PostgreSQL.
 Primeros pasos
No hay mucho que decir ya que este es un proceso bastante simple. Será necesario configurar PostgreSQL con un nuevo usuario y una base de datos listos para Bitbucket.
PostgreSQL
# Part 1: Preparing the database.

$ pg_lsclusters

$ sudo systemctl -a | grep postgres

$ sudo -u postgres psql -c "\du" -c "\l"
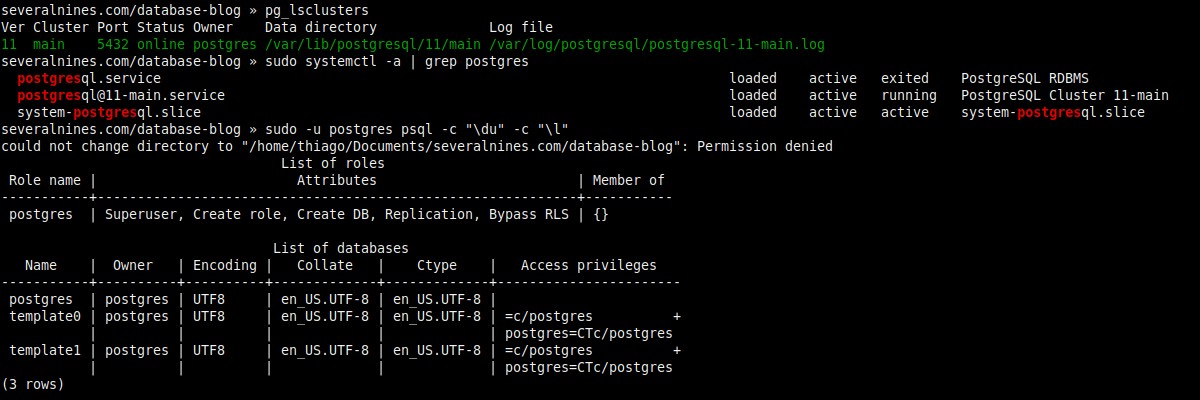 2.1. Verificando si ya hay clústeres ejecutándose.
# Part 2: Creating a new user (role) and database.

$ sudo -u postgres psql -c "create role thiago with createdb login password 'Th14g0_P4ssw0rd'"

$ psql -d postgres -c "create database bitbucket_db"

$ psql -d bitbucket_db -c "\du" -c "\l"
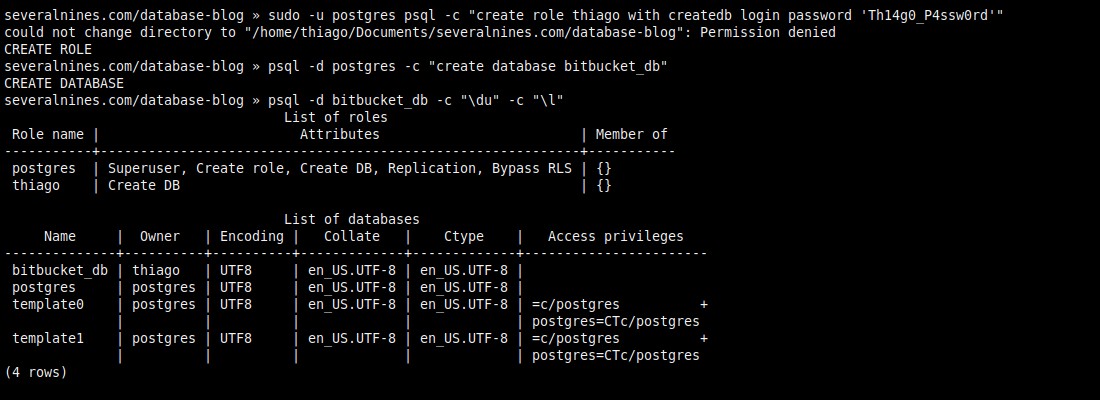 2.2. El propietario de la base de datos no es el superusuario postgres.
# Part 3: Changing the cluster configuration (postgresql.conf).

$ sudo -u postgres psql -c "show config_file"

$ sudo cat /etc/postgresql/11/main/postgresql.conf | grep listen_addresses

$ sudo sed -i "s|#listen_addresses = 'localhost'|listen_addresses = '\*'\t|" /etc/postgresql/11/main/postgresql.conf

$ sudo cat /etc/postgresql/11/main/postgresql.conf | grep listen_addresses
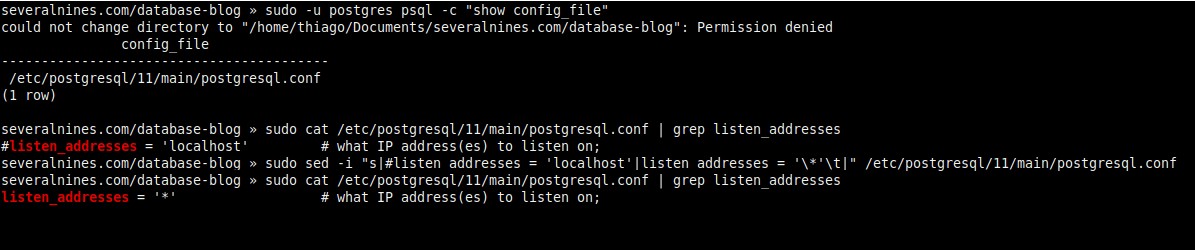 2.3. Permitir conexiones remotas (postgresql.conf).
# Part 4: Changing the cluster configuration (pg_hba.conf).

$ sudo wc -l /etc/postgresql/11/main/pg_hba.conf

$ sudo tail -3 /etc/postgresql/11/main/pg_hba.conf

$ sudo sed -i "$ a # Allow remote connections (listen_addresses = '*') with authentication" /etc/postgresql/11/main/pg_hba.conf

$ sudo sed -i "$ a host\tall\t\tall\t\t192.168.0.0/16\t\tmd5" /etc/postgresql/11/main/pg_hba.conf

$ sudo sed -i "$ a host\tall\t\tall\t\t::/0\t\t\tmd5" /etc/postgresql/11/main/pg_hba.conf

$ sudo wc -l /etc/postgresql/11/main/pg_hba.conf

$ sudo tail -3 /etc/postgresql/11/main/pg_hba.conf
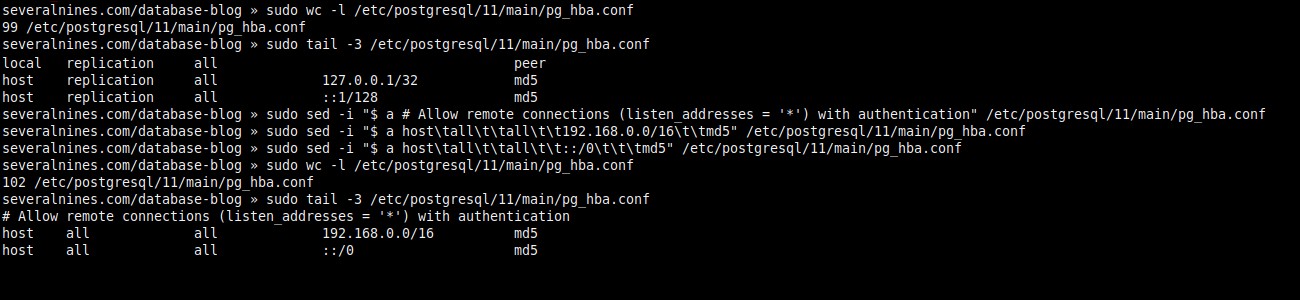 2.4. Cambio de permisos de acceso (pg_hba.conf).
# Part 5: Restarting the cluster.

$ sudo -u postgres psql -c "show listen_addresses"

$ ss -nlp | grep 5432

$ sudo systemctl restart example@sqldat.com

$ sudo -u postgres psql -c "show listen_addresses"

$ ss -nlp | grep 5432
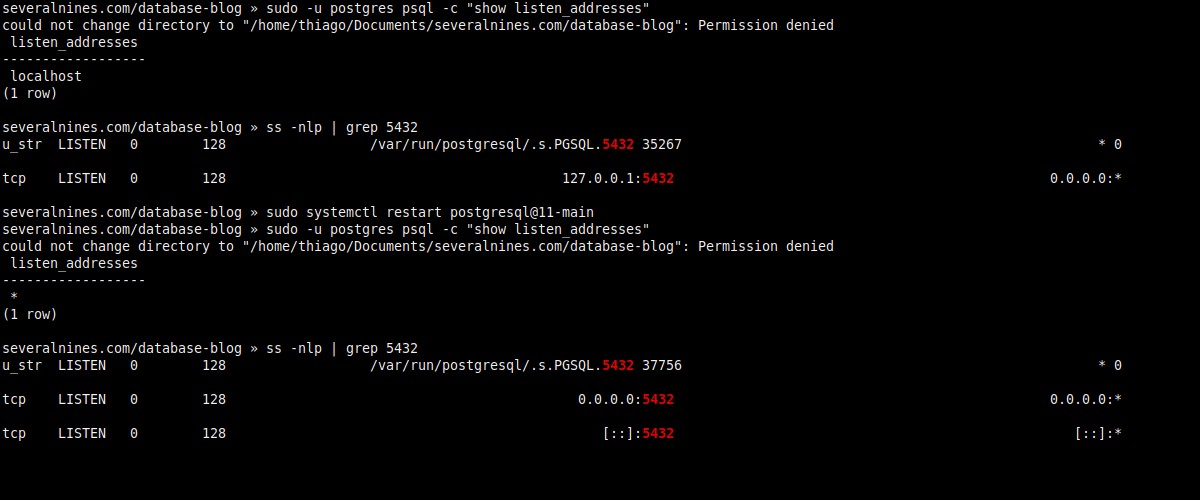 2.5. Aplicando los cambios.
# Part 6: Opening the door.

$ sudo ufw status

$ sudo ufw allow 5432/tcp

$ sudo ufw status

$ ip addr show
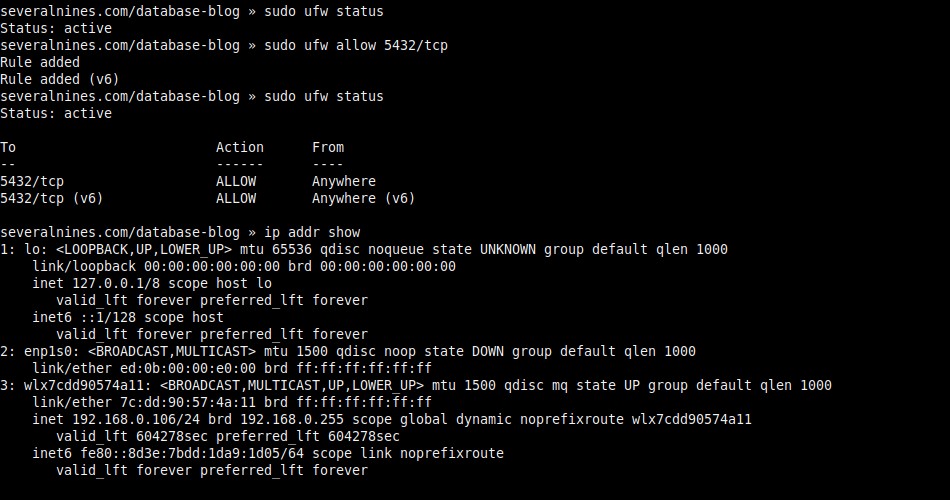 2.6. Configuración del cortafuegos y visualización de la dirección IP.
# Part 7: Set a password for the superuser role.

$ sudo -u postgres psql -c "\password"
 2.7. Cambiar la contraseña de administrador.
 Bitbucket
Esto es lo que deberá hacer en el lado de Bitbucket.
# Part 1: Verifying if the earlier set up was correct.

$ telnet 192.168.0.106 5432

# (Optional) Using psql.

$ sudo -u postgres psql -h 192.168.0.106 -p 5432 -d bitbucket_db -U thiago -c "\conninfo"
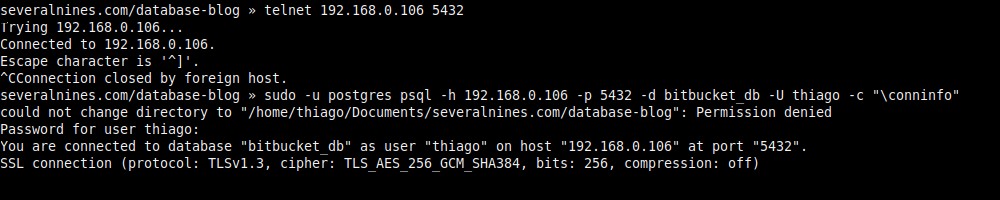 3.1. Acceso a la base de datos de forma remota.
# Part 2: Extracting the Bitbucket Server.

$ ls

$ tar xzf atlassian-bitbucket-6.10.0

$ ls

$ du -sh atlassian-bitbucket-6.10.0

$ tree -L 1 atlassian-bitbucket-6.10.0

$ tree -L 1 atlassian-bitbucket-6.10.0/bin
 3.2. Scripts para Linux y Windows.
# Part 3: Modifying the script (set-bitbucket-home.sh).

$ mkdir bitbucket-home

$ echo $(pwd)/bitbucket-home

$ cat atlassian-bitbucket-6.10.0/bin/set-bitbucket-home.sh | grep BITBUCKET_HOME=$

$ sed -i 's|BITBUCKET_HOME=$|BITBUCKET_HOME=/home/thiago/Documents/severalnines.com/database-blog/bitbucket-home|' atlassian-bitbucket-6.10.0/bin/set-bitbucket-home.sh

$ cat atlassian-bitbucket-6.10.0/bin/set-bitbucket-home.sh | grep BITBUCKET_HOME=/
 3.3. Configuración de BITBUCKET_HOME.
# Part 4: Modifying the script (set-jre-home.sh).

$ readlink -f $(which java)

$ cat atlassian-bitbucket-6.10.0/bin/set-jre-home.sh | grep JRE_HOME=$

$ sed -i 's|JRE_HOME=$|JRE_HOME=/usr/lib/jvm/java-11-openjdk-amd64|' atlassian-bitbucket-6.10.0/bin/set-jre-home.sh

$ cat atlassian-bitbucket-6.10.0/bin/set-jre-home.sh | grep JRE_HOME=/
 3.4. Configuración de JRE_HOME (Java).
# Part 5: Checking the hardware.

$ cat /proc/cpuinfo | grep processor | wc -l

$ free -h
 3.5. Núcleos de CPU y RAM al inicio.
# Part 6: Running the Bitbucket Server with Elasticsearch.

$ ./atlassian-bitbucket/bin/start-bitbucket.sh

$ free -h
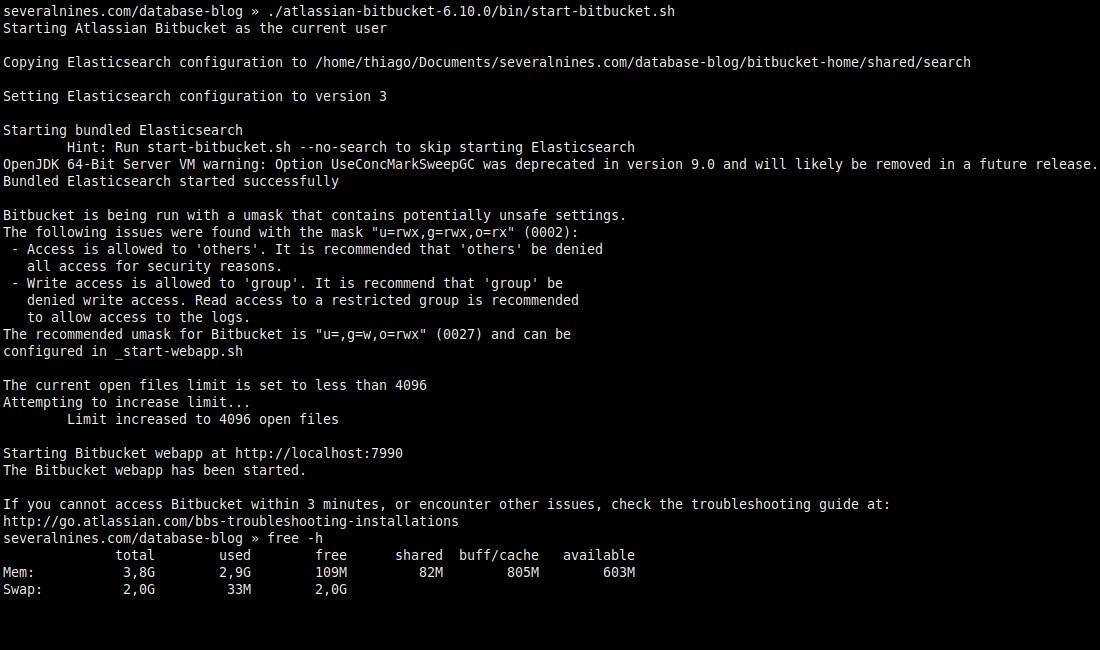 3.6. Ejecutar con Elasticsearch (predeterminado).
# Part 7: Running the Bitbucket Server without Elasticsearch.

$ ./atlassian-bitbucket/bin/start-bitbucket.sh --no-search

$ free -h
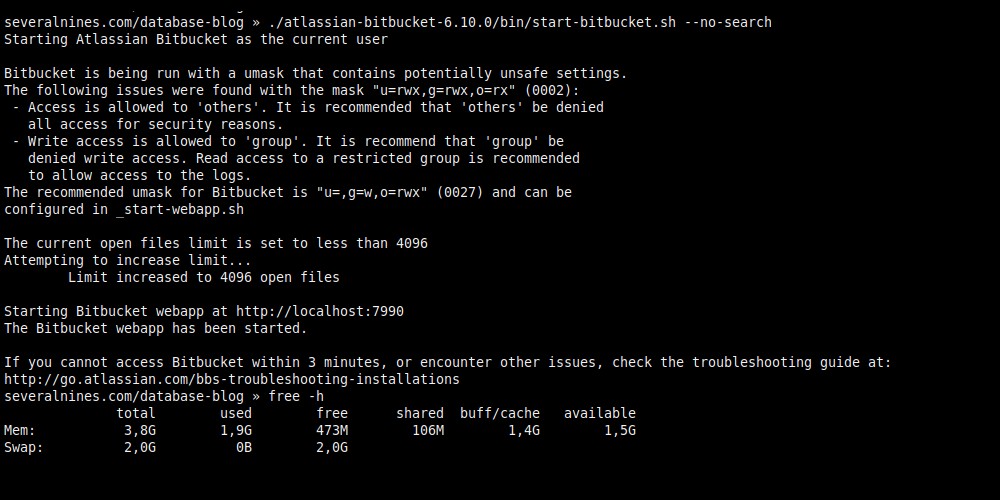 3.7. Ejecutar sin Elasticsearch (ahorra 1 GB de RAM).
# Part 8: Quick look at BITBUCKET_HOME.

$ du -sh bitbucket-home

$ tree -L 1 bitbucket-home
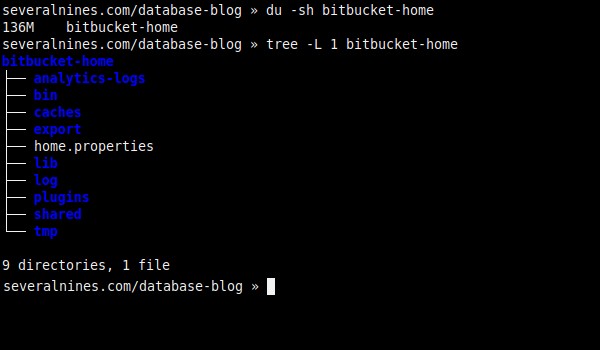 3.8. Dentro de BITBUCKET_HOME.
 Integración de PostgreSQL y Bitbucket
Después de configurar PostgreSQL y Bitbucket, su integración debe realizarse a través del navegador (https://localhost:7990/).
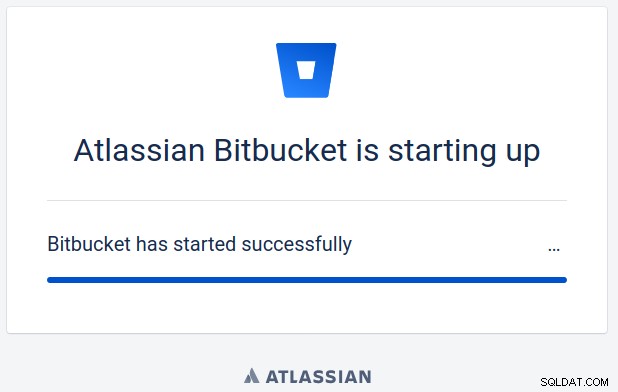 4.1. Bitbucket iniciándose.
# Displaying tables

$ psql -h 192.168.0.106 -d bitbucket_db -c "\dt"
 4.2. Listado de tablas de bases de datos actuales.
Ahora puede configurar Bitbucket para usar la API de persistencia de Java, con Hibernate como implementación, para crear el modelo de dominio en la base de datos, usando el controlador PostgreSQL JDBC.
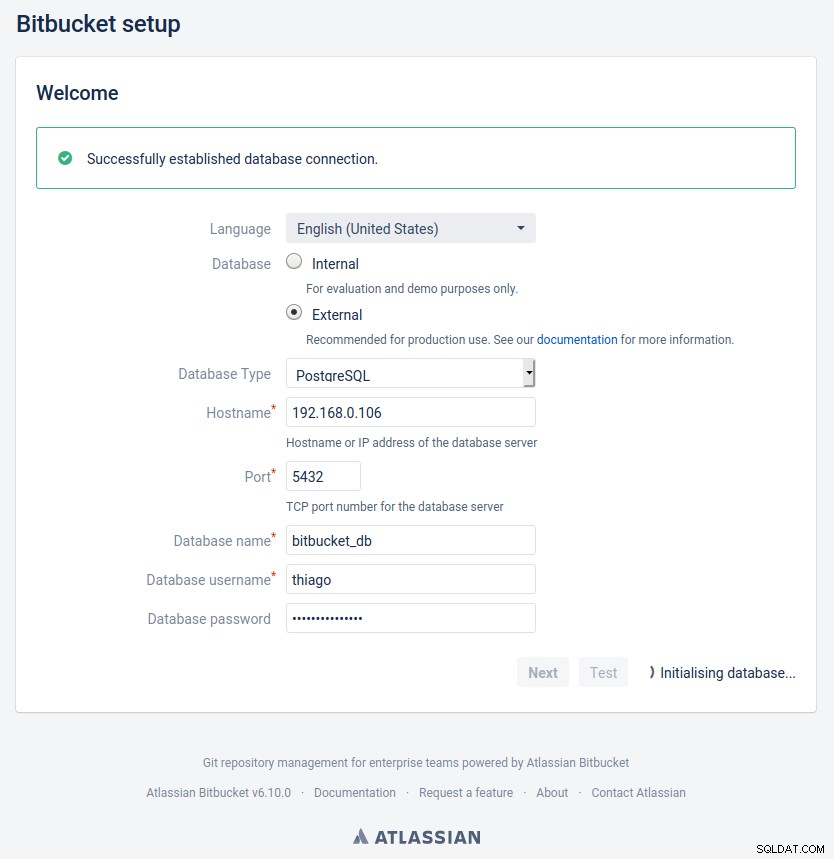 4.3. Configuración de origen de datos.
# Displaying tables (again)

$ psql -h 192.168.0.106 -d bitbucket_db -c "\dt"
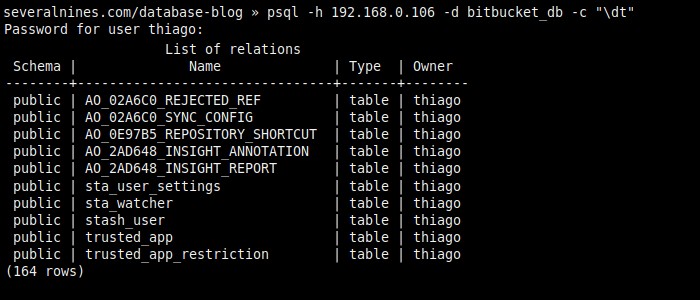 4.4. Listado de nuevo, mostrando 10 de 164 filas.
# Verifying the connection pool.

$ psql -h 192.168.0.106 -d bitbucket_db -c "select pid,usename,application_name,state from pg_stat_activity where datname = 'bitbucket_db'"
 4.5. Visualización del grupo de conexiones.
 Conclusión
Tenga en cuenta que si su red usa DHCP, es una buena idea configurar la dirección IP como estática en su enrutador, o Bitbucket puede fallar al intentar encontrar PostgreSQL más adelante.
La mayor parte de este blog ha hecho uso de expresiones regulares para cambiar los archivos de configuración sin abrir los editores de texto, pero también se pueden usar en navegadores web con fines de depuración, intente buscar el mensaje de error "no se pudo cambie el directorio a ?:Permiso denegado” con comillas dobles, o cualquier otro problema que pueda encontrar, reemplazando la ruta específica de la computadora con el comodín '?'.