Podría decirse que la construcción de proyectos es una de las formas más accesibles y efectivas de aprender a programar. Los proyectos reales requieren que aplique diferentes y variadas habilidades de codificación. También lo alientan a investigar temas que surgen a medida que resuelve problemas en el proceso de desarrollo. En este tutorial, creará una aplicación de libreta de contactos con Python, PyQt y SQLite.
En este tutorial, aprenderá a:
- Cree una interfaz gráfica de usuario (GUI) para su aplicación de libreta de contactos usando Python y PyQt
- Conecte la aplicación a una base de datos SQLite utilizando la compatibilidad con SQL de PyQt
- Gestione los datos de contacto con la arquitectura Model-View de PyQt
Al final de este proyecto, tendrá una aplicación de libreta de contactos funcional que le permitirá almacenar y administrar su información de contacto.
Para obtener el código fuente completo de la aplicación, así como el código de cada paso que seguirá en este tutorial, haga clic en el siguiente enlace:
Obtenga el código fuente: Haga clic aquí para obtener el código fuente que usará para crear un libro de contactos con Python, PyQt y SQLite en este tutorial.
Demostración:una libreta de contactos con Python
Los libros de contactos son un tipo de aplicación útil y ampliamente utilizada. Están por todas partes. Probablemente tenga una libreta de contactos en su teléfono y en su computadora. Con una libreta de contactos, puede almacenar y administrar la información de contacto de sus familiares, amigos, compañeros de trabajo, etc.
En este tutorial, codificará una aplicación GUI de libreta de contactos con Python, SQLite y PyQt. Aquí hay una demostración de cómo se verá y funcionará su libreta de contactos después de seguir los pasos de este tutorial:
Su libreta de contactos proporcionará el conjunto mínimo de características requeridas para este tipo de aplicación. Podrá mostrar, crear, actualizar y eliminar la información de su lista de contactos.
Resumen del proyecto
Para construir su aplicación de libreta de contactos, necesita organizar el código en módulos y paquetes y darle a su proyecto una estructura coherente. En este tutorial, utilizará la siguiente estructura de directorios y archivos:
rpcontacts_project/
│
├── rpcontacts/
│   ├── __init__.py
│   ├── views.py
│   ├── database.py
│   ├── main.py
│   └── model.py
│
├── requirements.txt
├── README.md
└── rpcontacts.py
Aquí hay un breve resumen del contenido de su directorio de proyectos:
rpcontacts_project/es el directorio raíz del proyecto. Contendrá los siguientes archivos:requirements.txtproporciona la lista de requisitos del proyecto.README.mdproporciona información general sobre el proyecto.rpcontacts.pyproporciona el script de punto de entrada para ejecutar la aplicación.
rpcontacts/es un subdirectorio que proporciona el paquete principal de la aplicación. Proporciona los siguientes módulos:__init__.pyviews.pydatabase.pymain.pymodel.py
Cubrirá cada uno de estos archivos paso a paso en este tutorial. El nombre de cada archivo da una idea de su función en la aplicación. Por ejemplo, views.py contendrá el código para generar la GUI de ventanas y cuadros de diálogo, database.py contendrá código para trabajar con la base de datos, y main.py alojará la propia aplicación. Finalmente, model.py implementará el modelo para administrar los datos en la base de datos de la aplicación.
En general, la aplicación tendrá una ventana principal para mostrar, agregar, eliminar y actualizar contactos. También tendrá un cuadro de diálogo para agregar nuevos contactos a la base de datos.
Requisitos
Para aprovechar al máximo este proyecto, sería útil tener algunos conocimientos previos de programación de GUI con Python y PyQt. En este sentido, necesitará saber los conceptos básicos de cómo:
- Cree aplicaciones GUI con PyQt y Python
- Cree y diseñe GUI con PyQt
- Administre bases de datos SQL con Python y PyQt
- Trabajar con bases de datos SQLite
Para repasar estos temas, puede consultar los siguientes recursos:
- Python y PyQt:construcción de una calculadora de escritorio GUI
- Python y PyQt:creación de menús, barras de herramientas y barras de estado
- Diseños de PyQt:Cree aplicaciones GUI de aspecto profesional
- Manejo de bases de datos SQL con PyQt:conceptos básicos
- Introducción a las bibliotecas SQL de Python
- Administración de datos con Python, SQLite y SQLAlchemy
No se preocupe si no es un experto en estas áreas antes de comenzar este tutorial. Aprenderá a través del proceso de ensuciarse las manos en un proyecto real. Si se queda atascado, tómese su tiempo y revise los recursos vinculados anteriormente. Luego vuelve al código.
La aplicación de libreta de contactos que va a crear en este tutorial tiene una única dependencia externa:PyQt.
La versión 6.0 de PyQt se lanzó el 4 de enero de 2021. Esta es la primera versión de la biblioteca que se vincula a la versión 6 de Qt. Sin embargo, el proyecto de este tutorial no se probó con PyQt 6.0.
Si siente la necesidad de ejecutar el proyecto con esta nueva versión de PyQt, pruébelo. Como sugerencia, deberías pip install PyQt6 y luego actualice las importaciones para usar PyQt6 en lugar de PyQt5 .
Para seguir las mejores prácticas en su proceso de desarrollo, puede comenzar creando un entorno virtual y luego instalar PyQt usando pip . Una vez que hayas instalado PyQt, ¡estarás listo para comenzar a programar!
Paso 1:Creación de la aplicación Skeleton de la libreta de contactos con PyQt
En este primer paso, creará una aplicación PyQt GUI mínima pero funcional para proporcionar la base sobre la cual comenzará a construir el libro de contactos. También creará la estructura de proyecto mínima requerida, incluido el paquete principal del proyecto y un script de punto de entrada para ejecutar la aplicación.
Todo el código y los archivos que agregará al proyecto del libro de contactos en esta sección se recopilan en el source_code_step_1/ directorio. Puede descargarlos haciendo clic en el siguiente enlace:
Obtenga el código fuente: Haga clic aquí para obtener el código fuente que usará para crear un libro de contactos con Python, PyQt y SQLite en este tutorial.
Al final de esta sección, podrá ejecutar la aplicación de interfaz gráfica de usuario básica para su libreta de contactos por primera vez.
Estructuración del proyecto del libro de contactos
Para comenzar a codificar la aplicación, continúe y cree un nuevo directorio llamado rpcontacts_project/ . Este será el directorio raíz del proyecto. Ahora cree un nuevo subdirectorio llamado rpcontacts/ dentro de rpcontacts_project/ . Este subdirectorio contendrá el paquete principal de la aplicación. Finalmente, inicie su editor de código o IDE dentro del directorio raíz.
Para convertir un directorio en un paquete, Python necesita un __init__.py módulo para inicializar el paquete. Crea este archivo dentro de rpcontacts/ y añádele el siguiente código:
# -*- coding: utf-8 -*-

"""This module provides the rpcontacts package."""

__version__ = "0.1.0"
Este archivo le dice a Python que rpcontacts es un paquete El código del archivo se ejecuta cuando importa el paquete o algunos de sus módulos.
No necesita poner ningún código en un __init__.py archivo para inicializar el paquete. Un __init__.py vacío archivo hará el trabajo. Sin embargo, en este caso, define una constante a nivel de módulo llamada __version__ para almacenar el número de versión de su aplicación.
Creación de la ventana principal de la aplicación
Ahora es el momento de crear la ventana principal de su libreta de contactos. Para hacer eso, crea un módulo llamado views.py en tus rpcontacts paquete. Luego agregue el siguiente código al módulo y guárdelo:
# -*- coding: utf-8 -*-

"""This module provides views to manage the contacts table."""

from PyQt5.QtWidgets import (
    QHBoxLayout,
    QMainWindow,
    QWidget,
)

class Window(QMainWindow):
    """Main Window."""
    def __init__(self, parent=None):
        """Initializer."""
        super().__init__(parent)
        self.setWindowTitle("RP Contacts")
        self.resize(550, 250)
        self.centralWidget = QWidget()
        self.setCentralWidget(self.centralWidget)
        self.layout = QHBoxLayout()
        self.centralWidget.setLayout(self.layout)
Primero, importa las clases requeridas desde PyQt5.QtWidgets . Luego creas Window . Esta clase hereda de QMainWindow y proporciona el código para generar la ventana principal de la aplicación. En el método de inicialización, establece el título de la ventana en "RP Contacts" , cambia el tamaño de la ventana a 550 por 250 píxeles, defina y configure el widget central usando QWidget y, finalmente, defina un diseño para el widget central utilizando un diseño de cuadro horizontal.
Codificación y ejecución de la aplicación
Como ya tiene una ventana principal para el libro de contactos, es hora de escribir el código para crear una aplicación PyQt funcional usando QApplication . Para hacer eso, crea un nuevo módulo llamado main.py en tus rpcontacts paquete y agregue el siguiente código:
# -*- coding: utf-8 -*-
# rpcontacts/main.py

"""This module provides RP Contacts application."""

import sys

from PyQt5.QtWidgets import QApplication

from .views import Window

def main():
    """RP Contacts main function."""
    # Create the application
    app = QApplication(sys.argv)
    # Create the main window
    win = Window()
    win.show()
    # Run the event loop
    sys.exit(app.exec())
En este módulo, importa sys para obtener acceso a exit() , que le permite salir limpiamente de la aplicación cuando el usuario cierra la ventana principal. Luego importas QApplication de PyQt5.QtWidgets y Window de views . El paso final es definir main() como función principal de su aplicación.
Dentro de main() , instancias QApplication y Window . Luego llamas a .show() en Window , y finalmente ejecutas el bucle principal de la aplicación o bucle de eventos , usando .exec() .
Ahora suba al directorio raíz del proyecto rpcontacts_project/ y crea un archivo llamado rpcontacts.py . Este archivo proporciona el script de punto de entrada para ejecutar la aplicación. Agregue el siguiente código al archivo y guárdelo:
#!/usr/bin/env python3
# -*- coding: utf-8 -*-
# rpcontacts_project/rpcontacts.py

"""This module provides RP Contacts entry point script."""

from rpcontacts.main import main

if __name__ == "__main__":
    main()
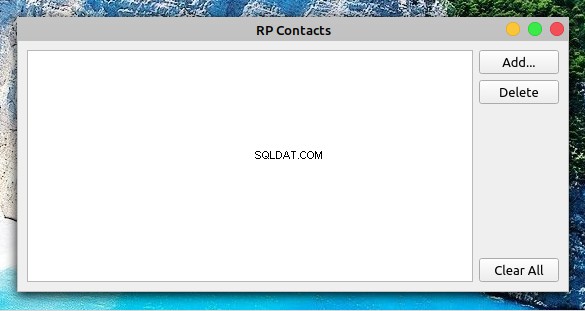
Este archivo importa main() desde tu main.py módulo. Luego implementa la declaración condicional tradicional que llama a main() si el usuario ejecuta este módulo como un script de Python. Ahora inicie la aplicación ejecutando el comando python rpcontacts.py en su entorno Python. Obtendrá la siguiente ventana en su pantalla:
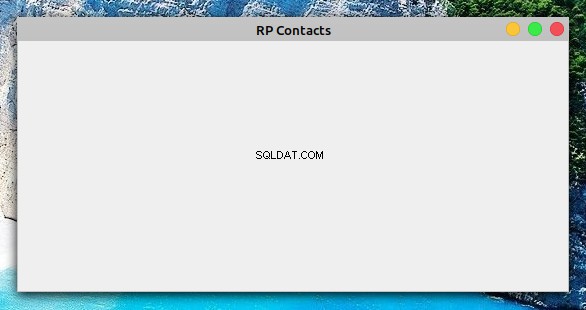
¡Eso es todo! Ha creado una aplicación PyQt GUI mínima pero funcional que puede usar como punto de partida para crear su libreta de contactos. En este punto, su proyecto debe tener la siguiente estructura:
./rpcontacts_project/
│
├── rpcontacts/
│   ├── __init__.py
│   ├── views.py
│   └── main.py
│
└── rpcontacts.py
En esta sección, ha creado la estructura mínima requerida para su proyecto de libreta de contactos utilizando módulos y paquetes de Python. Creó la ventana principal de la aplicación y reunió el código repetitivo para crear una aplicación GUI de PyQt. También ha ejecutado la aplicación por primera vez. A continuación, comenzará a agregar funciones a su GUI.
Paso 2:Creación de la GUI de la libreta de contactos con Python
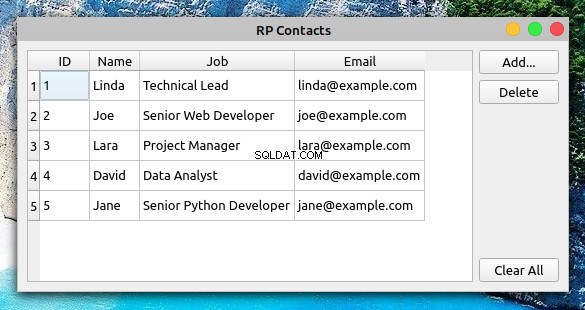
Ahora que ha creado el esqueleto de su aplicación de libreta de contactos, puede comenzar a codificar la GUI de la ventana principal. Al final de esta sección, habrá completado los pasos necesarios para crear la GUI de su libreta de contactos usando Python y PyQt. La GUI se verá así:
En el centro de la ventana, tiene una vista de tabla para mostrar su lista de contactos. En el lado derecho del formulario, tienes tres botones:
- Agregar para agregar un nuevo contacto a la lista
- Eliminar para eliminar un contacto seleccionado de la lista
- Borrar todo para eliminar todos los contactos de la lista
Todo el código y los archivos que agregará o modificará en esta sección se recopilan en source_code_step_2/ directorio. Puede descargarlos haciendo clic en el siguiente enlace:
Obtenga el código fuente: Haga clic aquí para obtener el código fuente que usará para crear un libro de contactos con Python, PyQt y SQLite en este tutorial.
Regrese a views.py module y actualice el código de Window para generar la GUI anterior:
 1# -*- coding: utf-8 -*-
 2# rpcontacts/views.py
 3
 4"""This module provides views to manage the contacts table."""
 5
 6from PyQt5.QtWidgets import (
 7    QAbstractItemView,
 8    QHBoxLayout,
 9    QMainWindow,
10    QPushButton,
11    QTableView,
12    QVBoxLayout,
13    QWidget,
14)
15
16class Window(QMainWindow):
17    """Main Window."""
18    def __init__(self, parent=None):
19        """Initializer."""
20        # Snip...
21
22        self.setupUI()
23
24    def setupUI(self):
25        """Setup the main window's GUI."""
26        # Create the table view widget
27        self.table = QTableView()
28        self.table.setSelectionBehavior(QAbstractItemView.SelectRows)
29        self.table.resizeColumnsToContents()
30        # Create buttons
31        self.addButton = QPushButton("Add...")
32        self.deleteButton = QPushButton("Delete")
33        self.clearAllButton = QPushButton("Clear All")
34        # Lay out the GUI
35        layout = QVBoxLayout()
36        layout.addWidget(self.addButton)
37        layout.addWidget(self.deleteButton)
38        layout.addStretch()
39        layout.addWidget(self.clearAllButton)
40        self.layout.addWidget(self.table)
41        self.layout.addLayout(layout)
Primero importa algunas clases PyQt adicionales para usar en la GUI. Estos son algunos de los más relevantes:
QPushButtonpara crear el Agregar , Eliminar y Borrar todo botonesQTableViewpara proporcionar la vista similar a una tabla que muestra la lista de contactosQAbstractItemViewpara proporcionar acceso a la política de comportamiento de selección de vista de tabla
En este código, la primera adición a Window es una llamada a .setupUI() al final de __init__() . Esta llamada genera la GUI de la ventana principal cuando ejecuta la aplicación.
Aquí está el código dentro de .setupUI() hace:
- Línea 27 crea un
QTableViewinstancia para mostrar la lista de contactos. - Línea 28 establece el
.selectionBehaviorpropiedad aQAbstractItemView.SelectRows. Esto asegura que cuando un usuario haga clic en cualquier celda de la vista de tabla, se seleccionará la fila completa. Las filas en la vista de tabla contienen toda la información relacionada con un solo contacto en la lista de contactos. - Líneas 31 a 33 agregue los tres botones a la GUI:Agregar , Eliminar y Borrar todo . Estos botones aún no realizan ninguna acción.
- Líneas 35 a 41 cree y configure un diseño coherente para todos los widgets en la GUI.
Con estas adiciones a Window , puede volver a ejecutar la aplicación. La ventana en su pantalla se verá como la ventana que vio al comienzo de la sección.
En esta sección, ejecutó todos los pasos necesarios para crear la GUI de la ventana principal de su libreta de contactos. Ahora está listo para comenzar a trabajar en cómo su aplicación administrará y almacenará sus datos de contacto.
Paso 3:Configuración de la base de datos de la libreta de contactos
En este punto, ha creado una aplicación PyQt y la GUI de su ventana principal para construir su proyecto de libreta de contactos. En esta sección, escribirá código para definir cómo se conecta la aplicación a la base de datos de contactos. Para completar este paso, utilizará SQLite para manejar la base de datos y la compatibilidad con SQL de PyQt para conectar la aplicación a la base de datos y trabajar con sus datos de contacto.
El código fuente y los archivos que agregará o modificará en esta sección se almacenan en source_code_step_3/ directorio. Puede descargarlos haciendo clic en el siguiente enlace:
Obtenga el código fuente: Haga clic aquí para obtener el código fuente que usará para crear un libro de contactos con Python, PyQt y SQLite en este tutorial.
Primero, vuelve a main.py en los rpcontacts/ directorio y actualice el código para crear la conexión a la base de datos:
# -*- coding: utf-8 -*-
# rpcontacts/main.py

"""This module provides RP Contacts application."""

import sys

from PyQt5.QtWidgets import QApplication

from .database import createConnection
from .views import Window

def main():
    """RP Contacts main function."""
    # Create the application
    app = QApplication(sys.argv)
    # Connect to the database before creating any window
    if not createConnection("contacts.sqlite"):
        sys.exit(1)
    # Create the main window if the connection succeeded
    win = Window()
    win.show()
    # Run the event loop
    sys.exit(app.exec_())
En este caso, primero importa createConnection() de database.py . Esta función contendrá código para crear y abrir una conexión a la base de datos de contactos. Crearás database.py y escribe createConnection() en la siguiente sección.
Dentro de main() , la primera línea resaltada es un intento de crear una conexión a la base de datos usando createConnection() . Si por alguna razón la aplicación no puede crear una conexión, entonces la llamada a sys.exit(1) cerrará la aplicación sin crear un elemento gráfico e indicará que se ha producido un error.
Debe manejar la conexión de esta manera porque la aplicación depende de la base de datos para funcionar correctamente. Si no tiene una conexión funcional, entonces su aplicación no funcionará en absoluto.
Esta práctica le permite manejar errores y cerrar limpiamente la aplicación si ocurre un problema. También podrá presentar al usuario información relevante sobre el error que tuvo la aplicación al intentar conectarse a la base de datos.
Con estas adiciones en su lugar, es hora de sumergirse en el código de createConnection() .
Conexión a la base de datos con PyQt y SQLite
Conectar su aplicación de libreta de contactos a su base de datos asociada es un paso fundamental en el desarrollo de la aplicación. Para hacer esto, codificará una función llamada createConnection() , que creará y abrirá una conexión a la base de datos. Si la conexión es exitosa, la función devolverá True . De lo contrario, proporcionará información sobre la causa de la falla de conexión.
Regrese a los rpcontacts/ directorio y cree un nuevo módulo llamado database.py dentro de ella. Luego agregue el siguiente código a ese módulo:
 1# -*- coding: utf-8 -*-
 2# rpcontacts/database.py
 3
 4"""This module provides a database connection."""
 5
 6from PyQt5.QtWidgets import QMessageBox
 7from PyQt5.QtSql import QSqlDatabase
 8
 9def createConnection(databaseName):
10    """Create and open a database connection."""
11    connection = QSqlDatabase.addDatabase("QSQLITE")
12    connection.setDatabaseName(databaseName)
13
14    if not connection.open():
15        QMessageBox.warning(
16            None,
17            "RP Contact",
18            f"Database Error: {connection.lastError().text()}",
19        )
20        return False
21
22    return True
Aquí, primero importa algunas clases PyQt requeridas. Luego defines createConnection() . Esta función toma un argumento:databaseName contiene el nombre o la ruta al archivo de base de datos SQLite físico en su sistema de archivos.
Aquí está el código dentro de createConnection() hace:
- Línea 11 crea la conexión a la base de datos usando
QSQLITEconductor. - Línea 12 establece el nombre del archivo o la ruta a la base de datos.
- Línea 14 intenta abrir la conexión. Si ocurre un problema durante la llamada a
.open(), entonces elifbloque de código muestra un mensaje de error y luego devuelveFalsepara indicar que el intento de conexión falló. - Línea 22 devuelve
Truesi el intento de conexión es exitoso.
Ya codificaste createConnection() . Ahora puedes escribir el código para crear los contacts tablas en la base de datos.
Crear los contacts Mesa
Con la función que crea y abre la conexión a la base de datos, puede proceder a codificar una función auxiliar para crear los contacts mesa. Usarás esta tabla para almacenar la información sobre tus contactos.
Aquí está el código que implementa _createContactsTable() :
# -*- coding: utf-8 -*-
# rpcontacts/database.py

# Snip...
from PyQt5.QtSql import QSqlDatabase, QSqlQuery

def _createContactsTable():
    """Create the contacts table in the database."""
    createTableQuery = QSqlQuery()
    return createTableQuery.exec(
        """
        CREATE TABLE IF NOT EXISTS contacts (
            id INTEGER PRIMARY KEY AUTOINCREMENT UNIQUE NOT NULL,
            name VARCHAR(40) NOT NULL,
            job VARCHAR(50),
            email VARCHAR(40) NOT NULL
        )
        """
    )

def createConnection(databaseName):
    # Snip...
    _createContactsTable()
    return True
Aquí, primero agrega una nueva importación. Importas QSqlQuery para ejecutar y manipular sentencias SQL.
Dentro de _createContactsTable() , creas un QSqlQuery instancia. Luego llamas a .exec() en el objeto de consulta con un SQL basado en cadenas CREATE TABLE afirmación como argumento. Esta declaración crea una nueva tabla llamada contacts en su base de datos. La tabla tiene las siguientes columnas:
| Columna | Contenido |
|---|---|
id | Un número entero con la clave principal de la tabla |
name | Una cadena con el nombre de un contacto |
job | Una cadena con el cargo de un contacto |
email | Una cadena con el correo electrónico de un contacto |
Los contacts La tabla en su base de datos almacenará información relevante sobre sus contactos.
El paso final para terminar de codificar database.py es agregar una llamada a _createContactsTable() desde dentro createConnection() , justo antes del último return declaración. Esto asegura que la aplicación cree los contacts tabla antes de realizar cualquier operación en la base de datos.
Una vez que haya creado los contacts tabla, puede ejecutar algunas pruebas en la base de datos y también agregar algunos datos de muestra para realizar más pruebas.
Prueba de la base de datos de la libreta de contactos
Hasta ahora, ha terminado de escribir el código requerido para manejar la conexión a la base de datos de la libreta de contactos. En esta sección, realizará algunas pruebas para asegurarse de que este código y la base de datos funcionen correctamente. También agregará algunos datos de muestra a la base de datos para realizar más pruebas más adelante en este tutorial.
Ahora abra una terminal o línea de comando y muévase al directorio raíz del proyecto, rpcontacts_project/ . Una vez allí, inicie una sesión interactiva de Python y escriba el siguiente código:
>>> from rpcontacts.database import createConnection

>>> # Create a connection
>>> createConnection("contacts.sqlite")
True

>>> # Confirm that contacts table exists
>>> from PyQt5.QtSql import QSqlDatabase
>>> db = QSqlDatabase.database()
>>> db.tables()
['contacts', 'sqlite_sequence']
Aquí, primero importa createConnection() de la database.py módulo. Luego llama a esta función para crear y abrir una conexión a la base de datos de contactos. El nombre del archivo de la base de datos es contacts.sqlite . Dado que este archivo no existe en el directorio raíz del proyecto, SQLite lo crea por usted. Puede verificar esto echando un vistazo a su directorio actual.
A continuación, confirma que la base de datos contiene una tabla llamada contacts . Para hacerlo, llama a .database() en QSqlDatabase . Este método de clase devuelve un puntero a la conexión de base de datos actual. Con esta referencia a la conexión, puede llamar a .tables() para obtener la lista de tablas en la base de datos. Tenga en cuenta que la primera tabla de la lista es contacts , así que ahora está seguro de que todo funciona bien.
Ahora puede preparar una consulta SQL para insertar datos de muestra en los contacts tabla:
>>> # Prepare a query to insert sample data
>>> from PyQt5.QtSql import QSqlQuery

>>> insertDataQuery = QSqlQuery()
>>> insertDataQuery.prepare(
...     """
...     INSERT INTO contacts (
...         name,
...         job,
...         email
...     )
...     VALUES (?, ?, ?)
...     """
... )
True
La consulta anterior le permite insertar valores específicos en el name , job y email atributos y guardar esos valores en la base de datos. A continuación se muestra un ejemplo de cómo hacer esto:
>>> # Sample data
>>> data = [
...     ("Linda", "Technical Lead", "linda@example.com"),
...     ("Joe", "Senior Web Developer", "joe@example.com"),
...     ("Lara", "Project Manager", "lara@example.com"),
...     ("David", "Data Analyst", "david@example.com"),
...     ("Jane", "Senior Python Developer", "jane@example.com"),
... ]

>>> # Insert sample data
>>> for name, job, email in data:
...     insertDataQuery.addBindValue(name)
...     insertDataQuery.addBindValue(job)
...     insertDataQuery.addBindValue(email)
...     insertDataQuery.exec()
...
True
True
True
True
True
En este fragmento de código, primero define data para contener la información de contacto de una lista de personas. A continuación, utiliza un for bucle para insertar los datos llamando a .addBindValue() . Luego llamas a .exec() en el objeto de consulta para ejecutar efectivamente la consulta SQL en la base de datos.
Dado que todas las llamadas a .exec() devuelve True , puede concluir que los datos se insertaron correctamente en la base de datos. Si desea confirmar esto, ejecute el siguiente código:
>>> query = QSqlQuery()
>>> query.exec("SELECT name, job, email FROM contacts")
True

>>> while query.next():
...     print(query.value(0), query.value(1), query.value(2))
...
Linda Technical Lead linda@example.com
Joe Senior Web Developer joe@example.com
Lara Project Manager lara@example.com
David Data Analyst david@example.com
Jane Senior Python Developer jane@example.com
¡Eso es todo! ¡Su base de datos funciona bien! Ahora tiene algunos datos de muestra para probar la aplicación y puede concentrarse en cómo cargar y mostrar la información de contacto en la ventana principal de su libreta de contactos.
Paso 4:Visualización y actualización de contactos existentes
Para mostrar sus datos de contacto en la ventana principal de la aplicación, puede usar QTableView . Esta clase es parte de la arquitectura Model-View de PyQt y proporciona una forma robusta y eficiente de mostrar elementos de un objeto modelo de PyQt.
Los archivos y el código que agregará o modificará en esta sección se almacenan en el source_code_step_4/ directorio. Para descargarlos, haga clic en el siguiente enlace:
Obtenga el código fuente: Haga clic aquí para obtener el código fuente que usará para crear un libro de contactos con Python, PyQt y SQLite en este tutorial.
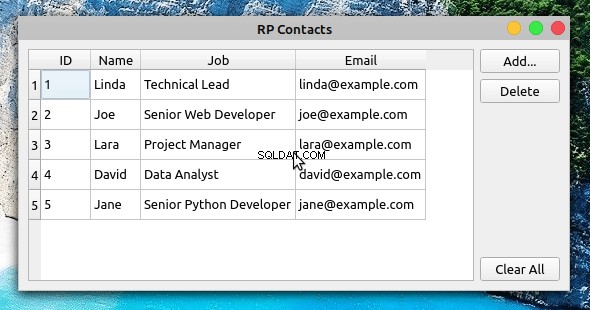
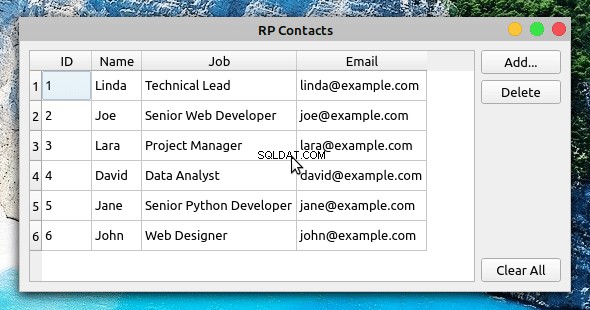
Una vez que haya terminado este paso, su libreta de contactos se verá así:
El objeto de vista de tabla en la ventana principal proporciona la funcionalidad requerida para permitirle modificar y actualizar la información de contacto rápidamente.
Por ejemplo, para actualizar el nombre de un contacto, puede hacer doble clic en la celda que contiene el nombre, actualizar el nombre y luego presionar Enter para guardar automáticamente los cambios en la base de datos. Pero antes de poder hacer esto, debe crear un modelo y conectarlo a la vista de tabla.
Creación de un modelo para manejar los datos de contacto
PyQt proporciona un amplio conjunto de clases para trabajar con bases de datos SQL. Para su aplicación de libreta de contactos, usará QSqlTableModel , que proporciona un modelo de datos editable para una sola tabla de base de datos. Es perfecto para el trabajo ya que su base de datos tiene una sola tabla, contacts .
Regrese a su editor de código y cree un nuevo módulo llamado model.py dentro de los rpcontacts/ directorio. Agregue el siguiente código al archivo y guárdelo:
 1# -*- coding: utf-8 -*-
 2# rpcontacts/model.py
 3
 4"""This module provides a model to manage the contacts table."""
 5
 6from PyQt5.QtCore import Qt
 7from PyQt5.QtSql import QSqlTableModel
 8
 9class ContactsModel:
10    def __init__(self):
11        self.model = self._createModel()
12
13    @staticmethod
14    def _createModel():
15        """Create and set up the model."""
16        tableModel = QSqlTableModel()
17        tableModel.setTable("contacts")
18        tableModel.setEditStrategy(QSqlTableModel.OnFieldChange)
19        tableModel.select()
20        headers = ("ID", "Name", "Job", "Email")
21        for columnIndex, header in enumerate(headers):
22            tableModel.setHeaderData(columnIndex, Qt.Horizontal, header)
23        return tableModel
In this code, you first do some required imports, then you create ContactsModel . In the class initializer, you define an instance attribute called .model to hold the data model.
Next, you add a static method to create and set up the model object. Here’s what the code in ._createModel() does:
- Line 16 creates an instance of
QSqlTableModel()calledtableModel. - Line 17 associates the model object with the
contactstable in your database. - Line 18 sets the
.editStrategyproperty of the model toQSqlTableModel.OnFieldChange. With this, you ensure that the changes on the model get saved into the database immediately. - Line 19 loads the table into the model by calling
.select(). - Lines 20 to 22 define and set user-friendly headers for the
contactstable’s columns. - Line 23 returns the newly created model.
At this point, you have your data model ready to use. Now you need to connect the table view widget to the model so you can present your users with the contact information.
Connecting the Model to the View
To display contact data in your contact book’s main window, you need to connect the table view with the data model. To perform this connection, you need to call .setModel() on the table view object and pass the model as an argument:
# -*- coding: utf-8 -*-
# rpcontacts/views.py

# Snip...
from .model import ContactsModel

class Window(QMainWindow):
    """Main Window."""
    def __init__(self, parent=None):
        # Snip...
        self.contactsModel = ContactsModel()
        self.setupUI()

    def setupUI(self):
        """Setup the main window's GUI."""
        # Create the table view widget
        self.table = QTableView()
        self.table.setModel(self.contactsModel.model)
        self.table.setSelectionBehavior(QAbstractItemView.SelectRows)
        # Snip...
In this code, you first import ContactsModel from model.py . This class provides the model that manages the data in your contact database.
In the initializer of Window , you create an instance of ContactsModel . Then inside .setupUI() , you call .setModel() on .table to connect the model with the table view. If you run the application after this update, then you’ll get the window you saw at the beginning of step 4.
Displaying and Updating Contacts
PyQt’s Model-View architecture provides a robust and user-friendly way to create GUI applications that manage databases. Models communicate with and access the data in the database. Any change in a model updates the database immediately. Views are responsible for displaying the data to the user and also for providing editable widgets to allow the user to modify the data directly in the view.
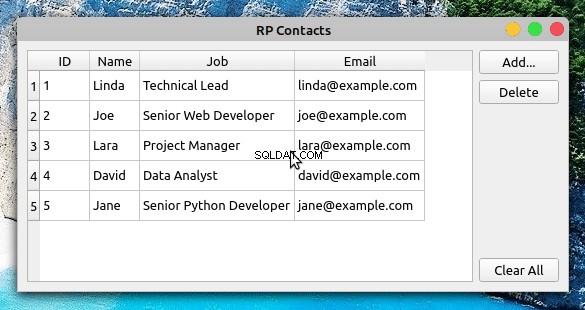
If the user modifies the data through the view, then the view internally communicates with and updates the model, which saves the changes to the physical database:
In this example, you double-click Joe’s Job campo. This gives you access to an editable widget that allows you to modify the value in the cell. Then you update the job description from Senior Web Developer to Web Developer . When you hit Enter , the table view communicates the change to the model, and the model saves the change to the database immediately.
To confirm that the changes were successfully saved into the database, you can close the application and run it again. The table view should reflect your updates.
Step 5:Creating New Contacts
At this step, your contact book application provides functionality to load, display, and update the information about your contacts. Even though you’re able to modify and update the contact information, you can neither add nor remove contacts from the list.
All the files and the code you’ll add or modify in this section are collected in the source_code_step_5/ directory. To download them, click the link below:
Get the Source Code: Click here to get the source code you’ll use to build a contact book with Python, PyQt, and SQLite in this tutorial.
In this section, you’ll provide the required functionality to add new contacts to the database, using a pop-up dialog to enter the new information. The first step is to create the Add Contact dialog.
Creating the Add Contact Dialog
Dialogs are small windows that you can use to communicate with your users. In this section, you’ll code the contact book’s Add Contact dialog to allow your users add new contacts to their current list of contacts.
To code the Add Contact dialog, you’ll subclass QDialog . This class provides a blueprint to build dialogs for your GUI applications.
Now open the views.py module and update the import section like this:
# -*- coding: utf-8 -*-
# rpcontacts/views.py

# Snip...
from PyQt5.QtCore import Qt
from PyQt5.QtWidgets import (
    QAbstractItemView,
    QDialog,
    QDialogButtonBox,
    QFormLayout,
    QHBoxLayout,
    QLineEdit,
    QMainWindow,
    QMessageBox,
    QPushButton,
    QTableView,
    QVBoxLayout,
    QWidget,
)
The highlighted lines in the above code import the required classes to build the Add Contact diálogo. With these classes in your namespace, add the following class at the end of views.py :
 1# -*- coding: utf-8 -*-
 2# rpcontacts/views.py
 3
 4# Snip...
 5class AddDialog(QDialog):
 6    """Add Contact dialog."""
 7    def __init__(self, parent=None):
 8        """Initializer."""
 9        super().__init__(parent=parent)
10        self.setWindowTitle("Add Contact")
11        self.layout = QVBoxLayout()
12        self.setLayout(self.layout)
13        self.data = None
14
15        self.setupUI()
16
17    def setupUI(self):
18        """Setup the Add Contact dialog's GUI."""
19        # Create line edits for data fields
20        self.nameField = QLineEdit()
21        self.nameField.setObjectName("Name")
22        self.jobField = QLineEdit()
23        self.jobField.setObjectName("Job")
24        self.emailField = QLineEdit()
25        self.emailField.setObjectName("Email")
26        # Lay out the data fields
27        layout = QFormLayout()
28        layout.addRow("Name:", self.nameField)
29        layout.addRow("Job:", self.jobField)
30        layout.addRow("Email:", self.emailField)
31        self.layout.addLayout(layout)
32        # Add standard buttons to the dialog and connect them
33        self.buttonsBox = QDialogButtonBox(self)
34        self.buttonsBox.setOrientation(Qt.Horizontal)
35        self.buttonsBox.setStandardButtons(
36            QDialogButtonBox.Ok | QDialogButtonBox.Cancel
37        )
38        self.buttonsBox.accepted.connect(self.accept)
39        self.buttonsBox.rejected.connect(self.reject)
40        self.layout.addWidget(self.buttonsBox)
There are a lot of things happening in this code. Here’s a summary:
- Line 5 defines a new class that inherits from
QDialog. - Lines 7 to 15 define the class initializer. In this case, the most relevant addition is
.data, which is an instance attribute that you’ll use to hold the data your users provide.
In .setupUI() , you define the dialog’s GUI:
- Lines 20 to 25 add three
QLineEditobjects:name,job, andemail. You’ll use these line edits to take the user’s input for the name, job description, and email of the contact to add. They represent the corresponding fields in the database. - Lines 27 to 30 create a
QFormLayoutinstance that arranges the line edits in a form. This layout manager also provides user-friendly labels for each line edit or field. - Lines 33 to 37 add a
QDialogButtonBoxobject that provides two standard buttons:OK and Cancel . The OK button accepts the user’s input and the Cancel button rejects it. - Lines 38 and 39 connect the dialog’s built-in
.accepted()and.rejected()signals with the.accept()andreject()slots, respectively. In this case, you’ll rely on the dialog’s built-in.reject()slot, which closes the dialog without processing the input. Other than that, you just need to code the.accept()slot.
To code the dialog’s .accept() slot, you need to consider that any user input needs validation to make sure that it’s correct and safe. This is especially true when you’re working with SQL databases because of the risk of an SQL injection attack.
In this example, you’ll add a minimal validation rule just to make sure that the user provides data for each input field in the dialog. However, adding your own, more robust validation rules would be a good exercise.
Without further ado, get back to AddDialog and add the following code for its .accept() slot:
 1# -*- coding: utf-8 -*-
 2# rpcontacts/views.py
 3
 4# Snip...
 5class AddDialog(QDialog):
 6    def __init__(self, parent=None):
 7        # Snip...
 8
 9    def setupUI(self):
10        # Snip...
11
12    def accept(self):
13        """Accept the data provided through the dialog."""
14        self.data = []
15        for field in (self.nameField, self.jobField, self.emailField):
16            if not field.text():
17                QMessageBox.critical(
18                    self,
19                    "Error!",
20                    f"You must provide a contact's {field.objectName()}",
21                )
22                self.data = None  # Reset .data
23                return
24
25            self.data.append(field.text())
26
27        if not self.data:
28            return
29
30        super().accept()
The code within .accept() does the following:
- Line 14 initializes
.datato an empty list ([]). This list will store the user’s input data. - Line 15 defines a
forloop that iterates over the three line edits, or fields, in the dialog. - Lines 16 to 23 define a conditional statement that checks if the user has provided data for each field in the dialog. If not, then the dialog shows an error message that warns the user about the missing data.
- Line 25 adds the user’s input for each field to
.data. - Line 30 calls the superclass’s
.accept()slot to provide the standard behavior that closes the dialog after the user clicks OK .
With this code, you’re ready to add a new slot to the contact book’s main window. This slot will launch the dialog, and if the user provides valid input, then the slot will use the model to save the newly added contact to the database.
Launching the Add Contact Dialog
Now that you’ve coded the Add Contact dialog, it’s time to add a new slot to Window so you can launch the dialog by clicking Add and process the user’s input once they click OK .
Go to the definition of Window and add the following code:
 1# -*- coding: utf-8 -*-
 2# rpcontacts/views.py
 3
 4# Snip...
 5class Window(QMainWindow):
 6    # Snip...
 7
 8    def setupUI(self):
 9        # Snip...
10        self.addButton = QPushButton("Add...")
11        self.addButton.clicked.connect(self.openAddDialog)
12        # Snip...
13
14    def openAddDialog(self):
15        """Open the Add Contact dialog."""
16        dialog = AddDialog(self)
17        if dialog.exec() == QDialog.Accepted:
18            self.contactsModel.addContact(dialog.data)
19            self.table.resizeColumnsToContents()
Here’s a summary of what’s happening in the above code:
- Line 11 connects the
.clicked()signal of the Add button to the newly created slot,.openAddDialog(). This way, a click on the button will automatically call the slot. - Line 14 defines the
.openAddDialog()slot. - Line 16 creates an instance of
AddDialog. - Lines 17 to 19 define a conditional statement to check if the dialog was accepted. If so, then line 14 calls
.addContact()on the data model with the dialog’s.dataattribute as an argument. The final statement in theifcode block resizes the table view to fit the size of its updated content.
Now that you have a way to launch the Add Contact dialog and to process its data, you need to provide the code for .addContact() in your data model. That’s a topic for the next section.
Processing the Add Dialog’s Data in the Model
In this section, you’ll add a method called .addContact() to your data model, ContactsModel . Open model.py in your code editor, go to the definition of ContactsModel , and add the following code:
 1# -*- coding: utf-8 -*-
 2# rpcontacts/model.py
 3
 4# Snip...
 5class ContactsModel:
 6    # Snip...
 7
 8    def addContact(self, data):
 9        """Add a contact to the database."""
10        rows = self.model.rowCount()
11        self.model.insertRows(rows, 1)
12        for column, field in enumerate(data):
13            self.model.setData(self.model.index(rows, column + 1), field)
14        self.model.submitAll()
15        self.model.select()
Inside .addContact() , the code does the following:
- Line 10 gets the current number of rows in the data model.
- Line 11 inserts a new row at the end of the data model.
- Lines 12 and 13 run a
forloop that inserts every item indatainto the corresponding cell in the data model. To do this, line 9 calls.setData()on the model, with the index of the cell and the current datafieldas arguments. - Line 14 submits the changes to the database by calling
.submitAll()on the model. - Line 15 reloads the data from the database into the model.
If you run the application with these new additions, then you’ll get the following behavior:
Now when you click Add , the Add Contact dialog appears on your screen. You can use the dialog to provide the required information for a new contact and to add the contact to the database by clicking OK .
Step 6:Deleting Existing Contacts
The final feature you’ll add to the contact book application is the ability to remove contacts from the database using the GUI.
Again, you’ll find all the files and the code added or modified in this section under the source_code_step_6/ directory. You can download them by clicking the link below:
Get the Source Code: Click here to get the source code you’ll use to build a contact book with Python, PyQt, and SQLite in this tutorial.
In this section, you’ll first add the capability to delete a single contact at a time. Then you’ll add code to remove all the contacts from the database.
Deleting Selected Contacts
To remove a single contact from the contact database, you need to select the desired contact in the table view on the contact book’s main window. Once you’ve selected the contact, you can click Delete to perform the operation on the database.
Go to the model.py module and add the following code to implement .deleteContact() inside ContactsModel :
# -*- coding: utf-8 -*-
# rpcontacts/model.py

# Snip...
class ContactsModel:
    # Snip...

    def deleteContact(self, row):
        """Remove a contact from the database."""
        self.model.removeRow(row)
        self.model.submitAll()
        self.model.select()
This method has three lines of code. The first line removes the selected row . The second line submits the change to the database. Finally, the third line reloads the data into the model.
Next, get back to the views.py module and add the code behind the Delete button in Window :
# -*- coding: utf-8 -*-
# rpcontacts/views.py

# Snip...
class Window(QMainWindow):
    # Snip...

    def setupUI(self):
        """Setup the main window's GUI."""
        # Snip...
        self.deleteButton = QPushButton("Delete")
        self.deleteButton.clicked.connect(self.deleteContact)
        # Snip...

    def deleteContact(self):
        """Delete the selected contact from the database."""
        row = self.table.currentIndex().row()
        if row < 0:
            return

        messageBox = QMessageBox.warning(
            self,
            "Warning!",
            "Do you want to remove the selected contact?",
            QMessageBox.Ok | QMessageBox.Cancel,
        )

        if messageBox == QMessageBox.Ok:
            self.contactsModel.deleteContact(row)
In the first highlighted line, you connect the .clicked() signal of the Delete button to the .deleteContact() ranura. This connection triggers a call to .deleteContact() every time the user clicks the button.
In .deleteContact() , you first get the index of the currently selected row in the table view. The if statement checks if the index is lower than 0 , which would mean that there are no contacts in the table view. If so, then the method returns immediately without performing any further actions.
Then the method shows a warning message confirming that the user wants to delete the selected contact. If the user accepts the operation, then .deleteContact(row) gets called. In this case, row represents the index of the currently selected row in the table.
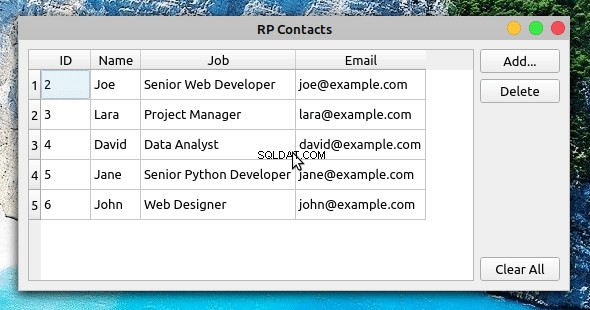
After these additions, you can run the application again to get the following behavior:
Now when you select a contact from the table view and click Delete , you’re presented with a warning message. If you click the message dialog’s OK button, then the application removes the selected contact from the database, updating the table view accordingly.
Clearing the Contact Database
To remove all the contacts from the database, you’ll start by adding a method called .clearContacts() to ContactsModel . Open your model.py module and add the following method at the end of the class:
 1# -*- coding: utf-8 -*-
 2# rpcontacts/model.py
 3
 4# Snip...
 5class ContactsModel:
 6    # Snip...
 7
 8    def clearContacts(self):
 9        """Remove all contacts in the database."""
10        self.model.setEditStrategy(QSqlTableModel.OnManualSubmit)
11        self.model.removeRows(0, self.model.rowCount())
12        self.model.submitAll()
13        self.model.setEditStrategy(QSqlTableModel.OnFieldChange)
14        self.model.select()
Here’s what each line of code does:
- Line 10 sets the data model’s
.editStrategyproperty toQSqlTableModel.OnManualSubmit. This allows you to cache all the changes until you call.submitAll()mas tarde. You need to do this because you’re changing several rows at the same time. - Line 11 removes all the rows from the model.
- Line 12 saves changes to the database.
- Line 13 resets the model’s
.editStrategyproperty to its original value,QSqlTableModel.OnFieldChange. If you don’t reset this property to its original value, then you won’t be able to update the contacts directly in the table view. - Line 14 reloads the data into the model.
Once you’ve coded .clearContacts() , you can get back to the views.py file and update Window with the following code:
# -*- coding: utf-8 -*-
# rpcontacts/views.py

# Snip...
class Window(QMainWindow):
    # Snip...

    def setupUI(self):
        """Setup the main window's GUI."""
        # Snip...
        self.clearAllButton = QPushButton("Clear All")
        self.clearAllButton.clicked.connect(self.clearContacts)
        # Snip...

    def clearContacts(self):
        """Remove all contacts from the database."""
        messageBox = QMessageBox.warning(
            self,
            "Warning!",
            "Do you want to remove all your contacts?",
            QMessageBox.Ok | QMessageBox.Cancel,
        )

        if messageBox == QMessageBox.Ok:
            self.contactsModel.clearContacts()
The first highlighted line in this code connects the .clicked() signal of the Clear All button to the .clearContacts() slot below.
In .clearContacts() , you first create a message dialog, messageBox , to ask the user to confirm the removing operation. If the user confirms the operation by clicking OK , then .clearContacts() gets called on the model to remove all the contacts from the database:
That’s it! With this last piece of code, your contact book application is complete. The application provides features that allow your users to display, add, update, and remove contacts from the database.
Conclusion
Building a contact book GUI application with Python, PyQt, and SQLite is an excellent exercise for you to expand your skills with these tools and as a developer in general. Coding projects like this allows you to apply the knowledge and skills you already have and also pushes you to research and learn about new topics every time you encounter a new programming problem.
In this tutorial, you learned how to:
- Build the GUI for a contact book application using PyQt
- Use PyQt’s SQL support to connect the application to an SQLite database
- Use PyQt’s Model-View architecture to work with the application’s database
You can download the complete source code for the contact book application and also the code to complete each step in this tutorial by clicking the link below:
Get the Source Code: Click here to get the source code you’ll use to build a contact book with Python, PyQt, and SQLite in this tutorial.
Next Steps
At this point, you’ve completed a fully functional contact book project. The application provides minimal functionality, but it’s a good starting point to continue adding features and take your Python and PyQt skills to the next level. Here are some next step ideas that you can implement:
-
Add new data fields: Adding new data fields to store more information about your contacts would be great. For example, you can add the contact’s photo, phone number, web page, Twitter handle, and so on. To do this, you might need to create new tables and set up relations between them. PyQt provides the
QSqlRelationalTableModel, which defines an editable data model for a single table and provides foreign key support. -
Provide search capability: Giving your users a way to search for a contact in the database is arguably a must-have feature in this kind of application. To implement it, you can use PyQt’s
QSqlQueryandQSqlQueryModel. -
Add back-up capability: Providing a way of backing up contact information is another interesting feature. Users might face problems with their computers and lose their data. You can provide options to upload the data to a cloud service or to back it up to an external disk.
These are just a few ideas for how you can continue adding features to your contact book. Take the challenge and build something amazing on top of this!