Todos los programas procesan datos de una forma u otra, y muchos necesitan poder guardar y recuperar esos datos de una invocación a la siguiente. Python, SQLite y SQLAlchemy brindan a sus programas la funcionalidad de la base de datos, lo que le permite almacenar datos en un solo archivo sin necesidad de un servidor de base de datos.
Puede lograr resultados similares utilizando archivos planos en cualquier cantidad de formatos, incluidos CSV, JSON, XML e incluso formatos personalizados. Los archivos planos suelen ser archivos de texto legibles por humanos, aunque también pueden ser datos binarios, con una estructura que un programa informático puede analizar. A continuación, explorará el uso de bases de datos SQL y archivos sin formato para el almacenamiento y la manipulación de datos y aprenderá a decidir qué enfoque es el adecuado para su programa.
En este tutorial, aprenderá a usar:
- Archivos planos para almacenamiento de datos
- SQL para mejorar el acceso a datos persistentes
- SQLite para almacenamiento de datos
- Alquimia SQL para trabajar con datos como objetos de Python
Puede obtener todo el código y los datos que verá en este tutorial haciendo clic en el siguiente enlace:
Descargue el código de muestra: Haga clic aquí para obtener el código que usará para aprender sobre la administración de datos con SQLite y SQLAlchemy en este tutorial.
Uso de archivos planos para el almacenamiento de datos
Un archivo plano es un archivo que contiene datos sin jerarquía interna y normalmente sin referencias a archivos externos. Los archivos planos contienen caracteres legibles por humanos y son muy útiles para crear y leer datos. Debido a que no tienen que usar anchos de campo fijos, los archivos planos a menudo usan otras estructuras para que un programa pueda analizar el texto.
Por ejemplo, los archivos de valores separados por comas (CSV) son líneas de texto sin formato en las que el carácter de coma separa los elementos de datos. Cada línea de texto representa una fila de datos y cada valor separado por comas es un campo dentro de esa fila. El carácter de coma delimitador indica el límite entre los valores de datos.
Python sobresale en la lectura y el guardado de archivos. Ser capaz de leer archivos de datos con Python le permite restaurar una aplicación a un estado útil cuando la vuelva a ejecutar en otro momento. Poder guardar datos en un archivo le permite compartir información del programa entre usuarios y sitios donde se ejecuta la aplicación.
Antes de que un programa pueda leer un archivo de datos, debe poder comprender los datos. Por lo general, esto significa que el archivo de datos debe tener alguna estructura que la aplicación pueda usar para leer y analizar el texto en el archivo.
A continuación se muestra un archivo CSV llamado author_book_publisher.csv , utilizado por el primer programa de ejemplo en este tutorial:
first_name,last_name,title,publisher
Isaac,Asimov,Foundation,Random House
Pearl,Buck,The Good Earth,Random House
Pearl,Buck,The Good Earth,Simon & Schuster
Tom,Clancy,The Hunt For Red October,Berkley
Tom,Clancy,Patriot Games,Simon & Schuster
Stephen,King,It,Random House
Stephen,King,It,Penguin Random House
Stephen,King,Dead Zone,Random House
Stephen,King,The Shining,Penguin Random House
John,Le Carre,"Tinker, Tailor, Soldier, Spy: A George Smiley Novel",Berkley
Alex,Michaelides,The Silent Patient,Simon & Schuster
Carol,Shaben,Into The Abyss,Simon & Schuster
La primera línea proporciona una lista de campos separados por comas, que son los nombres de columna para los datos que siguen en las líneas restantes. El resto de las líneas contienen los datos, y cada línea representa un único registro.
A continuación, verá algunas de las ventajas y desventajas de usar archivos planos como el CSV anterior para trabajar con sus datos.
Ventajas de los archivos planos
Trabajar con datos en archivos planos es manejable y fácil de implementar. Tener los datos en un formato legible por humanos es útil no solo para crear el archivo de datos con un editor de texto, sino también para examinar los datos y buscar inconsistencias o problemas.
Muchas aplicaciones pueden exportar versiones de archivos sin formato de los datos generados por el archivo. Por ejemplo, Excel puede importar o exportar un archivo CSV hacia y desde una hoja de cálculo. Los archivos planos también tienen la ventaja de ser autónomos y transferibles si desea compartir los datos.
Casi todos los lenguajes de programación tienen herramientas y bibliotecas que facilitan el trabajo con archivos CSV. Python tiene el csv incorporado módulo y el poderoso módulo pandas disponibles, lo que hace que trabajar con archivos CSV sea una solución potente.
Desventajas de los archivos planos
Las ventajas de trabajar con archivos planos comienzan a disminuir a medida que los datos aumentan de tamaño. Los archivos grandes aún son legibles por humanos, pero editarlos para crear datos o buscar problemas se vuelve una tarea más difícil. Si su aplicación cambiará los datos en el archivo, entonces una solución sería leer todo el archivo en la memoria, realizar los cambios y escribir los datos en otro archivo.
Otro problema con el uso de archivos sin formato es que deberá crear y mantener explícitamente cualquier relación entre partes de sus datos y el programa de aplicación dentro de la sintaxis del archivo. Además, deberá generar código en su aplicación para usar esas relaciones.
Una complicación final es que las personas con las que desea compartir su archivo de datos también necesitarán conocer y actuar sobre las estructuras y relaciones que ha creado en los datos. Para acceder a la información, esos usuarios deberán comprender no solo la estructura de los datos, sino también las herramientas de programación necesarias para acceder a ellos.
Ejemplo de archivo plano
El programa de ejemplo examples/example_1/main.py utiliza el author_book_publisher.csv archivo para obtener los datos y las relaciones en él. Este archivo CSV mantiene una lista de autores, los libros que han publicado y los editores de cada uno de los libros.
project/data directorio. También hay un archivo de programa en el project/build_data directorio que genera los datos. Esa aplicación es útil si cambia los datos y desea volver a un estado conocido.
Para obtener acceso a los archivos de datos utilizados en esta sección y en todo el tutorial, haga clic en el siguiente enlace:
Descargue el código de muestra: Haga clic aquí para obtener el código que usará para aprender sobre la administración de datos con SQLite y SQLAlchemy en este tutorial.
El archivo CSV presentado arriba es un archivo de datos bastante pequeño que contiene solo algunos autores, libros y editores. También debe notar algunas cosas sobre los datos:
-
Los autores Stephen King y Tom Clancy aparecen más de una vez porque en los datos se representan varios libros que han publicado.
-
Los autores Stephen King y Pearl Buck tienen el mismo libro publicado por más de una editorial.
Estos campos de datos duplicados crean relaciones entre otras partes de los datos. Un autor puede escribir muchos libros y un editor puede trabajar con varios autores. Los autores y editores comparten relaciones con libros individuales.
Las relaciones en el author_book_publisher.csv están representados por campos que aparecen varias veces en diferentes filas del archivo de datos. Debido a esta redundancia de datos, los datos representan más de una sola tabla bidimensional. Verá más de esto cuando use el archivo para crear un archivo de base de datos SQLite.
El programa de ejemplo examples/example_1/main.py utiliza las relaciones incrustadas en author_book_publisher.csv archivo para generar algunos datos. Primero presenta una lista de los autores y el número de libros que ha escrito cada uno. A continuación, muestra una lista de editoriales y el número de autores para los que cada uno ha publicado libros.
También utiliza el treelib módulo para mostrar una jerarquía de árbol de los autores, libros y editores.
Por último, agrega un nuevo libro a los datos y vuelve a mostrar la jerarquía del árbol con el nuevo libro en su lugar. Aquí está el main() función de punto de entrada para este programa:
 1def main():
 2    """The main entry point of the program"""
 3    # Get the resources for the program
 4    with resources.path(
 5        "project.data", "author_book_publisher.csv"
 6    ) as filepath:
 7        data = get_data(filepath)
 8
 9    # Get the number of books printed by each publisher
10    books_by_publisher = get_books_by_publisher(data, ascending=False)
11    for publisher, total_books in books_by_publisher.items():
12        print(f"Publisher: {publisher}, total books: {total_books}")
13    print()
14
15    # Get the number of authors each publisher publishes
16    authors_by_publisher = get_authors_by_publisher(data, ascending=False)
17    for publisher, total_authors in authors_by_publisher.items():
18        print(f"Publisher: {publisher}, total authors: {total_authors}")
19    print()
20
21    # Output hierarchical authors data
22    output_author_hierarchy(data)
23
24    # Add a new book to the data structure
25    data = add_new_book(
26        data,
27        author_name="Stephen King",
28        book_title="The Stand",
29        publisher_name="Random House",
30    )
31
32    # Output the updated hierarchical authors data
33    output_author_hierarchy(data)
El código de Python anterior sigue los siguientes pasos:
- Líneas 4 a 7 leer el
author_book_publisher.csvarchivo en un marco de datos de pandas. - Líneas 10 a 13 imprime el número de libros publicados por cada editorial.
- Líneas 16 a 19 imprime el número de autores asociados con cada editorial.
- Línea 22 genera los datos del libro como una jerarquía ordenada por autores.
- Líneas 25 a 30 agregue un nuevo libro a la estructura en memoria.
- Línea 33 genera los datos del libro como una jerarquía ordenada por autores, incluido el libro recién agregado.
La ejecución de este programa genera el siguiente resultado:
$ python main.py
Publisher: Simon & Schuster, total books: 4
Publisher: Random House, total books: 4
Publisher: Penguin Random House, total books: 2
Publisher: Berkley, total books: 2

Publisher: Simon & Schuster, total authors: 4
Publisher: Random House, total authors: 3
Publisher: Berkley, total authors: 2
Publisher: Penguin Random House, total authors: 1

Authors
├── Alex Michaelides
│   └── The Silent Patient
│       └── Simon & Schuster
├── Carol Shaben
│   └── Into The Abyss
│       └── Simon & Schuster
├── Isaac Asimov
│   └── Foundation
│       └── Random House
├── John Le Carre
│   └── Tinker, Tailor, Soldier, Spy: A George Smiley Novel
│       └── Berkley
├── Pearl Buck
│   └── The Good Earth
│       ├── Random House
│       └── Simon & Schuster
├── Stephen King
│   ├── Dead Zone
│   │   └── Random House
│   ├── It
│   │   ├── Penguin Random House
│   │   └── Random House
│   └── The Shining
│       └── Penguin Random House
└── Tom Clancy
    ├── Patriot Games
    │   └── Simon & Schuster
    └── The Hunt For Red October
        └── Berkley
La jerarquía de autores anterior se presenta dos veces en el resultado, con la adición de The Stand de Stephen King. , publicado por Random House. La salida actual anterior se ha editado y muestra solo la salida de la primera jerarquía para ahorrar espacio.
main() llama a otras funciones para realizar la mayor parte del trabajo. La primera función que llama es get_data() :
def get_data(filepath):
    """Get book data from the csv file"""
    return pd.read_csv(filepath)
Esta función toma la ruta del archivo al archivo CSV y usa pandas para leerlo en un DataFrame de pandas, que luego se devuelve a la persona que llama. El valor de retorno de esta función se convierte en la estructura de datos que se pasa a las demás funciones que componen el programa.
get_books_by_publisher() calcula el número de libros publicados por cada editorial. La serie pandas resultante usa la funcionalidad de pandas GroupBy para agrupar por editor y luego ordenar según el ascending bandera:
def get_books_by_publisher(data, ascending=True):
    """Return the number of books by each publisher as a pandas series"""
    return data.groupby("publisher").size().sort_values(ascending=ascending)
get_authors_by_publisher() hace esencialmente lo mismo que la función anterior, pero para los autores:
def get_authors_by_publisher(data, ascending=True):
    """Returns the number of authors by each publisher as a pandas series"""
    return (
        data.assign(name=data.first_name.str.cat(data.last_name, sep=" "))
        .groupby("publisher")
        .nunique()
        .loc[:, "name"]
        .sort_values(ascending=ascending)
    )
add_new_book() crea un nuevo libro en el DataFrame de pandas. El código comprueba si el autor, el libro o la editorial ya existen. De lo contrario, crea un nuevo libro y lo agrega al marco de datos de pandas:
def add_new_book(data, author_name, book_title, publisher_name):
    """Adds a new book to the system"""
    # Does the book exist?
    first_name, _, last_name = author_name.partition(" ")
    if any(
        (data.first_name == first_name)
        & (data.last_name == last_name)
        & (data.title == book_title)
        & (data.publisher == publisher_name)
    ):
        return data
    # Add the new book
    return data.append(
        {
            "first_name": first_name,
            "last_name": last_name,
            "title": book_title,
            "publisher": publisher_name,
        },
        ignore_index=True,
    )
output_author_hierarchy() usa for bucles para iterar a través de los niveles de la estructura de datos. Luego usa el treelib módulo para generar una lista jerárquica de los autores, los libros que han publicado y las editoriales que han publicado esos libros:
def output_author_hierarchy(data):
    """Output the data as a hierarchy list of authors"""
    authors = data.assign(
        name=data.first_name.str.cat(data.last_name, sep=" ")
    )
    authors_tree = Tree()
    authors_tree.create_node("Authors", "authors")
    for author, books in authors.groupby("name"):
        authors_tree.create_node(author, author, parent="authors")
        for book, publishers in books.groupby("title")["publisher"]:
            book_id = f"{author}:{book}"
            authors_tree.create_node(book, book_id, parent=author)
            for publisher in publishers:
                authors_tree.create_node(publisher, parent=book_id)

    # Output the hierarchical authors data
    authors_tree.show()
Esta aplicación funciona bien e ilustra el poder disponible para usted con el módulo pandas. El módulo proporciona una excelente funcionalidad para leer un archivo CSV e interactuar con los datos.
Sigamos adelante y creemos un programa que funcione de manera idéntica usando Python, una versión de la base de datos SQLite de los datos del autor y la publicación, y SQLAlchemy para interactuar con esos datos.
Uso de SQLite para conservar datos
Como vio anteriormente, hay datos redundantes en author_book_publisher.csv expediente. Por ejemplo, toda la información sobre The Good Earth de Pearl Buck aparece dos veces porque dos editoriales diferentes han publicado el libro.
Imagínese si este archivo de datos contuviera más datos relacionados, como la dirección y el número de teléfono del autor, las fechas de publicación y los ISBN de los libros, o las direcciones, los números de teléfono y quizás los ingresos anuales de las editoriales. Estos datos se duplicarían para cada elemento de datos raíz, como autor, libro o editorial.
Es posible crear datos de esta manera, pero sería excepcionalmente difícil de manejar. Piense en los problemas para mantener actualizado este archivo de datos. ¿Y si Stephen King quisiera cambiar su nombre? Tendría que actualizar varios registros que contengan su nombre y asegurarse de que no haya errores tipográficos.
Peor que la duplicación de datos sería la complejidad de agregar otras relaciones a los datos. ¿Qué pasaría si decidiera agregar números de teléfono para los autores y tuvieran números de teléfono para el hogar, el trabajo, el móvil y tal vez más? Cada nueva relación que desee agregar para cualquier elemento raíz multiplicará la cantidad de registros por la cantidad de elementos en esa nueva relación.
Este problema es una de las razones por las que existen relaciones en los sistemas de bases de datos. Un tema importante en la ingeniería de bases de datos es la normalización de bases de datos. , o el proceso de separar los datos para reducir la redundancia y aumentar la integridad. Cuando la estructura de una base de datos se amplía con nuevos tipos de datos, normalizarla de antemano reduce al mínimo los cambios en la estructura existente.
La base de datos SQLite está disponible en Python y, según la página de inicio de SQLite, se usa más que todos los demás sistemas de bases de datos combinados. Ofrece un sistema de administración de base de datos relacional (RDBMS) con todas las funciones que funciona con un solo archivo para mantener toda la funcionalidad de la base de datos.
También tiene la ventaja de que no requiere un servidor de base de datos separado para funcionar. El formato de archivo de la base de datos es multiplataforma y accesible para cualquier lenguaje de programación compatible con SQLite.
Toda esta es información interesante, pero ¿cómo es relevante para el uso de archivos planos para el almacenamiento de datos? ¡Lo descubrirás a continuación!
Crear una estructura de base de datos
El enfoque de fuerza bruta para obtener el author_book_publisher.csv datos en una base de datos SQLite sería crear una sola tabla que coincidiera con la estructura del archivo CSV. Hacer esto ignoraría gran parte del poder de SQLite.
Bases de datos relacionales proporcionar una forma de almacenar datos estructurados en tablas y establecer relaciones entre esas tablas. Por lo general, utilizan el lenguaje de consulta estructurado (SQL) como la forma principal de interactuar con los datos. Esta es una simplificación excesiva de lo que proporcionan los RDBMS, pero es suficiente para los propósitos de este tutorial.
Una base de datos SQLite proporciona soporte para interactuar con la tabla de datos usando SQL. Un archivo de base de datos SQLite no solo contiene los datos, sino que también tiene una forma estandarizada de interactuar con los datos. Este soporte está incrustado en el archivo, lo que significa que cualquier lenguaje de programación que pueda usar un archivo SQLite también puede usar SQL para trabajar con él.
Interactuar con una base de datos con SQL
SQL es un lenguaje declarativo Se utiliza para crear, administrar y consultar los datos contenidos en una base de datos. Un lenguaje declarativo describe qué se debe lograr en lugar de cómo debe cumplirse. Verá ejemplos de sentencias SQL más adelante cuando empiece a crear tablas de bases de datos.
Estructurando una base de datos con SQL
Para aprovechar el poder de SQL, deberá aplicar cierta normalización de la base de datos a los datos en author_book_publisher.csv expediente. Para hacer esto, separará a los autores, libros y editores en tablas de bases de datos separadas.
Conceptualmente, los datos se almacenan en la base de datos en estructuras de tablas bidimensionales. Cada tabla consta de filas de registros y cada registro consta de columnas o campos , que contiene datos.
Los datos contenidos en los campos son de tipos predefinidos, incluidos texto, enteros, flotantes y más. Los archivos CSV son diferentes porque todos los campos son de texto y deben ser analizados por un programa para que se les asigne un tipo de datos.
Cada registro de la tabla tiene una clave principal definido para dar a un registro un identificador único. La clave principal es similar a la clave en un diccionario de Python. El propio motor de la base de datos a menudo genera la clave principal como un valor entero incremental para cada registro insertado en la tabla de la base de datos.
Aunque el motor de la base de datos suele generar automáticamente la clave principal, no tiene por qué ser así. Si los datos almacenados en un campo son únicos entre todos los demás datos de la tabla en ese campo, entonces puede ser la clave principal. Por ejemplo, una tabla que contenga datos sobre libros podría usar el ISBN del libro como clave principal.
Creación de tablas con SQL
Así es como puede crear las tres tablas que representan a los autores, libros y editores en el archivo CSV usando instrucciones SQL:
CREATE TABLE author (
    author_id INTEGER NOT NULL PRIMARY KEY,
    first_name VARCHAR,
    last_name VARCHAR
);

CREATE TABLE book (
    book_id INTEGER NOT NULL PRIMARY KEY,
    author_id INTEGER REFERENCES author,
    title VARCHAR
);

CREATE TABLE publisher (
    publisher_id INTEGER NOT NULL PRIMARY KEY,
    name VARCHAR
);
Tenga en cuenta que no hay operaciones de archivo, no se crean variables ni estructuras para contenerlas. Las declaraciones describen solo el resultado deseado:la creación de una tabla con atributos particulares. El motor de la base de datos determina cómo hacer esto.
Una vez que haya creado y completado esta tabla con los datos del autor de author_book_publisher.csv archivo, puede acceder a él mediante sentencias SQL. La siguiente declaración (también llamada consulta ) utiliza el carácter comodín (* ) para obtener todos los datos en el author tabla y mostrarlo:
SELECT * FROM author;
Puedes usar el sqlite3 herramienta de línea de comandos para interactuar con author_book_publisher.db archivo de base de datos en el project/data directorio:
$ sqlite3 author_book_publisher.db
Una vez que la herramienta de línea de comandos SQLite se ejecuta con la base de datos abierta, puede ingresar comandos SQL. Aquí está el comando SQL anterior y su salida, seguido de .q comando para salir del programa:
sqlite> SELECT * FROM author;
1|Isaac|Asimov
2|Pearl|Buck
3|Tom|Clancy
4|Stephen|King
5|John|Le Carre
6|Alex|Michaelides
7|Carol|Shaben

sqlite> .q
Tenga en cuenta que cada autor existe solo una vez en la tabla. A diferencia del archivo CSV, que tenía varias entradas para algunos de los autores, aquí solo es necesario un registro único por autor.
Mantener una base de datos con SQL
SQL proporciona formas de trabajar con bases de datos y tablas existentes mediante la inserción de nuevos datos y la actualización o eliminación de datos existentes. Aquí hay una instrucción SQL de ejemplo para insertar un nuevo autor en el author tabla:
INSERT INTO author
    (first_name, last_name)
VALUES ('Paul', 'Mendez');
Esta instrucción SQL inserta los valores 'Paul ‘ y ‘Mendez ‘ en las columnas respectivas first_name y last_name del author mesa.
Observe que el author_id la columna no está especificada. Debido a que esa columna es la clave principal, el motor de la base de datos genera el valor y lo inserta como parte de la ejecución de la declaración.
Actualizar registros en una tabla de base de datos es un proceso sencillo. Por ejemplo, supongamos que Stephen King quisiera ser conocido por su seudónimo, Richard Bachman. Aquí hay una instrucción SQL para actualizar el registro de la base de datos:
UPDATE author
SET first_name = 'Richard', last_name = 'Bachman'
WHERE first_name = 'Stephen' AND last_name = 'King';
La instrucción SQL localiza el registro único para 'Stephen King' usando la declaración condicional WHERE first_name = 'Stephen' AND last_name = 'King' y luego actualiza el first_name y last_name campos con los nuevos valores. SQL usa el signo igual (= ) como operador de comparación y operador de asignación.
También puede eliminar registros de una base de datos. Aquí hay una instrucción SQL de ejemplo para eliminar un registro del author tabla:
DELETE FROM author
WHERE first_name = 'Paul'
AND last_name = 'Mendez';
Esta instrucción SQL elimina una sola fila del author tabla donde el first_name es igual a 'Paul' y el last_name es igual a 'Mendez' .
¡Tenga cuidado al eliminar registros! Las condiciones que establezca deben ser lo más específicas posible. Un condicional demasiado amplio puede hacer que se eliminen más registros de los previstos. Por ejemplo, si la condición se basara solo en la línea first_name = 'Paul' , todos los autores cuyo nombre de pila sea Paul se eliminarán de la base de datos.
active y contienen un valor que se evalúa como Verdadero o Falso, lo que indica si el registro debe incluirse al consultar la base de datos.
Por ejemplo, la siguiente consulta SQL obtendría todas las columnas para todos los registros activos en some_table :
SELECT
  *
FROM some_table
WHERE active = 1;
SQLite no tiene un tipo de datos booleano, por lo que active la columna está representada por un número entero con un valor de 0 o 1 para indicar el estado del expediente. Otros sistemas de bases de datos pueden o no tener tipos de datos booleanos nativos.
Es totalmente posible crear aplicaciones de base de datos en Python usando declaraciones SQL directamente en el código. Al hacerlo, los datos regresan a la aplicación como una lista de listas o una lista de diccionarios.
El uso de SQL sin procesar es una forma perfectamente aceptable de trabajar con los datos devueltos por las consultas a la base de datos. Sin embargo, en lugar de hacer eso, pasará directamente a usar SQLAlchemy para trabajar con bases de datos.
Construcción de relaciones
Otra característica de los sistemas de bases de datos que puede encontrar aún más poderosa y útil que la persistencia y recuperación de datos son las relaciones. . Las bases de datos que admiten relaciones le permiten dividir los datos en varias tablas y establecer conexiones entre ellas.
Los datos en el author_book_publisher.csv El archivo representa los datos y las relaciones mediante la duplicación de datos. Una base de datos maneja esto dividiendo los datos en tres tablas:author , book y publisher —y establecer relaciones entre ellos.
Después de obtener todos los datos que desea en un solo lugar en el archivo CSV, ¿por qué querría dividirlo en varias tablas? ¿No sería más trabajo crear y volver a armar? Eso es cierto hasta cierto punto, ¡pero las ventajas de dividir los datos y volver a juntarlos usando SQL podrían convencerlo!
Relaciones de uno a muchos
Un uno a muchos la relación es como la de un cliente que pide artículos en línea. Un cliente puede tener muchos pedidos, pero cada pedido pertenece a un cliente. El author_book_publisher.db base de datos tiene una relación de uno a muchos en forma de autores y libros. Cada autor puede escribir muchos libros, pero cada libro está escrito por un autor.
Como vio en la creación de la tabla anterior, la implementación de estas entidades separadas es colocar cada una en una tabla de base de datos, una para autores y otra para libros. Pero, ¿cómo se implementa la relación de uno a muchos entre estas dos tablas?
Recuerde, cada tabla en una base de datos tiene un campo designado como clave principal para esa tabla. Cada tabla anterior tiene un campo de clave principal nombrado usando este patrón:<table name>_id .
El book la tabla que se muestra arriba contiene un campo, author_id , que hace referencia al author mesa. El author_id El campo establece una relación de uno a muchos entre autores y libros que se ve así:
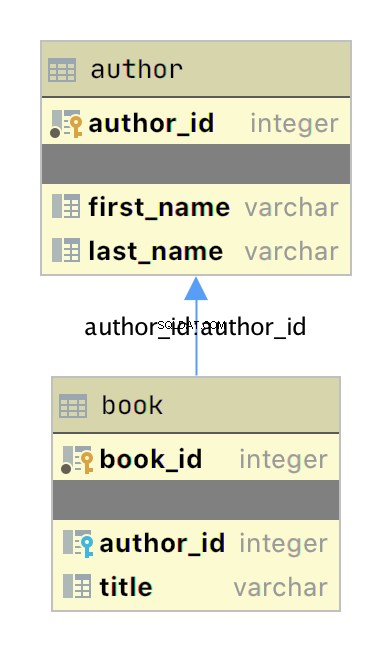
El diagrama anterior es un diagrama entidad-relación (ERD) simple creado con la aplicación JetBrains DataGrip que muestra las tablas author y book como recuadros con sus respectivas claves primarias y campos de datos. Dos elementos gráficos agregan información sobre la relación:
-
Los pequeños iconos de llave amarilla y azul indicar las claves primaria y foránea de la tabla, respectivamente.
-
La flecha que conecta
bookalauthorindica la relación entre las tablas en función delauthor_idclave foránea en elbookmesa.
Cuando agrega un nuevo libro al book tabla, los datos incluyen un author_id valor para un autor existente en el author mesa. De esta manera, todos los libros escritos por un autor tienen una relación de búsqueda con ese autor único.
Ahora que tiene tablas separadas para autores y libros, ¿cómo usa la relación entre ellos? SQL admite lo que se llama JOIN operación, que puede usar para decirle a la base de datos cómo conectar dos o más tablas.
La siguiente consulta SQL se une al author y book tabla usando la aplicación de línea de comandos SQLite:
sqlite> SELECT
   ...> a.first_name || ' ' || a.last_name AS author_name,
   ...> b.title AS book_title
   ...> FROM author a
   ...> JOIN book b ON b.author_id = a.author_id
   ...> ORDER BY a.last_name ASC;
Isaac Asimov|Foundation
Pearl Buck|The Good Earth
Tom Clancy|The Hunt For Red October
Tom Clancy|Patriot Games
Stephen King|It
Stephen King|Dead Zone
Stephen King|The Shining
John Le Carre|Tinker, Tailor, Soldier, Spy: A George Smiley Novel
Alex Michaelides|The Silent Patient
Carol Shaben|Into The Abyss
La consulta SQL anterior recopila información tanto del autor como de la tabla del libro uniendo las tablas usando la relación establecida entre las dos. La concatenación de cadenas SQL asigna el nombre completo del autor al alias author_name . Los datos recopilados por la consulta se ordenan en orden ascendente por el last_name campo.
Hay algunas cosas a tener en cuenta en la instrucción SQL. Primero, los autores se presentan por sus nombres completos en una sola columna y se ordenan por sus apellidos. Además, los autores aparecen en la salida varias veces debido a la relación de uno a varios. El nombre de un autor se duplica para cada libro que ha escrito en la base de datos.
Al crear tablas separadas para autores y libros y establecer la relación entre ellos, ha reducido la redundancia en los datos. Ahora solo tiene que editar los datos de un autor en un solo lugar, y ese cambio aparece en cualquier consulta SQL que acceda a los datos.
Relaciones de muchos a muchos
Muchos a muchos existen relaciones en el author_book_publisher.db base de datos entre autores y editores, así como entre libros y editores. Un autor puede trabajar con muchas editoriales y una editorial puede trabajar con muchos autores. De manera similar, un libro puede ser publicado por muchas editoriales, y una editorial puede publicar muchos libros.
Manejar esta situación en la base de datos es más complicado que una relación de uno a muchos porque la relación va en ambos sentidos. Las relaciones de muchos a muchos se crean mediante una tabla de asociación acting as a bridge between the two related tables.
The association table contains at least two foreign key fields, which are the primary keys of each of the two associated tables. This SQL statement creates the association table relating the author and publisher tables:
CREATE TABLE author_publisher (
    author_id INTEGER REFERENCES author,
    publisher_id INTEGER REFERENCES publisher
);
The SQL statements create a new author_publisher table referencing the primary keys of the existing author and publisher mesas. The author_publisher table is an association table establishing relationships between an author and a publisher.
Because the relationship is between two primary keys, there’s no need to create a primary key for the association table itself. The combination of the two related keys creates a unique identifier for a row of data.
As before, you use the JOIN keyword to connect two tables together. Connecting the author table to the publisher table is a two-step process:
JOINtheauthortable with theauthor_publishermesa.JOINtheauthor_publishertable with thepublishertable.
The author_publisher association table provides the bridge through which the JOIN connects the two tables. Here’s an example SQL query returning a list of authors and the publishers publishing their books:
 1sqlite> SELECT
 2   ...> a.first_name || ' ' || a.last_name AS author_name,
 3   ...> p.name AS publisher_name
 4   ...> FROM author a
 5   ...> JOIN author_publisher ap ON ap.author_id = a.author_id
 6   ...> JOIN publisher p ON p.publisher_id = ap.publisher_id
 7   ...> ORDER BY a.last_name ASC;
 8Isaac Asimov|Random House
 9Pearl Buck|Random House
10Pearl Buck|Simon & Schuster
11Tom Clancy|Berkley
12Tom Clancy|Simon & Schuster
13Stephen King|Random House
14Stephen King|Penguin Random House
15John Le Carre|Berkley
16Alex Michaelides|Simon & Schuster
17Carol Shaben|Simon & Schuster
The statements above perform the following actions:
-
Line 1 starts a
SELECTstatement to get data from the database. -
Line 2 selects the first and last name from the
authortable using theaalias for theauthortable and concatenates them together with a space character. -
Line 3 selects the publisher’s name aliased to
publisher_name. -
Line 4 uses the
authortable as the first source from which to retrieve data and assigns it to the aliasa. -
Line 5 is the first step of the process outlined above for connecting the
authortable to thepublishermesa. It uses the aliasapfor theauthor_publisherassociation table and performs aJOINoperation to connect theap.author_idforeign key reference to thea.author_idprimary key in theauthormesa. -
Line 6 is the second step in the two-step process mentioned above. It uses the alias
pfor thepublishertable and performs aJOINoperation to relate theap.publisher_idforeign key reference to thep.publisher_idprimary key in thepublishermesa. -
Line 7 sorts the data by the author’s last name in ascending alphabetical order and ends the SQL query.
-
Lines 8 to 17 are the output of the SQL query.
Note that the data in the source author and publisher tables are normalized, with no data duplication. Yet the returned results have duplicated data where necessary to answer the SQL query.
The SQL query above demonstrates how to make use of a relationship using the SQL JOIN keyword, but the resulting data is a partial re-creation of the author_book_publisher.csv CSV data. What’s the win for having done the work of creating a database to separate the data?
Here’s another SQL query to show a little bit of the power of SQL and the database engine:
 1sqlite> SELECT
 2   ...> a.first_name || ' ' || a.last_name AS author_name,
 3   ...> COUNT(b.title) AS total_books
 4   ...> FROM author a
 5   ...> JOIN book b ON b.author_id = a.author_id
 6   ...> GROUP BY author_name
 7   ...> ORDER BY total_books DESC, a.last_name ASC;
 8Stephen King|3
 9Tom Clancy|2
10Isaac Asimov|1
11Pearl Buck|1
12John Le Carre|1
13Alex Michaelides|1
14Carol Shaben|1
The SQL query above returns the list of authors and the number of books they’ve written. The list is sorted first by the number of books in descending order, then by the author’s name in alphabetical order:
-
Line 1 begins the SQL query with the
SELECTpalabra clave. -
Line 2 selects the author’s first and last names, separated by a space character, and creates the alias
author_name. -
Line 3 counts the number of books written by each author, which will be used later by the
ORDER BYclause to sort the list. -
Line 4 selects the
authortable to get data from and creates theaalias. -
Line 5 connects to the related
booktable through aJOINto theauthor_idand creates thebalias for thebookmesa. -
Line 6 generates the aggregated author and total number of books data by using the
GROUP BYkeyword.GROUP BYis what groups eachauthor_nameand controls what books are tallied byCOUNT()for that author. -
Line 7 sorts the output first by number of books in descending order, then by the author’s last name in ascending alphabetical order.
-
Lines 8 to 14 are the output of the SQL query.
In the above example, you take advantage of SQL to perform aggregation calculations and sort the results into a useful order. Having the database perform calculations based on its built-in data organization ability is usually faster than performing the same kinds of calculations on raw data sets in Python. SQL offers the advantages of using set theory embedded in RDBMS databases.
Entity Relationship Diagrams
An entity-relationship diagram (ERD) is a visual depiction of an entity-relationship model for a database or part of a database. The author_book_publisher.db SQLite database is small enough that the entire database can be visualized by the diagram shown below:
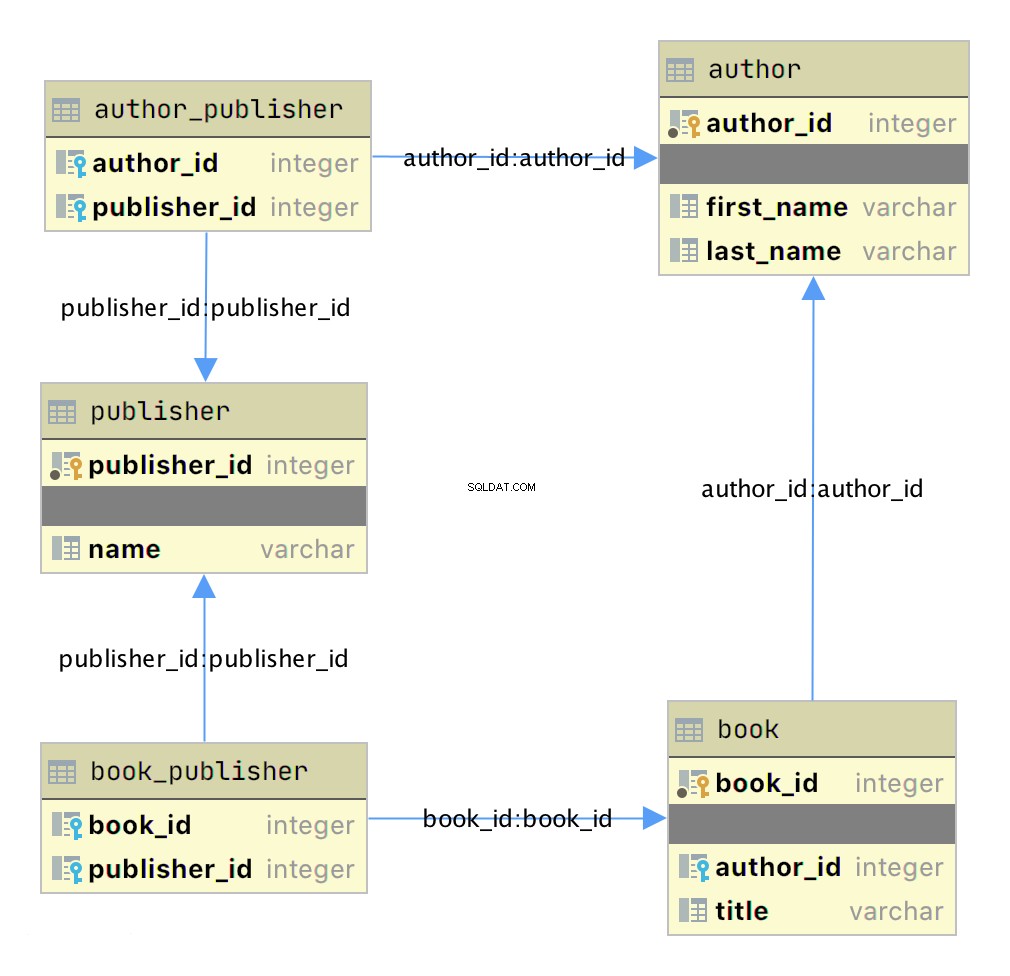
This diagram presents the table structures in the database and the relationships between them. Each box represents a table and contains the fields defined in the table, with the primary key indicated first if it exists.
The arrows show the relationships between the tables connecting a foreign key field in one table to a field, often the primary key, in another table. The table book_publisher has two arrows, one connecting it to the book table and another connecting it to the publisher mesa. The arrow indicates the many-to-many relationship between the book and publisher mesas. The author_publisher table provides the same relationship between author and publisher .
Working With SQLAlchemy and Python Objects
SQLAlchemy is a powerful database access tool kit for Python, with its object-relational mapper (ORM) being one of its most famous components, and the one discussed and used here.
When you’re working in an object-oriented language like Python, it’s often useful to think in terms of objects. It’s possible to map the results returned by SQL queries to objects, but doing so works against the grain of how the database works. Sticking with the scalar results provided by SQL works against the grain of how Python developers work. This problem is known as object-relational impedance mismatch.
The ORM provided by SQLAlchemy sits between the SQLite database and your Python program and transforms the data flow between the database engine and Python objects. SQLAlchemy allows you to think in terms of objects and still retain the powerful features of a database engine.
The Model
One of the fundamental elements to enable connecting SQLAlchemy to a database is creating a model . The model is a Python class defining the data mapping between the Python objects returned as a result of a database query and the underlying database tables.
The entity-relationship diagram displayed earlier shows boxes connected with arrows. The boxes are the tables built with the SQL commands and are what the Python classes will model. The arrows are the relationships between the tables.
The models are Python classes inheriting from an SQLAlchemy Base clase. The Base class provides the interface operations between instances of the model and the database table.
Below is the models.py file that creates the models to represent the author_book_publisher.db database:
 1from sqlalchemy import Column, Integer, String, ForeignKey, Table
 2from sqlalchemy.orm import relationship, backref
 3from sqlalchemy.ext.declarative import declarative_base
 4
 5Base = declarative_base()
 6
 7author_publisher = Table(
 8    "author_publisher",
 9    Base.metadata,
10    Column("author_id", Integer, ForeignKey("author.author_id")),
11    Column("publisher_id", Integer, ForeignKey("publisher.publisher_id")),
12)
13
14book_publisher = Table(
15    "book_publisher",
16    Base.metadata,
17    Column("book_id", Integer, ForeignKey("book.book_id")),
18    Column("publisher_id", Integer, ForeignKey("publisher.publisher_id")),
19)
20
21class Author(Base):
22    __tablename__ = "author"
23    author_id = Column(Integer, primary_key=True)
24    first_name = Column(String)
25    last_name = Column(String)
26    books = relationship("Book", backref=backref("author"))
27    publishers = relationship(
28        "Publisher", secondary=author_publisher, back_populates="authors"
29    )
30
31class Book(Base):
32    __tablename__ = "book"
33    book_id = Column(Integer, primary_key=True)
34    author_id = Column(Integer, ForeignKey("author.author_id"))
35    title = Column(String)
36    publishers = relationship(
37        "Publisher", secondary=book_publisher, back_populates="books"
38    )
39
40class Publisher(Base):
41    __tablename__ = "publisher"
42    publisher_id = Column(Integer, primary_key=True)
43    name = Column(String)
44    authors = relationship(
45        "Author", secondary=author_publisher, back_populates="publishers"
46    )
47    books = relationship(
48        "Book", secondary=book_publisher, back_populates="publishers"
49    )
Here’s what’s going on in this module:
-
Line 1 imports the
Column,Integer,String,ForeignKey, andTableclasses from SQLAlchemy, which are used to help define the model attributes. -
Line 2 imports the
relationship()andbackrefobjects, which are used to create the relationships between objects. -
Line 3 imports the
declarative_baseobject, which connects the database engine to the SQLAlchemy functionality of the models. -
Line 5 creates the
Baseclass, which is what all models inherit from and how they get SQLAlchemy ORM functionality. -
Lines 7 to 12 create the
author_publisherassociation table model. -
Lines 14 to 19 create the
book_publisherassociation table model. -
Lines 21 to 29 define the
Authorclass model to theauthordatabase table. -
Lines 31 to 38 define the
Bookclass model to thebookdatabase table. -
Lines 40 to 49 define the
Publisherclass model to thepublisherdatabase table.
The description above shows the mapping of the five tables in the author_book_publisher.db base de datos. But it glosses over some SQLAlchemy ORM features, including Table , ForeignKey , relationship() , and backref . Let’s get into those now.
Table Creates Associations
author_publisher and book_publisher are both instances of the Table class that create the many-to-many association tables used between the author and publisher tables and the book and publisher tables, respectively.
The SQLAlchemy Table class creates a unique instance of an ORM mapped table within the database. The first parameter is the table name as defined in the database, and the second is Base.metadata , which provides the connection between the SQLAlchemy functionality and the database engine.
The rest of the parameters are instances of the Column class defining the table fields by name, their type, and in the example above, an instance of a ForeignKey .
ForeignKey Creates a Connection
The SQLAlchemy ForeignKey class defines a dependency between two Column fields in different tables. A ForeignKey is how you make SQLAlchemy aware of the relationships between tables. For example, this line from the author_publisher instance creation establishes a foreign key relationship:
Column("author_id", Integer, ForeignKey("author.author_id"))
The statement above tells SQLAlchemy that there’s a column in the author_publisher table named author_id . The type of that column is Integer , and author_id is a foreign key related to the primary key in the author mesa.
Having both author_id and publisher_id defined in the author_publisher Table instance creates the connection from the author table to the publisher table and vice versa, establishing a many-to-many relationship.
relationship() Establishes a Collection
Having a ForeignKey defines the existence of the relationship between tables but not the collection of books an author can have. Take a look at this line in the Author class definition:
books = relationship("Book", backref=backref("author"))
The code above defines a parent-child collection. The books attribute being plural (which is not a requirement, just a convention) is an indication that it’s a collection.
The first parameter to relationship() , the class name Book (which is not the table name book ), is the class to which the books attribute is related. The relationship informs SQLAlchemy that there’s a relationship between the Author and Book clases SQLAlchemy will find the relationship in the Book class definition:
author_id = Column(Integer, ForeignKey("author.author_id"))
SQLAlchemy recognizes that this is the ForeignKey connection point between the two classes. You’ll get to the backref parameter in relationship() in a moment.
The other relationship in Author is to the Publisher clase. This is created with the following statement in the Author class definition:
publishers = relationship(
    "Publisher", secondary=author_publisher, back_populates="authors"
)
Like books , the attribute publishers indicates a collection of publishers associated with an author. The first parameter, "Publisher" , informs SQLAlchemy what the related class is. The second and third parameters are secondary=author_publisher and back_populates="authors" :
-
secondarytells SQLAlchemy that the relationship to thePublisherclass is through a secondary table, which is theauthor_publisherassociation table created earlier inmodels.py. Thesecondaryparameter makes SQLAlchemy find thepublisher_idForeignKeydefined in theauthor_publisherassociation table. -
back_populatesis a convenience configuration telling SQLAlchemy that there’s a complementary collection in thePublisherclass calledauthors.
backref Mirrors Attributes
The backref parameter of the books collection relationship() creates an author attribute for each Book instance. This attribute refers to the parent Author that the Book instance is related to.
For example, if you executed the following Python code, then a Book instance would be returned from the SQLAlchemy query. The Book instance has attributes that can be used to print out information about the book:
book = session.query(Book).filter_by(Book.title == "The Stand").one_or_none()
print(f"Authors name: {book.author.first_name} {book.author.last_name}")
The existence of the author attribute in the Book above is because of the backref definición. A backref can be very handy to have when you need to refer to the parent and all you have is a child instance.
Queries Answer Questions
You can make a basic query like SELECT * FROM author; in SQLAlchemy like this:
results = session.query(Author).all()
The session is an SQLAlchemy object used to communicate with SQLite in the Python example programs. Here, you tell the session you want to execute a query against the Author model and return all records.
At this point, the advantages of using SQLAlchemy instead of plain SQL might not be obvious, especially considering the setup required to create the models representing the database. The results returned by the query is where the magic happens. Instead of getting back a list of lists of scalar data, you’ll get back a list of instances of Author objects with attributes matching the column names you defined.
The books and publishers collections maintained by SQLAlchemy create a hierarchical list of authors and the books they’ve written as well as the publishers who’ve published them.
Behind the scenes, SQLAlchemy turns the object and method calls into SQL statements to execute against the SQLite database engine. SQLAlchemy transforms the data returned by SQL queries into Python objects.
With SQLAlchemy, you can perform the more complex aggregation query shown earlier for the list of authors and the number of books they’ve written like this:
author_book_totals = (
    session.query(
        Author.first_name,
        Author.last_name,
        func.count(Book.title).label("book_total")
    )
    .join(Book)
    .group_by(Author.last_name)
    .order_by(desc("book_total"))
    .all()
)
The query above gets the author’s first and last name, along with a count of the number of books that the author has written. The aggregating count used by the group_by clause is based on the author’s last name. Finally, the results are sorted in descending order based on the aggregated and aliased book_total .
Example Program
The example program examples/example_2/main.py has the same functionality as examples/example_1/main.py but uses SQLAlchemy exclusively to interface with the author_book_publisher.db SQLite database. The program is broken up into the main() function and the functions it calls:
 1def main():
 2    """Main entry point of program"""
 3    # Connect to the database using SQLAlchemy
 4    with resources.path(
 5        "project.data", "author_book_publisher.db"
 6    ) as sqlite_filepath:
 7        engine = create_engine(f"sqlite:///{sqlite_filepath}")
 8    Session = sessionmaker()
 9    Session.configure(bind=engine)
10    session = Session()
11
12    # Get the number of books printed by each publisher
13    books_by_publisher = get_books_by_publishers(session, ascending=False)
14    for row in books_by_publisher:
15        print(f"Publisher: {row.name}, total books: {row.total_books}")
16    print()
17
18    # Get the number of authors each publisher publishes
19    authors_by_publisher = get_authors_by_publishers(session)
20    for row in authors_by_publisher:
21        print(f"Publisher: {row.name}, total authors: {row.total_authors}")
22    print()
23
24    # Output hierarchical author data
25    authors = get_authors(session)
26    output_author_hierarchy(authors)
27
28    # Add a new book
29    add_new_book(
30        session,
31        author_name="Stephen King",
32        book_title="The Stand",
33        publisher_name="Random House",
34    )
35    # Output the updated hierarchical author data
36    authors = get_authors(session)
37    output_author_hierarchy(authors)
This program is a modified version of examples/example_1/main.py . Let’s go over the differences:
-
Lines 4 to 7 first initialize the
sqlite_filepathvariable to the database file path. Then they create theenginevariable to communicate with SQLite and theauthor_book_publisher.dbdatabase file, which is SQLAlchemy’s access point to the database. -
Line 8 creates the
Sessionclass from the SQLAlchemy’ssessionmaker(). -
Line 9 binds the
Sessionto the engine created in line 8. -
Line 10 creates the
sessioninstance, which is used by the program to communicate with SQLAlchemy.
The rest of the function is similar, except for the replacement of data with session as the first parameter to all the functions called by main() .
get_books_by_publisher() has been refactored to use SQLAlchemy and the models you defined earlier to get the data requested:
 1def get_books_by_publishers(session, ascending=True):
 2    """Get a list of publishers and the number of books they've published"""
 3    if not isinstance(ascending, bool):
 4        raise ValueError(f"Sorting value invalid: {ascending}")
 5
 6    direction = asc if ascending else desc
 7
 8    return (
 9        session.query(
10            Publisher.name, func.count(Book.title).label("total_books")
11        )
12        .join(Publisher.books)
13        .group_by(Publisher.name)
14        .order_by(direction("total_books"))
15    )
Here’s what the new function, get_books_by_publishers() , is doing:
-
Line 6 creates the
directionvariable and sets it equal to the SQLAlchemydescorascfunction depending on the value of theascendingparámetro. -
Lines 9 to 11 query the
Publishertable for data to return, which in this case arePublisher.nameand the aggregate total ofBookobjects associated with an author, aliased tototal_books. -
Line 12 joins to the
Publisher.bookscolección. -
Line 13 aggregates the book counts by the
Publisher.nameattribute. -
Line 14 sorts the output by the book counts according to the operator defined by
direction. -
Line 15 closes the object, executes the query, and returns the results to the caller.
All the above code expresses what is wanted rather than how it’s to be retrieved. Now instead of using SQL to describe what’s wanted, you’re using Python objects and methods. What’s returned is a list of Python objects instead of a list of tuples of data.
get_authors_by_publisher() has also been modified to work exclusively with SQLAlchemy. Its functionality is very similar to the previous function, so a function description is omitted:
def get_authors_by_publishers(session, ascending=True):
    """Get a list of publishers and the number of authors they've published"""
    if not isinstance(ascending, bool):
        raise ValueError(f"Sorting value invalid: {ascending}")

    direction = asc if ascending else desc

    return (
        session.query(
            Publisher.name,
            func.count(Author.first_name).label("total_authors"),
        )
        .join(Publisher.authors)
        .group_by(Publisher.name)
        .order_by(direction("total_authors"))
    )
get_authors() has been added to get a list of authors sorted by their last names. The result of this query is a list of Author objects containing a collection of books. The Author objects already contain hierarchical data, so the results don’t have to be reformatted:
def get_authors(session):
    """Get a list of author objects sorted by last name"""
    return session.query(Author).order_by(Author.last_name).all()
Like its previous version, add_new_book() is relatively complex but straightforward to understand. It determines if a book with the same title, author, and publisher exists in the database already.
If the search query finds an exact match, then the function returns. If no book matches the exact search criteria, then it searches to see if the author has written a book using the passed in title. This code exists to prevent duplicate books from being created in the database.
If no matching book exists, and the author hasn’t written one with the same title, then a new book is created. The function then retrieves or creates an author and publisher. Once instances of the Book , Author and Publisher exist, the relationships between them are created, and the resulting information is saved to the database:
 1def add_new_book(session, author_name, book_title, publisher_name):
 2    """Adds a new book to the system"""
 3    # Get the author's first and last names
 4    first_name, _, last_name = author_name.partition(" ")
 5
 6    # Check if book exists
 7    book = (
 8        session.query(Book)
 9        .join(Author)
10        .filter(Book.title == book_title)
11        .filter(
12            and_(
13                Author.first_name == first_name, Author.last_name == last_name
14            )
15        )
16        .filter(Book.publishers.any(Publisher.name == publisher_name))
17        .one_or_none()
18    )
19    # Does the book by the author and publisher already exist?
20    if book is not None:
21        return
22
23    # Get the book by the author
24    book = (
25        session.query(Book)
26        .join(Author)
27        .filter(Book.title == book_title)
28        .filter(
29            and_(
30                Author.first_name == first_name, Author.last_name == last_name
31            )
32        )
33        .one_or_none()
34    )
35    # Create the new book if needed
36    if book is None:
37        book = Book(title=book_title)
38
39    # Get the author
40    author = (
41        session.query(Author)
42        .filter(
43            and_(
44                Author.first_name == first_name, Author.last_name == last_name
45            )
46        )
47        .one_or_none()
48    )
49    # Do we need to create the author?
50    if author is None:
51        author = Author(first_name=first_name, last_name=last_name)
52        session.add(author)
53
54    # Get the publisher
55    publisher = (
56        session.query(Publisher)
57        .filter(Publisher.name == publisher_name)
58        .one_or_none()
59    )
60    # Do we need to create the publisher?
61    if publisher is None:
62        publisher = Publisher(name=publisher_name)
63        session.add(publisher)
64
65    # Initialize the book relationships
66    book.author = author
67    book.publishers.append(publisher)
68    session.add(book)
69
70    # Commit to the database
71    session.commit()
The code above is relatively long. Let’s break the functionality down to manageable sections:
-
Lines 7 to 18 set the
bookvariable to an instance of aBookif a book with the same title, author, and publisher is found. Otherwise, they setbooktoNone. -
Lines 20 and 21 determine if the book already exists and return if it does.
-
Lines 24 to 37 set the
bookvariable to an instance of aBookif a book with the same title and author is found. Otherwise, they create a newBookinstancia. -
Lines 40 to 52 set the
authorvariable to an existing author, if found, or create a newAuthorinstance based on the passed-in author name. -
Lines 55 to 63 set the
publishervariable to an existing publisher, if found, or create a newPublisherinstance based on the passed-in publisher name. -
Line 66 sets the
book.authorinstance to theauthorinstance. This creates the relationship between the author and the book, which SQLAlchemy will create in the database when the session is committed. -
Line 67 adds the
publisherinstance to thebook.publishersrecopilación. This creates the many-to-many relationship between thebookandpublishermesas. SQLAlchemy will create references in the tables as well as in thebook_publisherassociation table that connects the two. -
Line 68 adds the
Bookinstance to the session, making it part of the session’s unit of work. -
Line 71 commits all the creations and updates to the database.
There are a few things to take note of here. First, there’s is no mention of the author_publisher or book_publisher association tables in either the queries or the creations and updates. Because of the work you did in models.py setting up the relationships, SQLAlchemy can handle connecting objects together and keeping those tables in sync during creations and updates.
Second, all the creations and updates happen within the context of the session objeto. None of that activity is touching the database. Only when the session.commit() statement executes does the session then go through its unit of work and commit that work to the database.
For example, if a new Book instance is created (as in line 37 above), then the book has its attributes initialized except for the book_id primary key and author_id foreign key. Because no database activity has happened yet, the book_id is unknown, and nothing was done in the instantiation of book to give it an author_id .
When session.commit() is executed, one of the things it will do is insert book into the database, at which point the database will create the book_id Clave primaria. The session will then initialize the book.book_id value with the primary key value created by the database engine.
session.commit() is also aware of the insertion of the Book instance in the author.books recopilación. The author object’s author_id primary key will be added to the Book instance appended to the author.books collection as the author_id foreign key.
Providing Access to Multiple Users
To this point, you’ve seen how to use pandas, SQLite, and SQLAlchemy to access the same data in different ways. For the relatively straightforward use case of the author, book, and publisher data, it could still be a toss-up whether you should use a database.
One deciding factor when choosing between using a flat file or a database is data and relationship complexity. If the data for each entity is complicated and contains many relationships between the entities, then creating and maintaining it in a flat file might become more difficult.
Another factor to consider is whether you want to share the data between multiple users. The solution to this problem might be as simple as using a sneakernet to physically move data between users. Moving data files around this way has the advantage of ease of use, but the data can quickly get out of sync when changes are made.
The problem of keeping the data consistent for all users becomes even more difficult if the users are remote and want to access the data across networks. Even when you’re limited to a single language like Python and using pandas to access the data, network file locking isn’t sufficient to ensure the data doesn’t get corrupted.
Providing the data through a server application and a user interface alleviates this problem. The server is the only application that needs file-level access to the database. By using a database, the server can take advantage of SQL to access the data using a consistent interface no matter what programming language the server uses.
The last example program demonstrates this by providing a web application and user interface to the Chinook sample SQLite database. Peter Stark generously maintains the Chinook database as part of the SQLite Tutorial site. If you’d like to learn more about SQLite and SQL in general, then the site is a great resource.
The Chinook database provides artist, music, and playlist information along the lines of a simplified Spotify. The database is part of the example code project in the project/data carpeta.
Using Flask With Python, SQLite, and SQLAlchemy
The examples/example_3/chinook_server.py program creates a Flask application that you can interact with using a browser. The application makes use of the following technologies:
-
Flask Blueprint is part of Flask and provides a good way to follow the separation of concerns design principle and create distinct modules to contain functionality.
-
Flask SQLAlchemy is an extension for Flask that adds support for SQLAlchemy in your web applications.
-
Flask_Bootstrap4 packages the Bootstrap front-end tool kit, integrating it with your Flask web applications.
-
Flask_WTF extends Flask with WTForms, giving your web applications a useful way to generate and validate web forms.
-
python_dotenv is a Python module that an application uses to read environment variables from a file and keep sensitive information out of program code.
Though not necessary for this example, a .env file holds the environment variables for the application. The .env file exists to contain sensitive information like passwords, which you should keep out of your code files. However, the content of the project .env file is shown below since it doesn’t contain any sensitive data:
SECRET_KEY = "you-will-never-guess"
SQLALCHEMY_TRACK_MODIFICATIONS = False
SQLAlCHEMY_ECHO = False
DEBUG = True
The example application is fairly large, and only some of it is relevant to this tutorial. For this reason, examining and learning from the code is left as an exercise for the reader. That said, you can take a look at an animated screen capture of the application below, followed by the HTML that renders the home page and the Python Flask route that provides the dynamic data.
Here’s the application in action, navigating through various menus and features:
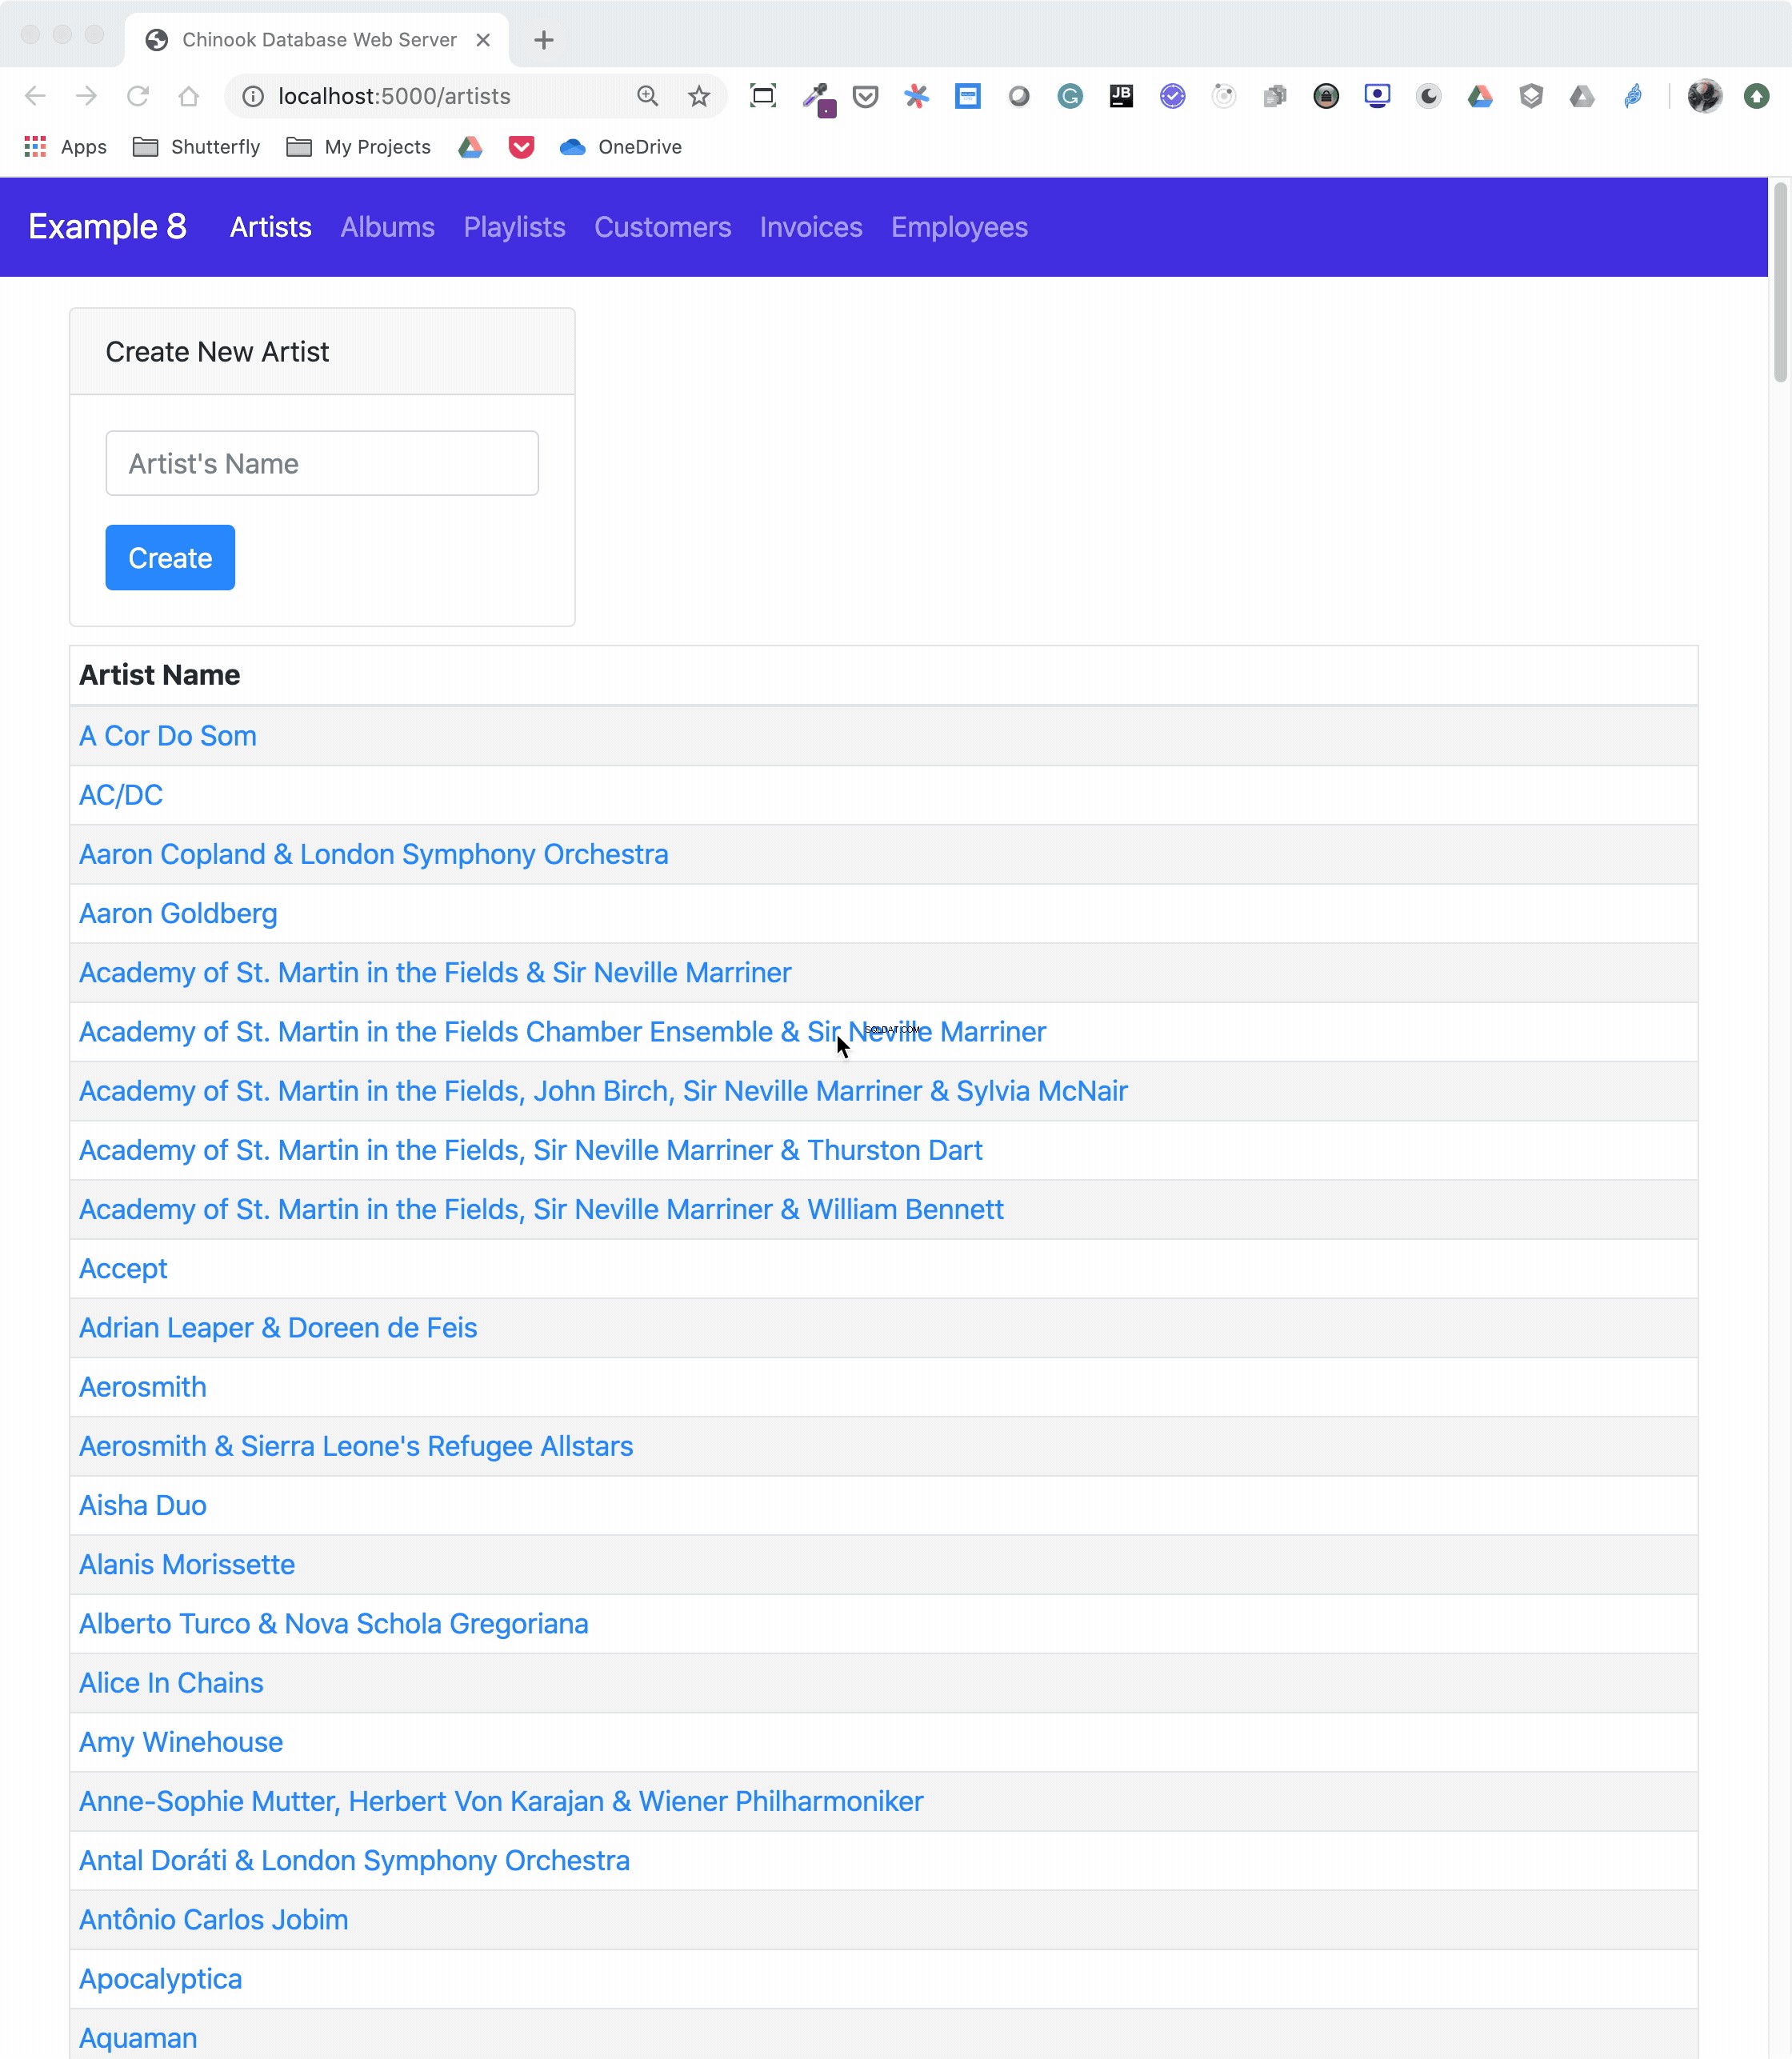
The animated screen capture starts on the application home page, styled using Bootstrap 4. The page displays the artists in the database, sorted in ascending order. The remainder of the screen capture presents the results of clicking on the displayed links or navigating around the application from the top-level menu.
Here’s the Jinja2 HTML template that generates the home page of the application:
 1{% extends "base.html" %}
 2
 3{% block content %}
 4<div class="container-fluid">
 5  <div class="m-4">
 6    <div class="card" style="width: 18rem;">
 7      <div class="card-header">Create New Artist</div>
 8      <div class="card-body">
 9        <form method="POST" action="{{url_for('artists_bp.artists')}}">
10          {{ form.csrf_token }}
11          {{ render_field(form.name, placeholder=form.name.label.text) }}
12          <button type="submit" class="btn btn-primary">Create</button>
13        </form>
14      </div>
15    </div>
16    <table class="table table-striped table-bordered table-hover table-sm">
17      <caption>List of Artists</caption>
18      <thead>
19        <tr>
20          <th>Artist Name</th>
21        </tr>
22      </thead>
23      <tbody>
24        {% for artist in artists %}
25        <tr>
26          <td>
27            <a href="{{url_for('albums_bp.albums', artist_id=artist.artist_id)}}">
28              {{ artist.name }}
29            </a>
30          </td>
31        </tr>
32        {% endfor %}
33      </tbody>
34    </table>
35  </div>
36</div>
37{% endblock %}
Here’s what’s going on in this Jinja2 template code:
-
Line 1 uses Jinja2 template inheritance to build this template from the
base.htmlmodelo. Thebase.htmltemplate contains all the HTML5 boilerplate code as well as the Bootstrap navigation bar consistent across all pages of the site. -
Lines 3 to 37 contain the block content of the page, which is incorporated into the Jinja2 macro of the same name in the
base.htmlbase template. -
Lines 9 to 13 render the form to create a new artist. This uses the features of Flask-WTF to generate the form.
-
Lines 24 to 32 create a
forloop that renders the table of artist names. -
Lines 27 to 29 render the artist name as a link to the artist’s album page showing the songs associated with a particular artist.
Here’s the Python route that renders the page:
 1from flask import Blueprint, render_template, redirect, url_for
 2from flask_wtf import FlaskForm
 3from wtforms import StringField
 4from wtforms.validators import InputRequired, ValidationError
 5from app import db
 6from app.models import Artist
 7
 8# Set up the blueprint
 9artists_bp = Blueprint(
10    "artists_bp", __name__, template_folder="templates", static_folder="static"
11)
12
13def does_artist_exist(form, field):
14    artist = (
15        db.session.query(Artist)
16        .filter(Artist.name == field.data)
17        .one_or_none()
18    )
19    if artist is not None:
20        raise ValidationError("Artist already exists", field.data)
21
22class CreateArtistForm(FlaskForm):
23    name = StringField(
24        label="Artist's Name", validators=[InputRequired(), does_artist_exist]
25    )
26
27@artists_bp.route("/")
28@artists_bp.route("/artists", methods=["GET", "POST"])
29def artists():
30    form = CreateArtistForm()
31
32    # Is the form valid?
33    if form.validate_on_submit():
34        # Create new artist
35        artist = Artist(name=form.name.data)
36        db.session.add(artist)
37        db.session.commit()
38        return redirect(url_for("artists_bp.artists"))
39
40    artists = db.session.query(Artist).order_by(Artist.name).all()
41    return render_template("artists.html", artists=artists, form=form,)
Let’s go over what the above code is doing:
-
Lines 1 to 6 import all the modules necessary to render the page and initialize forms with data from the database.
-
Lines 9 to 11 create the blueprint for the artists page.
-
Lines 13 to 20 create a custom validator function for the Flask-WTF forms to make sure a request to create a new artist doesn’t conflict with an already existing artist.
-
Lines 22 to 25 create the form class to handle the artist form rendered in the browser and provide validation of the form field inputs.
-
Lines 27 to 28 connect two routes to the
artists()function they decorate. -
Line 30 creates an instance of the
CreateArtistForm()class. -
Line 33 determines if the page was requested through the HTTP methods GET or POST (submit). If it was a POST, then it also validates the fields of the form and informs the user if the fields are invalid.
-
Lines 35 to 37 create a new artist object, add it to the SQLAlchemy session, and commit the artist object to the database, persisting it.
-
Line 38 redirects back to the artists page, which will be rerendered with the newly created artist.
-
Line 40 runs an SQLAlchemy query to get all the artists in the database and sort them by
Artist.name. -
Line 41 renders the artists page if the HTTP request method was a GET.
You can see that a great deal of functionality is created by a reasonably small amount of code.
Creating a REST API Server
You can also create a web server providing a REST API. This kind of server offers URL endpoints responding with data, often in JSON format. A server providing REST API endpoints can be used by JavaScript single-page web applications through the use of AJAX HTTP requests.
Flask is an excellent tool for creating REST applications. For a multi-part series of tutorials about using Flask, Connexion, and SQLAlchemy to create REST applications, check out Python REST APIs With Flask, Connexion, and SQLAlchemy.
If you’re a fan of Django and are interested in creating REST APIs, then check out Django Rest Framework – An Introduction and Create a Super Basic REST API with Django Tastypie.
Beyond that, if you’ve implemented your website with SQLAlchemy, then it’s possible to move the data from SQLite to another database such as MySQL or PostgreSQL. For a comparison of SQLite, MySQL, and PostgreSQL that will help you make decisions about which one will serve your application best, check out Introduction to Python SQL Libraries.
It’s well worth considering SQLite for your Python application, no matter what it is. Using a database gives your application versatility, and it might create surprising opportunities to add additional features.
Conclusión
You’ve covered a lot of ground in this tutorial about databases, SQLite, SQL, and SQLAlchemy! You’ve used these tools to move data contained in flat files to an SQLite database, access the data with SQL and SQLAlchemy, and provide that data through a web server.
In this tutorial, you’ve learned:
- Why an SQLite database can be a compelling alternative to flat-file data storage
- How to normalize data to reduce data redundancy and increase data integrity
- How to use SQLAlchemy to work with databases in an object-oriented manner
- How to build a web application to serve a database to multiple users
Working with databases is a powerful abstraction for working with data that adds significant functionality to your Python programs and allows you to ask interesting questions of your data.
You can get all of the code and data you saw in this tutorial at the link below:
Download the sample code: Click here to get the code you’ll use to learn about data management with SQLite and SQLAlchemy in this tutorial.
Further Reading
This tutorial is an introduction to using databases, SQL, and SQLAlchemy, but there’s much more to learn about these subjects. These are powerful, sophisticated tools that no single tutorial can cover adequately. Here are some resources for additional information to expand your skills:
-
If your application will expose the database to users, then avoiding SQL injection attacks is an important skill. For more information, check out Preventing SQL Injection Attacks With Python.
-
Providing web access to a database is common in web-based single-page applications. To learn how, check out Python REST APIs With Flask, Connexion, and SQLAlchemy – Part 2.
-
Preparing for data engineering job interviews gives you a leg up in your career. To get started, check out Data Engineer Interview Questions With Python.
-
Migrating data and being able to roll back using Flask with Postgres and SQLAlchemy is an integral part of the Software Development Life Cycle (SDLC). You can learn more about it by checking out Flask by Example – Setting up Postgres, SQLAlchemy, and Alembic.