Introducción
Tarde o temprano, cualquier sistema de información obtiene una base de datos, a menudo, más de una. Con el tiempo, esa base de datos recopila muchos datos, desde varios GB hasta decenas de TB. Para comprender cómo funcionarán las funciones con el aumento de los volúmenes de datos, necesitamos generar los datos para llenar esa base de datos.

Todos los scripts presentados e implementados se ejecutarán en JobEmplDB base de datos de un servicio de contratación. La realización de la base de datos está disponible aquí.
Enfoques al llenado de datos en bases de datos para pruebas y desarrollo
El desarrollo y las pruebas de la base de datos implican dos enfoques principales para completar los datos:
- Para copiar toda la base de datos del entorno de producción con datos personales y otros datos confidenciales modificados. De esta manera, asegura los datos y borra los datos confidenciales.
- Para generar datos sintéticos. Significa generar datos de prueba similares a los datos reales en aspecto, propiedades e interconexiones.
La ventaja del Enfoque 1 es que aproxima los datos y su distribución por diferentes criterios a la base de datos de producción. Nos permite analizar todo con precisión y, por tanto, sacar conclusiones y pronosticar en consecuencia.
Sin embargo, este enfoque no le permite aumentar la base de datos muchas veces. Se vuelve problemático predecir cambios en la funcionalidad de todo el sistema de información en el futuro.
Por otro lado, puede analizar datos desinfectados impersonales tomados de la base de datos de producción. Basándose en ellos, puede definir cómo generar los datos de prueba que serían como los datos reales por su apariencia, propiedades e interrelaciones. De esta manera, el Enfoque 1 produce el Enfoque 2.
Ahora, revisemos en detalle ambos enfoques para el llenado de datos en bases de datos para pruebas y desarrollo.
Copia y alteración de datos en una base de datos de producción
Primero, definamos el algoritmo general de copiar y cambiar los datos del entorno de producción.
El algoritmo general
El algoritmo general es el siguiente:
- Cree una nueva base de datos vacía.
- Cree un esquema en esa base de datos recién creada:el mismo sistema que el de la base de datos de producción.
- Copie los datos necesarios de la base de datos de producción en la base de datos recién creada.
- Desinfecte y cambie los datos secretos en la nueva base de datos.
- Haga una copia de seguridad de la base de datos recién creada.
- Entregue y restaure la copia de seguridad en el entorno necesario.
Sin embargo, el algoritmo se vuelve más complicado después del paso 5. Por ejemplo, el paso 6 requiere un entorno protegido específico para las pruebas preliminares. Esa etapa debe garantizar que todos los datos sean impersonales y que se modifiquen los datos secretos.
Después de esa etapa, puede volver al paso 5 nuevamente para la base de datos probada en el entorno de no producción protegido. Luego, reenvía la copia de seguridad probada a los entornos necesarios para restaurarla y usarla para desarrollo y pruebas.
Hemos presentado el algoritmo general de copia y cambio de datos de la base de datos de producción. Describamos cómo implementarlo.
Realización del algoritmo general
Una nueva creación de base de datos vacía
Puede crear una base de datos vacía con la ayuda de la construcción CREAR BASE DE DATOS como aquí.
La base de datos se llama JobEmplDB_Test . Tiene tres grupos de archivos:
- PRIMARIO – es el grupo de archivos principal por defecto. Define dos archivos:JobEmplDB_Test1(ruta D:\DBData\JobEmplDB_Test1.mdf) y JobEmplDB_Test2 (ruta D:\DBData\JobEmplDB_Test2.ndf) . El tamaño inicial de cada archivo es de 64 Mb y el paso de crecimiento es de 8 Mb para cada archivo.
- Grupo de tabla DB – un grupo de archivos personalizado que determina dos archivos:JobEmplDB_TestTableGroup1 (ruta D:\DBData\JobEmplDB_TestTableGroup1.ndf) y JobEmplDB_TestTableGroup2 (ruta D:\DBData\JobEmplDB_TestTableGroup2.ndf) . El tamaño inicial de cada archivo es de 8 Gb y el paso de crecimiento es de 1 Gb para cada archivo.
- Grupo DBIndex – un grupo de archivos personalizado que determina dos archivos:JobEmplDB_TestIndexGroup1 (ruta D:\DBData\JobEmplDB_TestIndexGroup1.ndf) y JobEmplDB_TestIndexGroup2 (ruta D:\DBData\JobEmplDB_TestIndexGroup2.ndf) . El tamaño inicial es de 16 Gb para cada archivo y el paso de crecimiento es de 1 Gb para cada archivo.
Además, esta base de datos incluye un diario de transacciones:JobEmplDB_Testlog , ruta E:\DBLog\JobEmplDB_Testlog.ldf . El tamaño inicial del archivo es de 8 Gb y el paso de crecimiento es de 1 Gb.
Copia del esquema y los datos necesarios de la base de datos de producción a una base de datos recién creada
Para copiar el esquema y los datos necesarios de la base de datos de producción a la nueva, puede utilizar varias herramientas. Primero, es Visual Studio (SSDT). O bien, puede usar utilidades de terceros como:
- Comparación de esquemas de DbForge y comparación de datos de DbForge
- ApexSQL Diff y Apex Data Diff
- Herramienta de comparación SQL y herramienta de comparación de datos SQL
Hacer scripts para cambios de datos
Requisitos esenciales para los scripts de cambios de datos
1. Debe ser imposible restaurar los datos reales usando ese script.
Por ejemplo, la inversión de las líneas no servirá, ya que nos permite restaurar los datos reales. Por lo general, el método consiste en reemplazar cada carácter o byte por un carácter o byte pseudoaleatorio. Lo mismo se aplica a la fecha y la hora.
2. El cambio de datos no debe alterar la selectividad de sus valores.
No funcionará asignar NULL al campo de la tabla. En cambio, debe asegurarse de que los mismos valores en los datos reales sigan siendo los mismos en los datos modificados. Por ejemplo, en datos reales, tiene un valor de 103785 encontrado 12 veces en la tabla. Cuando cambias este valor en los datos alterados, el nuevo valor debe permanecer 12 veces en los mismos campos de la tabla.
3. El tamaño y la longitud de los valores no deben diferir significativamente en los datos alterados. Por ejemplo, reemplaza cada byte o carácter con un byte o carácter pseudoaleatorio. La cadena inicial sigue siendo la misma en tamaño y longitud.
4. Las interrelaciones en los datos no deben romperse después de los cambios. Se relaciona con las claves externas y todos los demás casos en los que hace referencia a los datos alterados. Los datos modificados deben permanecer en las mismas relaciones que los datos reales.
Implementación de scripts de cambios de datos
Ahora, repasemos el caso particular del cambio de datos para despersonalizar y ocultar la información secreta. La muestra es la base de datos de reclutamiento.
La base de datos de muestra incluye los siguientes datos personales que debe despersonalizar:
- Apellido y nombre;
- Fecha de nacimiento;
- La fecha de emisión de la tarjeta de identificación;
- El certificado de acceso remoto como la secuencia de bytes;
- La tarifa de servicio para la promoción del currículum.
Primero, revisaremos ejemplos simples para cada tipo de datos alterados:
- Cambio de fecha y hora;
- Cambio de valor numérico;
- Cambiar las secuencias de bytes;
- Cambio de datos del personaje.
Cambio de fecha y hora
Puede obtener una fecha y hora aleatorias utilizando el siguiente script:
DECLARE @dt DATETIME;

SET @dt = CAST(CAST(@StartDate AS FLOAT) + (CAST(@FinishDate AS FLOAT) - CAST(@StartDate AS FLOAT)) * RAND(CHECKSUM(NEWID())) AS DATETIME);
Aquí, @StartDate y @FinishDate son los valores inicial y final del rango. Se correlacionan respectivamente para la generación pseudoaleatoria de fecha y hora.
Para generar estos datos, utiliza las funciones del sistema RAND, CHECKSUM y NEWID.
UPDATE [dbo].[Employee]
SET [DocDate] = CAST(CAST(CAST(CAST([BirthDate] AS DATETIME) AS FLOAT) + (CAST(GETDATE() AS FLOAT) - CAST(CAST([BirthDate] AS DATETIME) AS FLOAT)) * RAND(CHECKSUM(NEWID())) AS DATETIME) AS DATE);
El campo [DocDate] representa la fecha de emisión del documento. Lo reemplazamos con una fecha pseudoaleatoria, teniendo en cuenta los rangos de fechas y sus limitaciones.
El límite "inferior" es la fecha de nacimiento del candidato. El borde "superior" es la fecha actual. No necesitamos la hora aquí, por lo que la transformación del formato de hora y fecha a la fecha necesaria llega al final. Puede obtener valores pseudoaleatorios para cualquier parte de la fecha y hora de la misma manera.
Cambio de valor numérico
Puede obtener un número entero aleatorio con la ayuda del siguiente script:
DECLARE @Int INT;

SET @Int = CAST(((@MaxVal + 1) - @MinVal) *
    RAND(CHECKSUM(NEWID())) + @MinVal AS INT);
@MinVal y @MaxVal son los valores del rango inicial y final para la generación de números pseudoaleatorios. Lo generamos utilizando las funciones del sistema RAND, CHECKSUM y NEWID.
UPDATE [dbo].[Employee]
SET [CountRequest] = CAST(((@MaxVal + 1) - @MinVal) *
    RAND(CHECKSUM(NEWID())) + @MinVal AS INT);
El campo [CountRequest] representa la cantidad de solicitudes que las empresas realizan para el currículum de este candidato.
De manera similar, puede obtener valores pseudoaleatorios para cualquier valor numérico. Por ejemplo, eche un vistazo al número aleatorio de la generación de tipo decimal (18,2):
DECLARE @Dec DECIMAL(18,2);

SET @Dec=CAST(((@MaxVal + 1) - @MinVal) *
    RAND(CHECKSUM(NEWID())) + @MinVal AS DECIMAL(18,2));
Por lo tanto, puede actualizar la tarifa del servicio de promoción de currículum de la siguiente manera:
UPDATE [dbo].[Employee]
SET [PaymentAmount] = CAST(((@MaxVal + 1) - @MinVal) *
    RAND(CHECKSUM(NEWID())) + @MinVal AS DECIMAL(18,2));
Cambiar las secuencias de bytes
Puede obtener una secuencia de bytes aleatoria utilizando el siguiente script:
DECLARE @res VARBINARY(MAX);

SET @res = CRYPT_GEN_RANDOM(@Length, CAST(NEWID() AS VARBINARY(16)));
@Longitud representa la longitud de la secuencia. Define el número de bytes devueltos. Aquí, @Length no debe ser mayor que 16.
La generación se realiza con la ayuda de las funciones del sistema CRYPT_GEN_RANDOM y NEWID.
Por ejemplo, puede actualizar el certificado de acceso remoto para cada candidato de la siguiente manera:
UPDATE [dbo].[Employee]
SET [RemoteAccessCertificate] = CRYPT_GEN_RANDOM(CAST(LEN([RemoteAccessCertificate]) AS INT), CAST(NEWID() AS VARBINARY(16)));
Generamos una secuencia de bytes pseudoaleatorios de la misma longitud presente en el campo [RemoteAccessCertificate] en el momento del cambio. Suponemos que la longitud de la secuencia de bytes no supera los 16.
De manera similar, podemos crear nuestra función que devolverá secuencias de bytes pseudoaleatorias de cualquier longitud. Pondrá los resultados de la función del sistema CRYPT_GEN_RANDOM trabajando juntos usando el simple operador de suma "+". Pero 16 bytes suelen ser suficientes en la práctica.
Hagamos una función de muestra que devuelva la secuencia de bytes pseudoaleatorios de longitud definida, donde será posible establecer la longitud de más de 16 bytes. Para ello, realice la siguiente presentación:
CREATE VIEW [test].[GetNewID]
AS
SELECT NEWID() AS [NewID];
GO
Lo necesitamos para evadir la limitación que nos prohíbe usar NEWID dentro de la función.
De la misma manera, cree la siguiente presentación con el mismo propósito:
CREATE VIEW [test].[GetRand]
AS
SELECT RAND(CHECKSUM((SELECT TOP(1) [NewID] FROM [test].[GetNewID]))) AS [Value];
GO
Crea una presentación más:
CREATE VIEW [test].[GetRandVarbinary16]
AS
SELECT CRYPT_GEN_RANDOM(16, CAST((SELECT TOP(1) [NewID] FROM [test].[GetNewID]) AS VARBINARY(16))) AS [Value];
GO
Las definiciones de las tres funciones están aquí. Y aquí está la implementación de la función que devuelve una secuencia de bytes pseudoaleatorios de longitud definida.
Primero, definimos si la función necesaria está presente. Si no, primero creamos un montante. En cualquier caso, el código implica cambiar la definición de la función de manera adecuada. Al final, agregamos la descripción de la función a través de las propiedades extendidas. Más detalles sobre la documentación de la base de datos se encuentran en este artículo.
Para actualizar el certificado de acceso remoto de cada candidato, puede hacer lo siguiente:
UPDATE [dbo].[Employee]
SET [RemoteAccessCertificate] = [test].[GetRandVarbinary](CAST(LEN([RemoteAccessCertificate]) AS INT));
Como puede ver, aquí no hay limitaciones para la longitud de la secuencia de bytes.
Cambio de datos:cambio de datos de personajes
Aquí, tomamos un ejemplo para los alfabetos inglés y ruso, pero puede hacerlo para cualquier otro alfabeto. La única condición es que sus caracteres deben estar presentes en los tipos NCHAR.
Necesitamos crear una función que acepte la línea, reemplace cada carácter con un carácter pseudoaleatorio y luego junte el resultado y lo devuelva.
Sin embargo, primero debemos entender qué caracteres necesitamos. Para eso, podemos ejecutar el siguiente script:
DECLARE @tbl TABLE ([ValueInt] INT, [ValueNChar] NCHAR(1), [ValueChar] CHAR(1));

DECLARE @ind int=0;
DECLARE @count INT=65535;

WHILE(@count>=0)
BEGIN
	INSERT INTO @tbl ([ValueInt], [ValueNChar], [ValueChar])
	SELECT @ind, NCHAR(@ind), CHAR(@ind)

	SET @ind+=1;
	SET @count-=1;
END

SELECT *
INTO [test].[TblCharactersCode]
FROM @tbl;
Estamos haciendo la tabla [test].[TblCharacterCode] que incluye los siguientes campos:
- ValueInt:el valor numérico del carácter;
- ValueNCar:el carácter de tipo NCHAR;
- ValueChar:el carácter de tipo CHAR.
Repasemos el contenido de esta tabla. Necesitamos la siguiente solicitud:
SELECT [ValueInt]
      ,[ValueNChar]
      ,[ValueChar]
  FROM [test].[TblCharactersCode];
Los números están en el rango de 48 a 57:
Los caracteres latinos en mayúsculas están en el rango de 65 a 90:

Los caracteres latinos en el cuidado inferior están en el rango de 97 a 122:
Los caracteres rusos en mayúsculas están en el rango de 1040 a 1071:

Los caracteres rusos en minúsculas están en el rango de 1072 a 1103:


Y, caracteres en el rango de 58 a 64:

Seleccionamos los caracteres necesarios y los metemos en la tabla [test].[SelectCharactersCode] de la siguiente forma:
SELECT
	[ValueInt]
   ,[ValueNChar]
   ,[ValueChar]
   ,CASE
		WHEN ([ValueInt] BETWEEN 48 AND 57) THEN 1
		ELSE 0
	END AS [IsNumeral]
   ,CASE
		WHEN (([ValueInt] BETWEEN 65 AND 90) OR
			([ValueInt] BETWEEN 1040 AND 1071)) THEN 1
		ELSE 0
	END AS [IsUpperCase]
   ,CASE
		WHEN (([ValueInt] BETWEEN 65 AND 90) OR
			([ValueInt] BETWEEN 97 AND 122)) THEN 1
		ELSE 0
	END AS [IsLatin]
   ,CASE
		WHEN (([ValueInt] BETWEEN 1040 AND 1071) OR
			([ValueInt] BETWEEN 1072 AND 1103)) THEN 1
		ELSE 0
	END AS [IsRus]
   ,CASE
		WHEN (([ValueInt] BETWEEN 33 AND 47) OR
			([ValueInt] BETWEEN 58 AND 64)) THEN 1
		ELSE 0
	END AS [IsExtra]
INTO [test].[SelectCharactersCode]
FROM [test].[TblCharactersCode]
WHERE ([ValueInt] BETWEEN 48 AND 57)
OR ([ValueInt] BETWEEN 65 AND 90)
OR ([ValueInt] BETWEEN 97 AND 122)
OR ([ValueInt] BETWEEN 1040 AND 1071)
OR ([ValueInt] BETWEEN 1072 AND 1103)
OR ([ValueInt] BETWEEN 33 AND 47)
OR ([ValueInt] BETWEEN 58 AND 64);
Ahora, examinemos el contenido de esta tabla usando el siguiente script:
SELECT [ValueInt]
      ,[ValueNChar]
      ,[ValueChar]
      ,[IsNumeral]
      ,[IsUpperCase]
      ,[IsLatin]
      ,[IsRus]
      ,[IsExtra]
  FROM [test].[SelectCharactersCode];
Recibimos el siguiente resultado:

De esta forma, tenemos el [test].[SelectCharactersCode] tabla, donde:
- IntValor – el valor numérico del carácter
- ValorNCar – el carácter de tipo NCHAR
- Carácter de valor – el carácter de tipo CHAR
- EsNumeral – el criterio de que un carácter sea un dígito
- Es Mayúsculas – el criterio de un carácter en mayúsculas
- Es latino – el criterio de que un carácter sea un carácter latino;
- Isrus – el criterio de que un personaje sea un personaje ruso
- Es Extra – el criterio de que un carácter sea un carácter adicional
Ahora, podemos obtener el código para la inserción de los caracteres necesarios. Por ejemplo, así es como se hace para los caracteres latinos en minúsculas:
SELECT 'SELECT '+CAST([ValueInt] AS NVARCHAR(255))+' AS [ValueInt], '+''''+[ValueNChar]+''''+' AS [ValueNChar], '+''''+[ValueChar]+''''+' AS [ValueChar] UNION ALL'
  FROM [test].[SelectCharactersCode]
  WHERE [IsUpperCase]=0
    AND [IsLatin]=1;
Recibimos el siguiente resultado:

Es lo mismo para los caracteres rusos en minúsculas:
SELECT 'SELECT '+CAST([ValueInt] AS NVARCHAR(255))+' AS [ValueInt], '+''''+[ValueNChar]+''''+' AS [ValueNChar], '+COALESCE(''''+[ValueChar]+'''', 'NULL')+' AS [ValueChar] UNION ALL'
  FROM [test].[SelectCharactersCode]
  WHERE [IsUpperCase]=0
    AND [IsRus]=1;
Obtenemos el siguiente resultado:

Es lo mismo para los personajes:
SELECT 'SELECT '+CAST([ValueInt] AS NVARCHAR(255))+' AS [ValueInt], '+''''+[ValueNChar]+''''+' AS [ValueNChar], '+''''+[ValueChar]+''''+' AS [ValueChar] UNION ALL'
  FROM [test].[SelectCharactersCode]
  WHERE [IsNumeral]=1;
El resultado es el siguiente:

Entonces, tenemos códigos para insertar los siguientes datos por separado:
- Los caracteres latinos en minúsculas.
- Los caracteres rusos en minúsculas.
- Los dígitos.
Funciona para los tipos NCHAR y CHAR.
Del mismo modo, podemos preparar un script de inserción para cualquier conjunto de caracteres. Además, cada conjunto tendrá su propia función de tabulación.
Para ser simple, implementamos la función de tabulación común que devolverá el conjunto de datos necesario para los datos previamente seleccionados de la siguiente manera:
SELECT
	'SELECT ' + CAST([ValueInt] AS NVARCHAR(255)) + ' AS [ValueInt], '
	+ '''' + [ValueNChar] + '''' + ' AS [ValueNChar], '
	+ COALESCE('''' + [ValueChar] + '''', ‘NULL’) + ' AS [ValueChar], '
	+ CAST([IsNumeral] AS NCHAR(1)) + ' AS [IsNumeral], ' +
	+CAST([IsUpperCase] AS NCHAR(1)) + ' AS [IsUpperCase], ' +
	+CAST([IsLatin] AS NCHAR(1)) + ' AS [IsLatin], ' +
	+CAST([IsRus] AS NCHAR(1)) + ' AS [IsRus], ' +
	+CAST([IsExtra] AS NCHAR(1)) + ' AS [IsExtra]' +
	+' UNION ALL'
FROM [test].[SelectCharactersCode];
El resultado final es el siguiente:

El guión listo está incluido en la función de tabulación [test].[GetSelectCharacters].
Es importante eliminar un UNION ALL extra al final del script generado, y en [ValueInt]=39, necesitamos cambiar ”’ a ””:
SELECT 39 AS [ValueInt], '''' AS [ValueNChar], '''' AS [ValueChar], 0 AS [IsNumeral], 0 AS [IsUpperCase], 0 AS [IsLatin], 0 AS [IsRus], 1 AS [IsExtra] UNION ALLEsta función de tabulación devuelve el siguiente conjunto de campos:
- Número – el número de línea en el conjunto de datos devuelto;
- IntValor – el valor numérico del carácter;
- ValorNCar – el carácter de tipo NCHAR;
- Carácter de valor – el carácter de tipo CHAR;
- EsNumeral – el criterio de que el carácter sea un dígito;
- Es Mayúsculas – el criterio que define que el carácter está en mayúsculas;
- Es latino – el criterio que define que el carácter es un carácter latino;
- Isrus – el criterio que define que el carácter es un carácter ruso;
- Es Extra – el criterio que define que el personaje es extra.
Para la entrada, tiene los siguientes parámetros:
- @IsNumeral – si debe devolver los números;
- @IsUpperCase :<último>
- 0:debe devolver solo las minúsculas para las letras;
- 1:debe devolver solo las letras mayúsculas;
- NULL:debe devolver letras en todos los casos.
- @IsLatin – debe devolver los caracteres latinos
- @IsRus – debe devolver los caracteres rusos
- @IsExtra – debe devolver caracteres adicionales.
Todas las banderas se utilizan de acuerdo con el OR lógico. Por ejemplo, si necesita que se devuelvan dígitos y caracteres latinos en minúsculas, llame a la función de tabulación de la siguiente manera:
Obtenemos el siguiente resultado:
declare
@IsNumeral BIT=1
   ,@IsUpperCase BIT=0
   ,@IsLatin BIT=1
   ,@IsRus BIT=0
   ,@IsExtra BIT=0;

SELECT *
FROM [test].[GetSelectCharacters](@IsNumeral, @IsUpperCase, @IsLatin, @IsRus, @IsExtra);
Obtenemos el siguiente resultado:

Implementamos la función [test].[GetRandString] que reemplazará la línea con caracteres pseudoaleatorios, manteniendo la longitud inicial de la cadena. Esta función debe incluir la posibilidad de operar sólo aquellos caracteres que sean dígitos. Por ejemplo, puede ser útil cuando modifica la serie y el número de la tarjeta de identificación.
Cuando implementamos la función [test].[GetRandString], primero obtenemos el conjunto de caracteres necesarios para generar una línea pseudoaleatoria de la longitud especificada en el parámetro de entrada @Length. El resto de los parámetros funcionan como se describe arriba.
Luego, colocamos el conjunto de datos recibido en la variable de tabulación @tbl . Esta tabla guarda los campos [ID] – el número de orden en la tabla de caracteres resultante, y [Valor] – la presentación del carácter en el tipo NCHAR.
Después de eso, en un ciclo, genera un número pseudoaleatorio en el rango de 1 a la cardinalidad de los caracteres @tbl recibidos anteriormente. Ponemos este número en el [ID] de la variable de tabulación @tbl para la búsqueda. Cuando la búsqueda devuelve la línea, tomamos el carácter [Valor] y lo “pegamos” a la línea resultante @res.
Cuando finaliza el trabajo del ciclo, la línea recibida vuelve a través de la variable @res.
Puede cambiar tanto el nombre como el apellido del candidato de la siguiente manera:
UPDATE [dbo].[Employee]
SET [FirstName] = [test].[GetRandString](LEN([FirstName])),
        [LastName] = [test].[GetRandString](LEN([LastName]));
Por lo tanto, hemos examinado la implementación de la función y su uso para los tipos NCHAR y NVARCHAR. Podemos hacer lo mismo fácilmente para los tipos CHAR y VARCHAR.
A veces, sin embargo, necesitamos generar una línea según el conjunto de caracteres, no los caracteres alfabéticos o números. De esta manera, primero debemos usar la siguiente función multioperador [test].[GetListCharacters].
La función [test].[GetListCharacters] obtiene los dos parámetros siguientes para la entrada:
- @str – la línea de caracteres en sí;
- @IsGroupUnique – define si necesita agrupar caracteres únicos en la línea.
Con el CTE recursivo, la línea de entrada @str se transforma en la tabla de caracteres – @ListCharacters. Esa tabla contiene los siguientes campos:
- Identificación – el número de orden de la línea en la tabla de caracteres resultante;
- Personaje – la presentación del personaje en NCHAR(1)
- Contar – el número de repeticiones del carácter en la línea (siempre es 1 si el parámetro @IsGroupUnique=0)
Tomemos dos ejemplos del uso de esta función para comprender mejor su funcionamiento:
- Transformación de la línea en la lista de caracteres no únicos:
SELECT *
FROM [test].[GetListCharacters]('123456888  789 0000', 0);
Obtenemos el resultado:

Este ejemplo muestra que la línea se transforma en la lista de caracteres "tal cual", sin agruparla por la singularidad de los caracteres (el campo [Recuento] siempre contiene 1).
- La transformación de la línea en la lista de caracteres únicos
SELECT *
FROM [test].[GetListCharacters]('123456888  789 0000', 1);
El resultado es el siguiente:
Este ejemplo muestra que la línea se transforma en la lista de caracteres agrupados por su singularidad. El campo [Recuento] muestra el número de resultados de cada carácter en la línea de entrada.
Basándonos en la función multioperador [test].[GetListCharacters], creamos una función escalar [test].[GetRandString2].
La definición de la nueva función escalar muestra su similitud con la función escalar [test].[GetRandString]. La única diferencia es que utiliza la función multioperador [test].[GetListCharacters] en lugar de la función de tabulación [test].[GetSelectCharacters].
Aquí, revisemos dos ejemplos del uso de la función escalar implementada :
Generamos una línea pseudoaleatoria de 12 caracteres de longitud a partir de la línea de entrada de caracteres no agrupados por unicidad:
SELECT [test].[GetRandString2](12, '123456789!!!!!!!!0!!!', DEFAULT);El resultado es:
La palabra clave es DEFAULT. Establece que el valor predeterminado establece el parámetro. Aquí, es cero (0).
O
Generamos una línea pseudoaleatoria de 12 caracteres de longitud a partir de la línea de entrada de caracteres agrupados por unicidad:
SELECT [test].[GetRandString2](12, '123456789!!!!!!!!0!!!', 1);El resultado es:
Implementación del script general para la sanitización de datos y los cambios de datos secretos
Hemos examinado ejemplos simples para cada tipo de datos alterados:
- Cambiar la fecha y la hora;
- Cambiar el valor numérico;
- Cambiar la secuencia de bytes;
- Cambiando los datos de los personajes.
Sin embargo, estos ejemplos no cumplen con los criterios 2 y 3 para los scripts de modificación de datos:
- Criterio 2 :la selectividad de valores no cambiará significativamente en los datos alterados. No puede usar NULL para el campo de la tabla. En cambio, debe asegurarse de que los mismos valores de datos reales permanezcan iguales en los datos modificados. Por ejemplo, si los datos reales contienen el valor 103785 12 veces en el campo de una tabla sujeta a cambios, los datos modificados deben incluir un valor diferente (cambiado) que se encuentre 12 veces en el mismo campo de la tabla.
- Criterio 3 :la longitud y el tamaño de los valores no deben cambiar significativamente en los datos modificados. Por ejemplo, reemplaza cada carácter/byte con un carácter/byte pseudoaleatorio.
Por lo tanto, necesitamos crear un script que tenga en cuenta la selectividad de los valores en los campos de la tabla.
Echemos un vistazo a nuestra base de datos para el servicio de reclutamiento. Como vemos, los datos personales están presentes en la tabla de candidatos únicamente [dbo].[Empleado].
Suponga que la tabla incluye los siguientes campos:
Descripciones:
- Nombre – nombre, línea NVARCHAR(255)
- Apellido – apellido, línea NVARCHAR(255)
- Fecha de nacimiento – fecha de nacimiento, FECHA
- Número de documento – el número de la cédula de identidad con dos dígitos al principio para la serie del pasaporte, y los siguientes siete dígitos son el número del documento. Entre ellos, tenemos un guión como la línea NCHAR(10).
- DocDate – la fecha de emisión de la tarjeta de identificación, DATE
- Solicitud de recuento – el número de solicitudes para ese candidato durante la búsqueda de currículum, el entero INT
- Importe del pago – la tarifa de servicio de promoción de currículum recibida, el número decimal (18,2)
- Certificado de acceso remoto – el certificado de acceso remoto, secuencia de bytes VARBINARY
- Dirección – la dirección residencial o la dirección de registro, línea NVARCHAR(MAX)
Entonces, para mantener la selectividad inicial, necesitamos implementar el siguiente algoritmo:
- Extraiga todos los valores únicos para cada campo y guarde los resultados en tablas temporales o variables de tabulación;
- Genera un valor pseudoaleatorio para cada valor único. Este valor pseudoaleatorio no debe diferir significativamente en longitud y tamaño del valor original. Guarde el resultado en el mismo lugar donde guardamos los resultados del punto 1. Cada valor recién generado debe tener un valor actual único correlacionado.
- Reemplace todos los valores en la tabla con nuevos valores del punto 2.
Al principio, despersonalizamos los nombres y apellidos de los candidatos. Suponemos que el apellido y el nombre siempre están presentes y que no tienen menos de dos caracteres en cada campo.
Primero, seleccionamos nombres únicos. Luego, genera una línea pseudoaleatoria para cada nombre. La longitud del nombre sigue siendo la misma; el primer carácter está en mayúsculas y los otros caracteres están en minúsculas. Usamos la función escalar [test].[GetRandString] creada previamente para generar una línea pseudoaleatoria de la longitud específica de acuerdo con los criterios de caracteres definidos.
Luego, actualizamos los nombres en la tabla de candidatos según sus valores únicos. Es lo mismo para los apellidos.
Despersonalizamos el campo DocNumber. Es el número de la tarjeta de identificación (pasaporte). Los primeros dos caracteres representan la serie del documento y los últimos siete dígitos son el número del documento. El guión está entre ellos. Luego realizamos la operación de higienización.
Recopilamos todos los números de documentos únicos y generamos una línea pseudoaleatoria para cada uno. El formato de la línea es 'XX-XXXXXXX', donde X es el dígito en el rango de 0 a 9. Aquí, usamos la función escalar [test].[GetRandString] creada previamente para generar una línea pseudoaleatoria de la longitud especificada según los parámetros de los personajes establecidos.
Después de eso, el campo [NúmeroDocumento] se actualiza en la tabla de candidatos [dbo].[Empleado].
We depersonalize the DocDate field (the ID-card issue date) and the BirthDate field (the candidate’s date of birth).
First, we select all the unique pairs made of “date of birth &date of the ID-card issue.” For each such pair, we create a pseudorandom date for the date of birth. The pseudorandom date of the ID-card issue is made according to that “date of birth” – the date of the document’s issue must not be earlier than the date of birth.
After that, these data are updated in the respective fields of the candidates’ table [dbo].[Employee].
And, we update the remaining fields of the table.
The CountRequest value stands for the number of requests made for that candidate by companies during the resume search.
The PaymentAmount is the final amount of the resume promotion service fee paid. We calculate these numbers similarly to the previous fields.
Note that it generates a pseudorandom integer for the first case and a pseudorandom decimal for the second case. In both cases, the pseudorandom number generation occurs in the range of “two times less than original” to “two times more than original.” The selectivity of values in the fields is not changed too much.
After that, it writes the values into the fields of the candidates’ table [dbo].[Employee].
Further, we collect unique values of the RemoteAccessCertificate field for the remote access certificate. We generate a pseudorandom byte sequence for each such value. The length of the sequence must be the same as the original. Here, we use the previously created [test].[GetRandVarbinary] scalar function to generate the pseudorandom byte sequence of the specified length.
Then recording into the respective field [RemoteAccessCertificate] of the [dbo].[Employee] candidates’ table takes place.
The last step is the collection of the unique addresses from the [Address] field. For each value, we generate a pseudorandom line of the same length as the original. Note that if it was NULL originally, it must be NULL in the generated field. It allows you to keep NULL and don’t replace it with an empty line. It minimizes the selectivity values’ mismatch in this field between the production database and the altered data.
We use the previously created [test].[GetRandString] scalar function to generate the pseudorandom line of the specified length according to the characters’ parameters defined.
It then records the data into the respective [Address] field of the candidates’ table [dbo].[Employee].
This way, we get the full script for depersonalization and altering of the confidential data.
Finally, we get the database with altered personal and confidential data. The algorithms we used make it impossible to restore the original data from the altered data. Also, the values’ selectivity, length, and size aren’t changed significantly. So, the three criteria for the personal and secret data altering scripts are ensured.
We won’t review the criterion 4 separately here. Our database contains all the data subject to change in one candidates’ table [dbo].[Employee]. The data conformity is needed within this table only. Thus, criterion 4 is also here. However, we need to remember this criterion 4 claiming that all interrelations must remain the same in the altered data.
We often see other conditions for personal and confidential data altering algorithms, but we won’t review them here. Besides, the four criteria described above are always present. In many cases, it is enough to estimate the functionality of the algorithm suitable to use it.
Now, we need to make a backup of the created database, check it by restoring on another instance, and transfer that copy into the necessary environment for development and testing. For this, we examine the full database backup creation.
Full database backup creation
We can make a database backup with construction BACKUP DATABASE as in our example.
Make a compressed full backup of the database JobEmplDB_Test. The checksum calculation takes place in the file E:\Backup\JobEmplDB_Test.bak. Further, we check the backup created.
Then, we check the backup created by restoring the database for it. Let’s examine the database restoring.
Restoring the database
You can restore the database with the help of RESTORE DATABASE construction in the following way:
USE [master]
RESTORE DATABASE [JobEmplDB_Test]
FROM  DISK = N'E:\Backup\JobEmplDB_Test.bak' WITH  FILE = 1,
MOVE N'JobEmplDB' TO N'E:\DBData\JobEmplDB.mdf',
MOVE N'JobEmplDB_log' TO N'F:\DBLog\JobEmplDB_log.ldf',
NOUNLOAD,
REPLACE,
STATS = 5;
GO
We restore the JobEmplDB_Test database of the E:\Backup\JobEmplDB_Test.bak backup. The files will be overwritten, and the data file will be transferred into the file E:\DBData\JobEmplDB.mdf , while the transactions log file will be moved into F:\DBLog\JobEmplDB_log.ldf .
After we successfully check how the database is restored from the backup, we forward the backup to the development and testing environments. It will be restored again with the same method as described above.
We’ve examined the first approach to the data populating into the database for testing and development. This approach implies copying and altering the data from the production database. Now, we’ll examine the second approach – the synthetic data generation.
Synthetic data generation
The General algorithm for the synthetic data generation is following:
- Make a new empty database or clear a previously created database by purging all data.
- Create or renew a scheme in the newly created database – the same as that of the production databases.
- Copy of renew guidelines and regulations from the production database and transfer them into the new database.
- Generate synthetic data into the necessary tables of the new database.
- Make a backup of a new database.
- Deliver and restore the new backup in the necessary environment.
We already have the JobEmplDB_Test database to practice, and we have reviewed the means of creating a schema in the new database. Let’s focus on the tasks that are specific to this approach.
Clean up the database with the data purge
To clear the database off all its data, we need to do the following:
- Keep the definitions of all external keys.
- Disable all limitations and triggers.
- Delete all external keys.
- Clear the tables using the TRUNCATE construction.
- Restore all the external keys deleted in point 3.
- Enable all the limitations disabled in point 2.
You can save the definitions of all external keys with the following script:
1. The external keys’ definitions are saved in the tabulation variable @tbl_create_FK
2. You can disable the limitations and triggers with the following script:
EXEC sp_MSforeachtable "ALTER TABLE ? NOCHECK CONSTRAINT ALL";
EXEC sp_MSforeachtable "ALTER TABLE ? DISABLE TRIGGER ALL";
To enable the limitations and triggers, you can use the following script:
EXEC sp_MSforeachtable "ALTER TABLE ? WITH CHECK CHECK CONSTRAINT ALL";
EXEC sp_MSforeachtable "ALTER TABLE ? ENABLE TRIGGER ALL";
Here, we use the saved procedure sp_MSforeachtable that applies the construction to all the database’s tables.
3. To delete external keys, use the special script. Here, we receive the information about the external keys through the INFORMATION_SCHEMA.TABLE_CONSTRAINTS system presentation. We delete external keys through the cursor, one by one, using the formed dynamic script T-SQL, transferring the request into the system saved procedure sp_executesql .
4. To clear the tables with the TRUNCATE construction, use the dedicated script. The script works in the same way as above, but it receives the data for tables, and then it clears the tables one by one through the cursor, using the TRUNCATE construction.
5. Restoring the external keys is possible with the below script (earlier, we saved the external keys’ definitions in the tabulation variable @tbl_create_FK):
DECLARE @tsql NVARCHAR(4000);

DECLARE FK_Create CURSOR LOCAL FOR SELECT
	[Script]
FROM @tbl_create_FK;

OPEN FK_Create;

FETCH NEXT FROM FK_Create INTO @tsql;

WHILE (@@fetch_status = 0)
BEGIN
	EXEC sp_executesql @tsql = @tsql;
	FETCH NEXT FROM FK_Create INTO @tsql;
END

CLOSE FK_Create;
DEALLOCATE FK_Create;
The script works in the same way as the two other scripts we mentioned above. But it restores the external keys’ definitions through the cursor, one for each iteration.
A particular case of data purging in the database is the current script. To get this output, we need the below construction in the scripts:
EXEC sp_executesql @tsql = @tsql;Before this construction, or instead of it, we need to write the generated construction output. It is necessary to call it manually or via the dynamic T-SQL query. We do it via the system saved procedure sp_executesql.
Instead of the below code fragment in all cases:
WHILE (@@fetch_status = 0)
BEGIN
	EXEC sp_executesql @tsql = @tsql;
...

We write:

WHILE (@@fetch_status = 0)
BEGIN
	PRINT @tsql;

	EXEC sp_executesql @tsql = @tsql;
...
Or:
WHILE (@@fetch_status = 0)
BEGIN
	PRINT @tsql;
...
The first case implies both the output of constructions and their execution. The second case if for the output only – it is helpful for the scripts’ debugging.
Thus, we get the general database cleaning script.
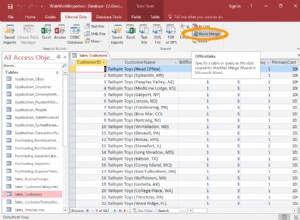
Copy guidelines and references from the production database to the new one
Here you can use the T-SQL scripts. Our example database of the recruitment service includes 5 guidelines:
- [dbo].[Company] – companies
- [dbo].[Skill] – skills
- [dbo].[Position] – positions (occupation)
- [dbo].[Project] – projects
- [dbo].[ProjectSkill] – project and skills’ correlations
The “skills” table [dbo].[Skill] serves to show how to make a script for the data insertion from the production database into the test database.
We form the following script:
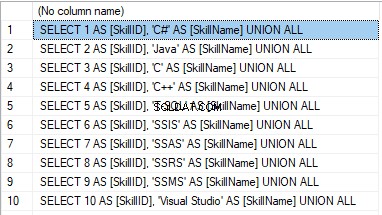
SELECT 'SELECT '+CAST([SkillID] AS NVARCHAR(255))+' AS [SkillID], '+''''+[SkillName]+''''+' AS [SkillName] UNION ALL'
  FROM [dbo].[Skill]
ORDER BY [SkillID];
We execute it in a copy of the production database that is usually available in read-only mode. It is a replica of the production database.
The result is:
Now, wrap the result up into the script for the data adding as here. We have a script for the skills’ guideline compilation. The scripts for other guidelines are made in the same way.
However, it is much easier to copy the guidelines’ data through the data export and import in SSMS. Or, you can use the data import and export wizard.
Generate synthetic data
We’ve determined the pseudorandom values’ generation for lines, numbers, and byte sequences. It took place when we examined the implementation of the data sanitization and the confidential data altering algorithms for approach 1. Those implemented functions and scripts are also used for the synthetic data generation.
The recruitment service database requires us to fill the synthetic data in two tables only:
- [dbo].[Employee] – candidates
- [dbo].[JobHistory] – a candidate’s work history (experience), the resume itself
We can fill the candidates’ table [dbo].[Employee] with synthetic data using this script.
At the beginning of the script, we set the following parameters:
- @count – the number of lines to be generated
- @LengthFirstName – the name’s length
- @LengthLastName – the last name’s length
- @StartBirthDate – the lower limit of the date for the date of birth
- @FinishBirthDate – the upper limit of the date for the date of birth
- @StartCountRequest – the lower limit for the field [CountRequest]
- @FinishCountRequest – the upper limit for the field [CountRequest]
- @StartPaymentAmount – the lower limit for the field [PaymentAmount]
- @FinishPaymentAmount – the upper limit for the field [PaymentAmount]
- @LengthRemoteAccessCertificate – the byte sequence’s length for the certificate
- @LengthAddress – the length for the field [Address]
- @count_get_unique_DocNumber – the number of attempts to generate the unique document’s number [DocNumber]
The script complies with the uniqueness of the [DocNumber] field’s value.
Now, let’s fill the [dbo].[JobHistory] table with synthetic data as follows.
The start date of work [StartDate] is later than the issuing date of the candidate’s document [DocDate]. The end date of work [FinishDate] is later than the start date of work [StartDate].
It is important to note that the current script is simplified, as it does not deal with parameters of the generated data selectivity configuration.
Make a full database backup
We can make a database backup with the construction BACKUP DATABASE, using our script.
We create a full compressed backup of the database JobEmplDB_Test. The checksum is calculated into the file E:\Backup\JobEmplDB_Test.bak. It also ensures further testing of the backup.
Let’s check the backup by restoring the database from it. We need to examine the database restoring then.
Restore the database
You can restore the database with the help of the RESTORE DATABASE construction, as shown below:
USE [master]
RESTORE DATABASE [JobEmplDB_Test]
FROM  DISK = N'E:\Backup\JobEmplDB_Test.bak' WITH  FILE = 1,
MOVE N'JobEmplDB' TO N'E:\DBData\JobEmplDB.mdf',
MOVE N'JobEmplDB_log' TO N'F:\DBLog\JobEmplDB_log.ldf',
NOUNLOAD,
REPLACE,
STATS = 5;
GO
We restore the database JobEmplDB_Test from the backup E:\Backup\JobEmplDB_Test.bak. The files are overwritten, and the data file is transferred to the file E:\DBData\JobEmplDB.mdf. The transaction log file is transferred to file F:\DBLog\JobEmplDB_log.ldf.
After checking the database restoring from the backup successfully, we transfer the backup to the necessary environments. It will be used for testing and development, and further deployment through the database restoring, as described above.
This way, we’ve examined the second approach to filling the database in with data for testing and development purposes. It is the synthetic data generation approach.
Data generation tools (for external resources)
When we have a job to fill in the database with data for testing and development purposes, it can be much faster and easier with the help of specialized tools. Let’s review the most popular and powerful data generation tools and explore their practical usage.
Full list of tools
DATPROF
IRI RowGen
Data Generator for SQL Server
Redgate SQL Data Generator
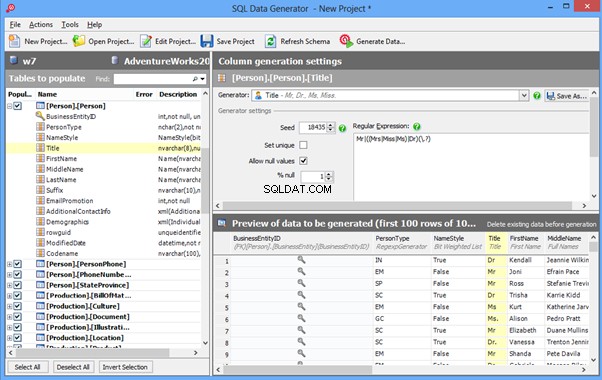
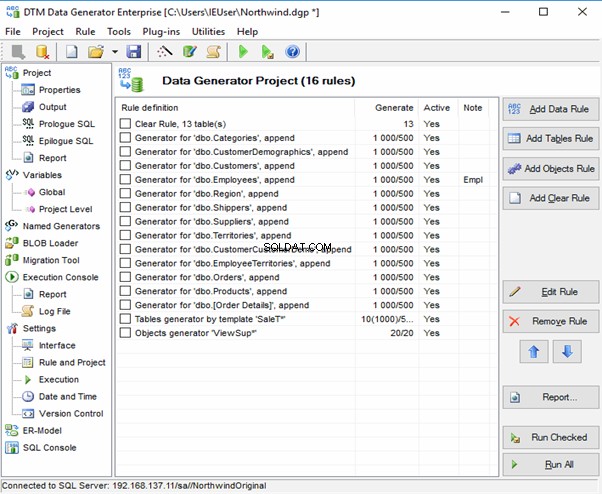
DTM Data Generator
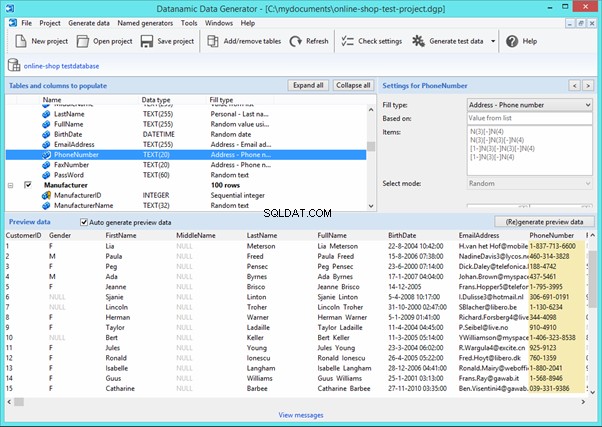
Datanamic Data Generator MultiDB
Now, let’s examine one of these tools more precisely.
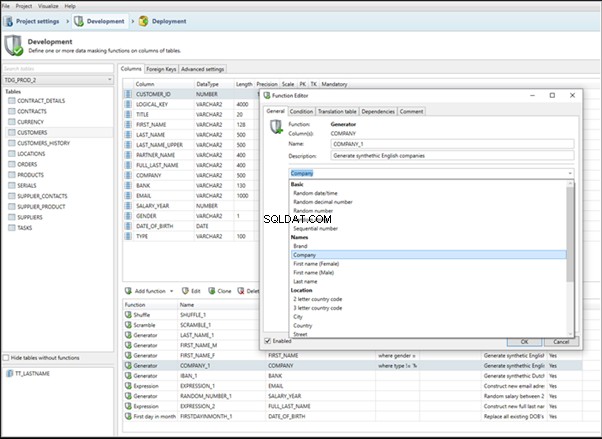
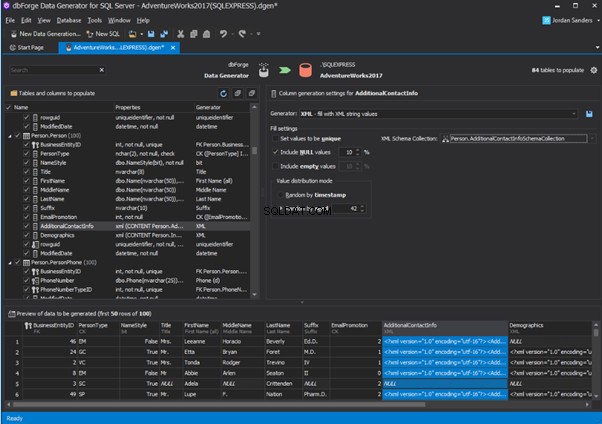
An overview of the employees’ generation by the Data Generator for SQL Server
The Data Generator for SQL Server utility is embedded in SSMS, and also it is a part of dbForge Studio. We reviewed this utility here. Let’s now examine how it works for synthetic data generation. As examples, we use the [dbo].[Employee] and the [dbo].[JobHistory] tables.
This generator can quickly generate first and last names of candidates for the [FirstName] and [LastName] fields respectively:
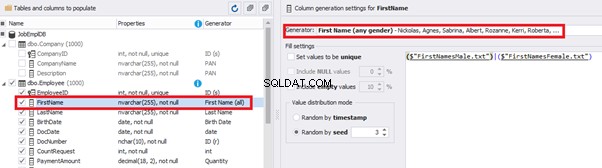
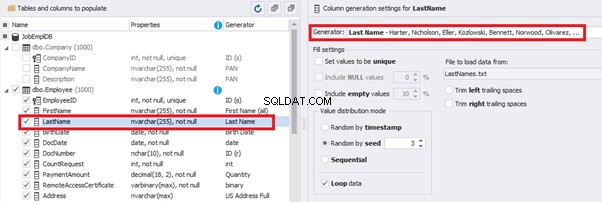
Note that FirstName requires choosing the “First Name” value in the “Generator” section. For LastName, you need to select the “Last Name” value from the “Generator” section.
It is important to note that the generator automatically determines which generation type it needs to apply to every field. The settings above were set by the generator itself, without manual correction.
You can configure distribution of values for the date of birth [BirthDate]:
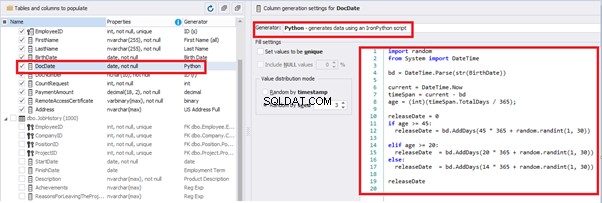
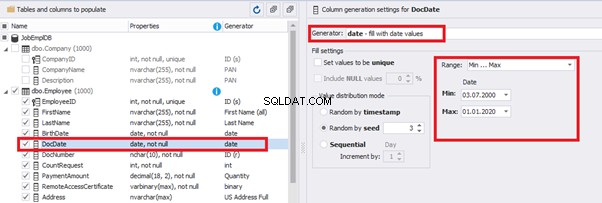
Set the distribution for the document’s date of issue [DocDate] through the Phyton generator using the below script:
import random
from System import DateTime
# receive the value from the Birthday field
bd = DateTime.Parse(str(BirthDate))
# receive the current date
current = DateTime.Now
# calculate the age in years
timeSpan = current - bd
age = (int)(timeSpan.TotalDays / 365);
# passport’s date of issue
releaseDate = 0
if age >= 45:
releaseDate = bd.AddDays(45 * 365 + random.randint(1, 30))
# randomize the issue during the month
elif age >= 20:
  releaseDate  = bd.AddDays(20 * 365 + random.randint(1, 30))
 # randomize the issue during the month
else:
  releaseDate  = bd.AddDays(14 * 365 + random.randint(1, 30))
# randomize the issue during the month
releaseDate
This way, the [DocDate] configuration will look as follows:
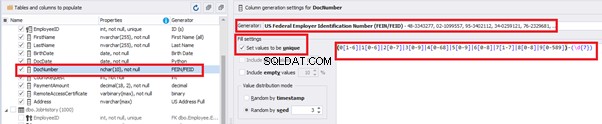
For the document’s number [DocNumber], we can select the necessary type of unique data generation, and edit the generated data format, if needed:
E.g., instead of the format
(0[1-6]|1[0-6]|2[0-7]|3[0-9]|4[0-68]|5[0-9]|6[0-8]|7[1-7]|8[0-8]|9[0-589])-(\d{7})We can set the following format:
(\d{2})-(\d{7})This format means that the line will be generated in format XX-XXXXXXX (X – is a digit in the range of 0 to 9).
We set up the generator for [CountRequest] and [PaymentAmount] fields in the same way, according to the generated data type:
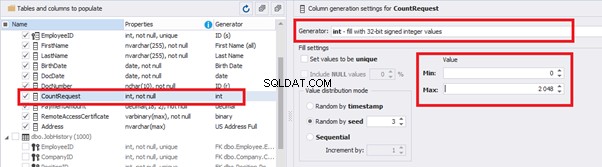
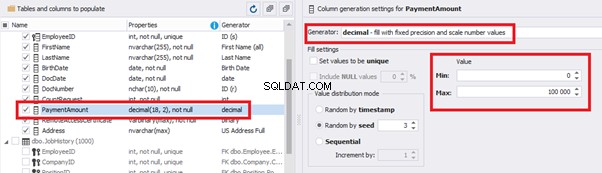
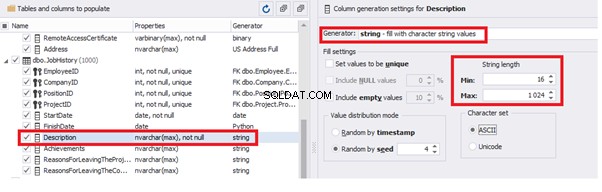
In the first case, we set the values’ range of 0 to 2048 for [CountRequest]. In the second case, it is the range of 0 to 100000 for [PaymentAmount].
We configure generation for [RemoteAccessCertificate] and [Address] fields in the same way:
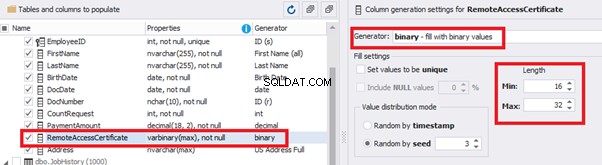
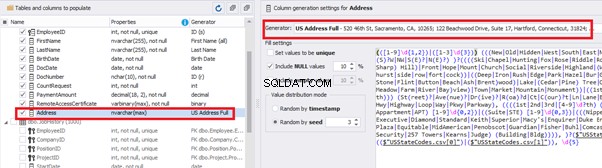
In the first case, we limit the byte sequence [RemoteAccessCertificate] with the range of lengths of 16 to 32. In the second case, we select values for [Address] as real addresses. It makes the generated values looking like the real ones.
This way, we’ve configured the synthetic data generation settings for the candidates’ table [dbo].[Employee]. Let’s now set up the synthetic data generation for the [dbo].[JobHistory] table.
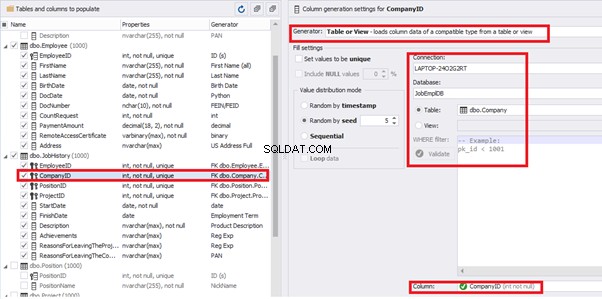
We set it to take the data for the [EmployeeID] field from the candidates’ table [dbo].[Employee] in the following way:
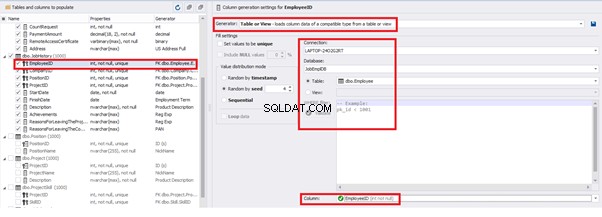
We select the generator’s type from the table or presentation. We then define the sample of MS SQL Server, the database, and the table to take the data from. We can also configure filters in the “WHERE filter” section, and select the [EmployeeID] field.
Here we suppose that we generate the “employees” first, and then we generate the data for the [dbo].[JobHistory] table, basing on the filled [dbo].[Employee] reference.
However, if we need to generate the data for both [dbo].[Employee] and [dbo].[JobHistory] at the same time, we need to select “Foreign Key (manually assigned) – references a column from the parent table,” referring to the [dbo].[Employee].[EmployeeID] column:
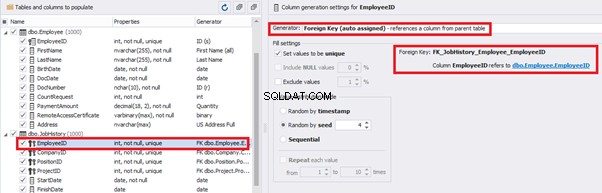
Similarly, we set up the data generation for the following fields.
[CompanyID] – from [dbo].[Company], the “companies” table:
[PositionID] – from the table of positions [dbo].[Position]:
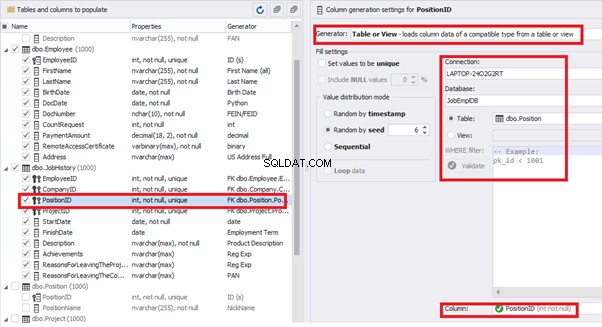
[ProjectID] – from the table of projects [dbo].[Project]:

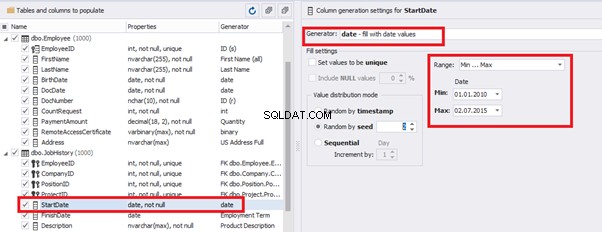
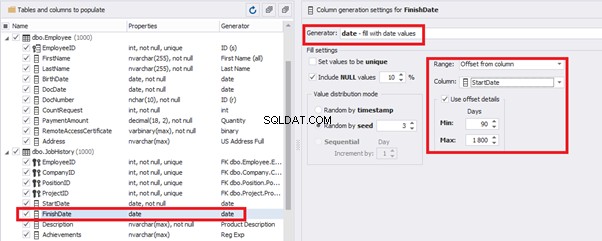
The tool cannot link the columns from different tables and shift them in some way. However, the generator can shift the date within one table – the “date” generator – fill with date values with Range – Offset from the column. Also, it can use data from a different table, but without any transformation (Table or View, SQL query, Foreign key generators).
That’s why we resolve the dates’ problem (BirthDate
E.g., we limit the BirthDate with the 40-50 years’ interval. Then, we restrict the DocDate with 20-40 years’ interval. The StartDate is, respectively, limited with 25-35 years’ interval, and we set up the FinishDate with the offset from StartDate.
We set up the date of birth:
Set up the date of the document’s issue
Then, the StartDate will match the age from 35 to 45:
The simple offset generator sets FinishDate:
The result is, a person has worked for three months till the current date.
Also, to configure the date of the working end, we can use a small Python script:
This way, we receive the below configuration for the dates of work end [FinishDate] data generation:
Similarly, we fill in the rest of fields. We set the generator type – string, and set the range for generated lines’ lengths:
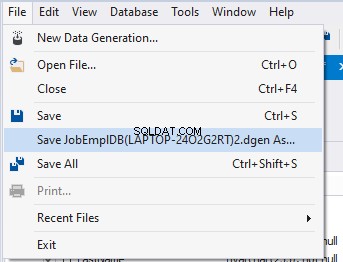
Also, you can save the data generation project as dgen-file consisting of:
We can save all these settings:it is enough to keep the project’s file and work with the database further, using that file:
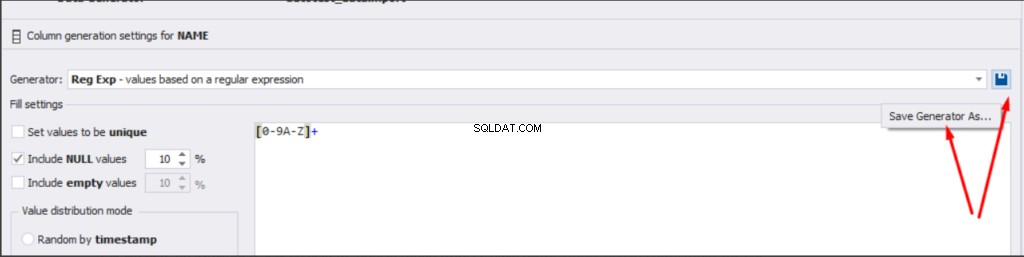
There is also the possibility to both save the new generators from scratch and save the custom settings in a new generator:
Thus, we’ve configured the synthetic data generation settings used for the jobs’ history table [dbo].[JobHistory].
We have examined two approaches to filling the data in the database for testing and development:
We’ve defied the objects for each approach and each script implementation. These objects are here. We’ve also provided scripts for changing the data from the production database and synthetic data generation. An example is the database of recruitment services. In the end, we’ve examined popular data generation tools and explored one of these tools in detail.
SQL SERVER – How to Disable and Enable All Constraint for Table and Database 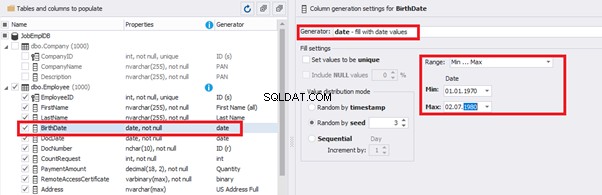
import random
from System import DateTime

bd = DateTime.Parse(str(StartDate))

releaseDate = bd.AddDays(random.randint(1, 30))

releaseDate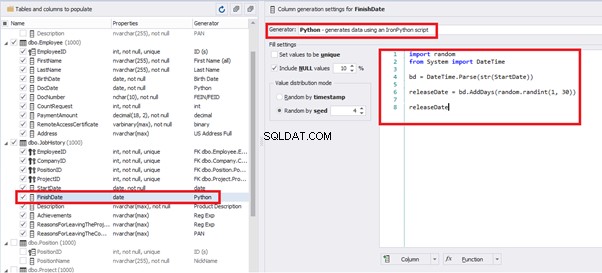
Conclusión
Referencias
Microsoft TechNet Wiki
Top 10 Best Test Data Generation Tools In 2020
SQL Server Documentation